You know that sinking feeling when you Google “daycare crafts for toddlers” and find 47 elaborate projects requiring supplies you don’t own, supervision you don’t have, and cleanup time that could fuel a small anxiety attack?
I’ve been there. Standing in my daycare room at 7:45 AM with twelve toddlers arriving in 15 minutes, realizing the “simple” butterfly craft I pinned requires pipe cleaners (lost), googly eyes (eaten by someone last week), and a glue gun (absolutely not happening with toddlers).
Here’s what I wish someone had told me three years ago: the best daycare crafts aren’t the cute ones. They’re the ones that work when you’re outnumbered 6-to-1, and someone just discovered they can unscrew the cap on the tempera paint.
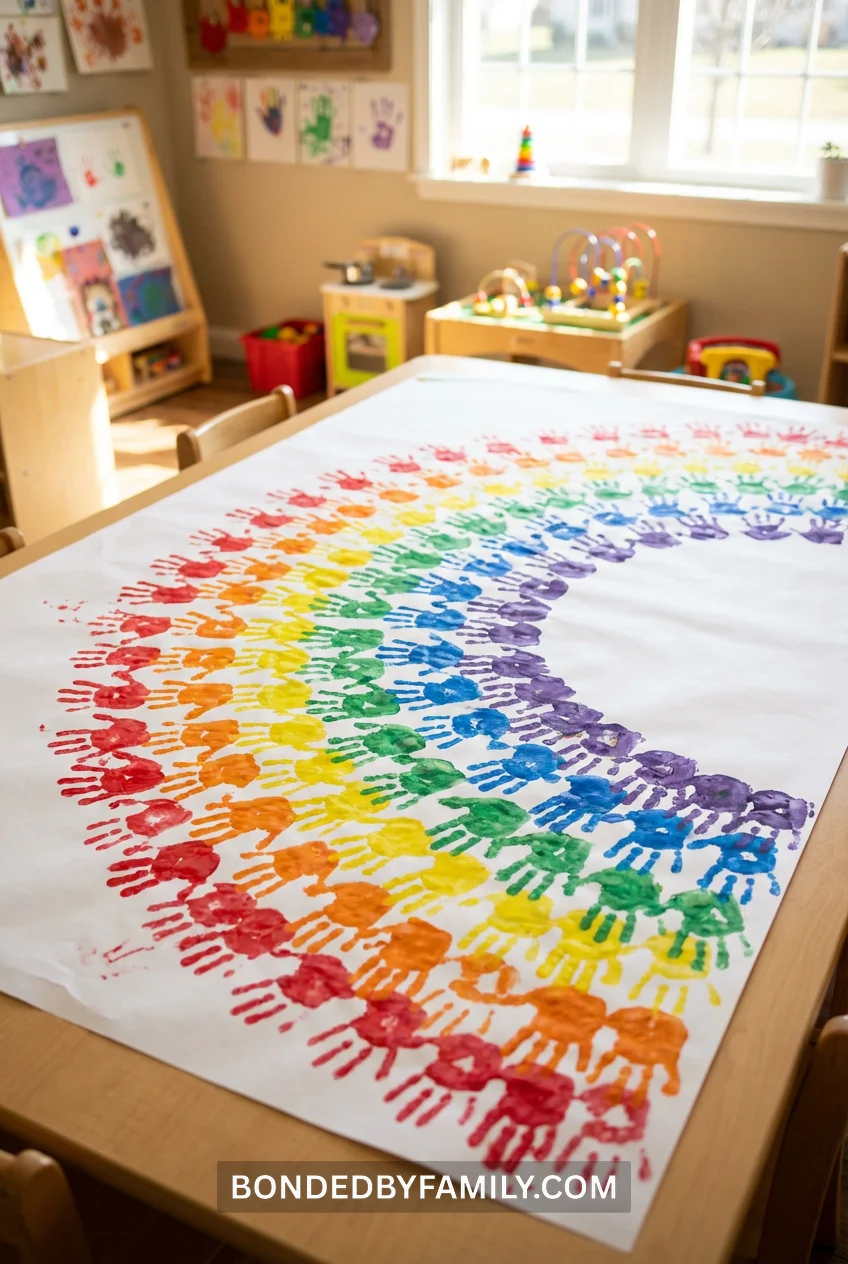
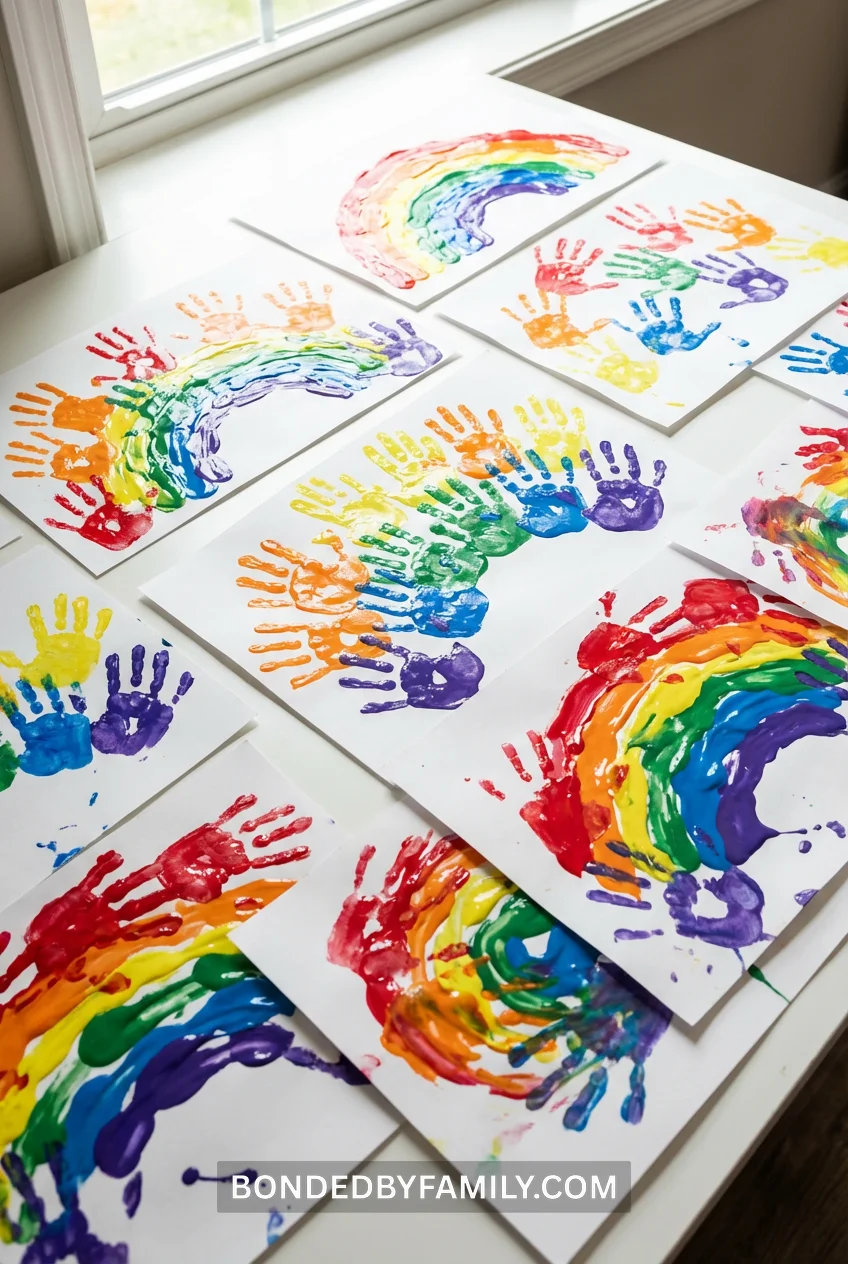
This handprint rainbow changed everything. It takes 5 minutes to set up. The mess stays inside a ziplock bag. Every single child gets a frame-worthy result, even the kid who insists on painting with their elbows.
Why This Beats Every Other Toddler Craft
Most daycare crafts fail for one of three reasons: too many steps, too much mess, or too much variation in results (which means meltdowns from the perfectionists).
This handprint rainbow solves all three. It’s literally: paint in bag, smoosh, add handprints, done. The bag contains the chaos. And because you’re working with primary colors that naturally blend, even “mistakes” look intentional and beautiful.
I’ve done this craft with 18-month-olds who mostly just slapped the bag with joy. I’ve done it with 3-year-olds who carefully planned their color placement. Both groups produced art their parents kept.
The secret? You’re not teaching technique. You’re facilitating an experience. The bag does the heavy lifting.

What You Need (Nothing Fancy)
For each child:
- 1 gallon-size ziplock bag (the freezer bags with the slider work best – $4 for 20 bags)
- 3 colors of washable tempera paint: red, yellow, blue (those $2 bottles from Target are perfect)
- 1 sheet of white cardstock or heavy paper (8.5×11)
- Painter’s tape or masking tape
For the whole group:
- Baby wipes or damp paper towels
- One plastic tablecloth if you’re feeling extra cautious (I stopped using this after the first time)
Total cost per child: About $0.35
That’s it. No glitter. No pipe cleaners. No laminating required. I keep a bin with pre-cut cardstock and extra bags in my supply closet, which means I can pull this craft together in under 3 minutes when I need to pivot from the original plan (which is… often).
The Process (Easier Than Making Coffee)
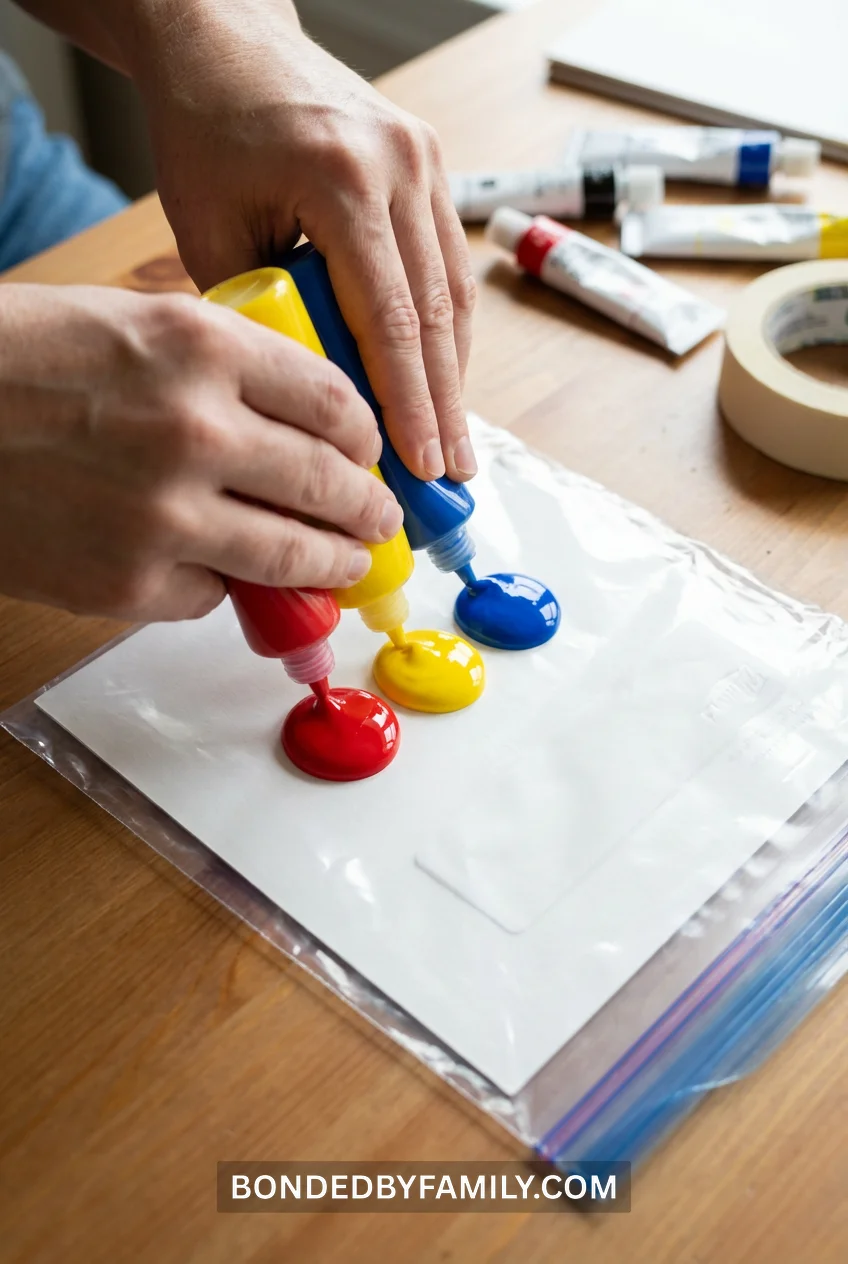
Step 1: Load the Bag (Adult Prep – 2 Minutes)
Slide the cardstock into the ziplock bag. Squeeze three grape-sized blobs of paint onto the paper – one red, one yellow, one blue. Place them in different areas, not touching yet.
Seal the bag, squeezing out most of the air. Then seal it again with painter’s tape across the top. This is your insurance policy against “helpful” toddlers who discover zippers.
Pro move: Tape the bag to the table with all four corners secured. This prevents the “bag slide” that happens when enthusiastic toddlers really commit to the smooshing.
Step 2: Let Them Smoosh (5-7 Minutes of Pure Joy)
Give each child their taped-down bag. The instructions are: “Smoosh the paint around with your hands and make the colors mix!”
That’s it. You’re done instructing.
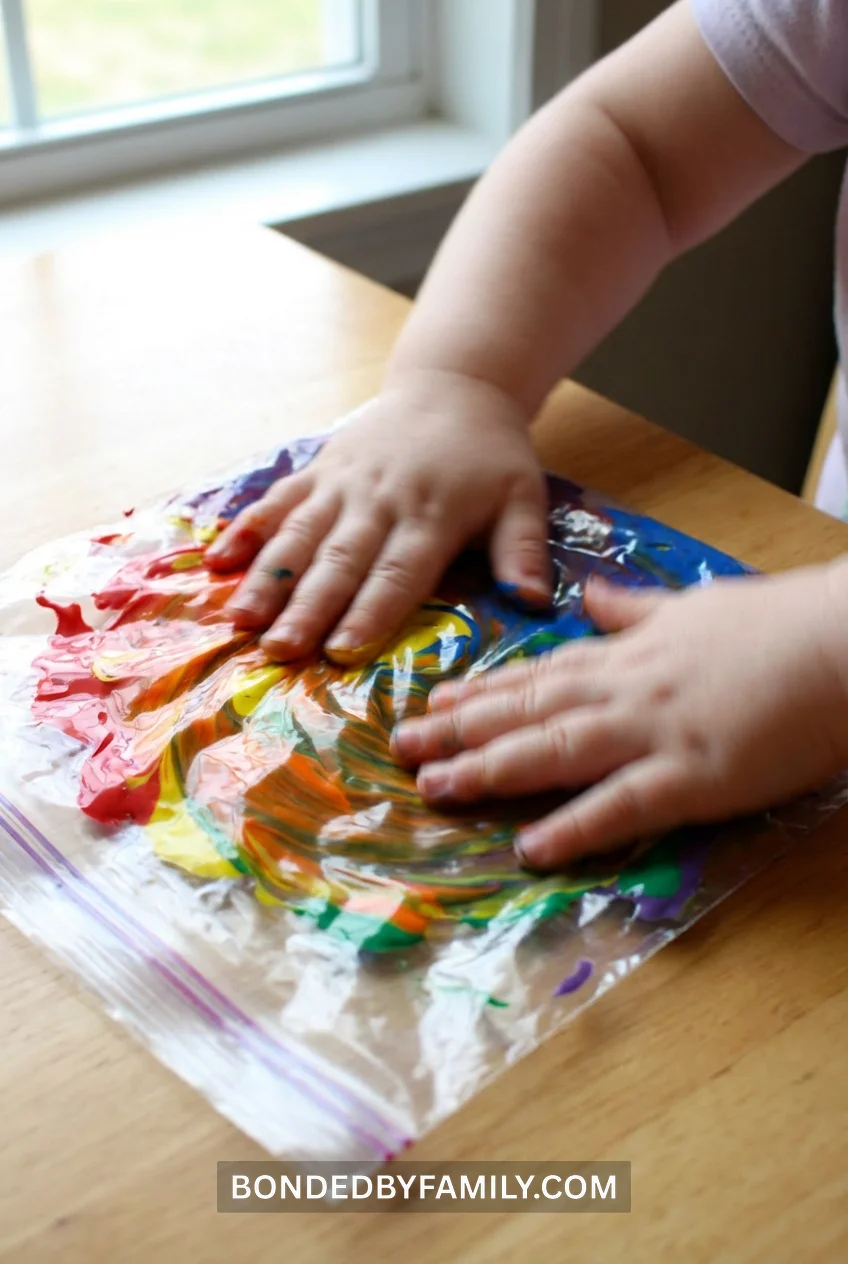
Some kids will systematically blend every section. Some will pound it like a drum. One kid will probably lick the outside of the bag (it’s fine – that’s why you used washable paint). Let them explore for as long as they’re engaged.
The magic happens when red meets yellow and turns orange. When blue meets yellow and creates green. I’ve watched two-year-olds experience that color-mixing revelation and their faces light up like they’ve discovered fire.
Step 3: Add the Handprints (3-4 Minutes)
Once the paint is mixed into a nice swirled pattern, pull the paper out of the bag. Work quickly here – tempera paint dries fast.
Have the child press their handprints onto the painted paper in an arc shape (rainbow formation). If they’re old enough to understand “make a rainbow shape,” great. If not, you can guide their hands, or just let them press prints anywhere they want.
The reality: Some rainbows will be perfect arcs. Some will be chaotic handprint explosions. Both look incredible when they dry. I’ve never had a parent look at their child’s handprint art and think “well, that arc is geometrically unsound.”
Step 4: Cleanup (90 Seconds, Seriously)
Remove the tape. Toss the bag. Wipe tiny hands with baby wipes.
Your table is clean. Your floor is clean. Your sanity is intact.
Set the papers aside to dry (takes about 20 minutes). I usually prop them on a drying rack or lay them flat on a counter the kids can’t reach.
What about the inevitable paint hand that touches a face before you intercept it? Baby wipe. Washable paint comes off skin in one swipe. This is why we don’t use acrylics with toddlers, friends.
Why Daycare Teachers Keep Coming Back to This Craft
I’ve been running this craft in my program for three years. Here’s what makes it stick:
It scales. I’ve done this with 3 kids during free play. I’ve done it with 14 kids during structured craft time. Same setup, same success rate.
It adapts. For younger toddlers (18 months – 2 years), I just let them smoosh and press. For older toddlers (2.5 – 3 years), we talk about color mixing, count handprints, practice making arc shapes.
Parents frame these. I cannot tell you how many times I’ve seen these handprint rainbows show up in family photos posted to our classroom page. They’re not craft-project-cute. They’re legitimately beautiful.
It works on Mondays. You know what I mean. When you’re running on 4 hours of sleep because you stayed up watching trashy TV, and your coffee hasn’t kicked in yet, and the thought of setting up a glitter station makes you want to fake a fire drill. This craft works even when you’re running at 60% capacity.
The Mistakes I Made (So You Don’t Have To)
First attempt: Used regular printer paper instead of cardstock. The paint soaked through and the paper warped into a sad crumpled mess. Cardstock is worth the extra 15 cents.
Second attempt: Didn’t tape the bag down. Three toddlers turned the smooshing into a bag-throwing game. Paint went everywhere because those “secure” ziplock seals are not toddler-tested. Always tape. Always.
Third attempt: Used too much paint. The kids were still happily smooshing 20 minutes later because there was so much liquid sloshing around. Grape-sized blobs are plenty – resist the urge to add more.
Fourth attempt: Tried to make everyone’s rainbow look like the Pinterest inspiration photo. One child cried because their handprints weren’t “in the right spot.” Now I just let them place prints wherever they want and celebrate every single result enthusiastically. Art is about process, not perfection.
When This Craft Works Best
Best times:
- Rainy days when outside time is cancelled and you need a 20-minute calm-down activity
- The week before parent-teacher conferences (guaranteed conversation starter: “Tell me about this beautiful rainbow!”)
- After naptime when you need something engaging but not overstimulating
- When you have a student teacher or volunteer who needs a “safe” craft to lead
Skip this craft if:
- You’re working with kids under 15 months who still mouth everything (the bag situation gets dicey)
- It’s the day before a major holiday and everyone’s already hyped up on 3 types of sugar
- Your ratios are off and you’re solo with more than 8 toddlers (you need two hands free to help with handprints)
Three Variations That Work
Once you’ve mastered the basic version, try these twists:
Themed rainbows: Use seasonal colors instead of rainbow. Fall? Orange, yellow, brown. Winter? White, silver, light blue (yes, you can do this with white paint on dark paper – it’s stunning). Valentine’s Day? All shades of red and pink.
Glitter version: Add a tiny pinch of biodegradable glitter to the paint before sealing the bag. I mean TINY – like 1/4 teaspoon total. More than that and you’ve created a glitter bomb. The glitter catches light when dry and parents lose their minds over it.
Collaborative rainbow: Use one giant piece of butcher paper and have each child add handprints to create a classroom rainbow mural. Takes 30 minutes total, creates amazing documentation for your portfolio, makes a showstopping hallway display.
FAQ
Can I use finger paint instead of tempera paint?
Sure, but tempera gives you brighter, more saturated colors that photograph better. Finger paint tends to dry lighter and more muted. For $2 bottles of tempera at Target, I’d stick with that.
My toddlers won’t keep their hands in the bag – they want to touch the paint directly. What do I do?
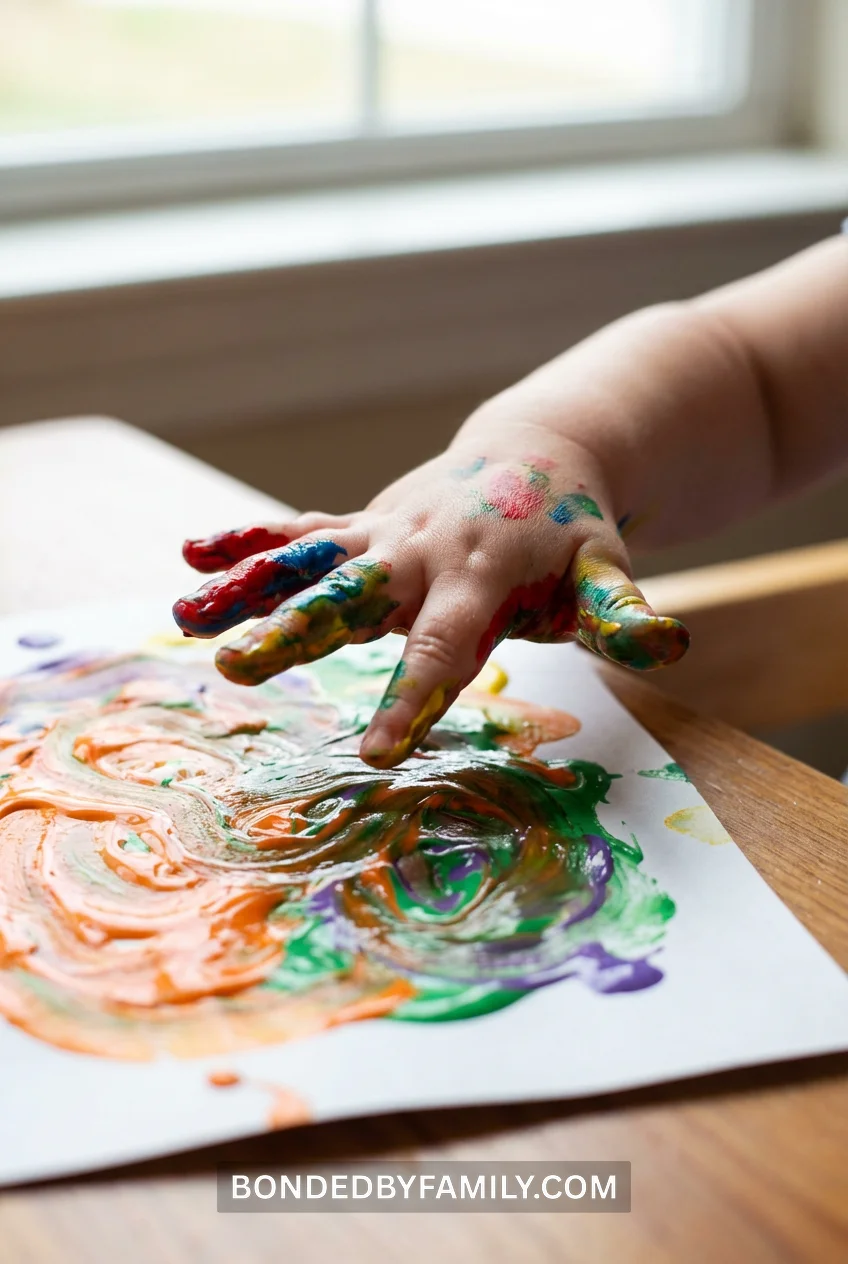
Let them. Seriously. Put the cardstock on the table without a bag, squirt the paint directly on the paper, and let them finger paint the rainbow. Then do handprints. It’s messier (you’ll need smocks and maybe that plastic tablecloth), but some kids just need the full sensory experience. That’s developmentally appropriate. Roll with it.
How long do these last? Can I send them home the same day?
Tempera paint dries in 20-30 minutes at normal room temperature. I usually let them dry during lunch/nap time and send them home at pickup. If you’re in a humid climate, give it an hour. Once dry, they’re permanent – the paint won’t smudge or run even if they get wet later.
Do you laminate these or seal them somehow?
Nope. The paint is permanent once dry on cardstock. Parents can frame them as-is. I’ve seen families keep these for years with no fading or damage. If you really want to preserve them, spray with a clear acrylic sealer, but it’s not necessary.
What if a child refuses to put their handprint on after all that smooshing?
Then you have a beautiful abstract swirl painting. Don’t force the handprint – some kids aren’t ready for the full-hand tactile input, and that’s okay. The smooshing alone is valuable process art. I’ve had parents frame the “just swirls” versions and they’re honestly just as gorgeous.
This handprint rainbow isn’t going to win you any early childhood education innovation awards. It’s not trendy or Instagrammable in that perfectly-curated-classroom-aesthetic way.
But it works. On the hard days when you’re tired and under-caffeinated and someone just bit someone else over the blue crayon. When you need 20 minutes of engaged, joyful learning that doesn’t end with you scraping paint off the ceiling.
When you need proof that the simplest crafts – the ones that honor where toddlers are developmentally instead of where Pinterest thinks they should be – create the best memories.
Thirty-five cents in materials. Five minutes of setup. Twenty minutes of pure toddler joy and genuine learning about colors, textures, and the simple magic of making something beautiful with their own two hands.
That’s what good daycare crafts for toddlers look like in real life.