So you said yes to making the diaper cake. Now you’re staring at a fat pack of newborn diapers, and these diaper cake ideas are the ones that turn them into something people gasp at. They hold up, they photograph well, and they don’t make you cry into a roll of ribbon at midnight. I have built more of these than I can count. Stick with me to the end, and you’ll know exactly which design to build, how many diapers to buy, and the one mistake that wrecks a cake on the drive over.

Here’s the promise. Pick any cake below, follow the count, and you’ll walk into that shower holding the thing everyone crowds around. Let’s get into it.
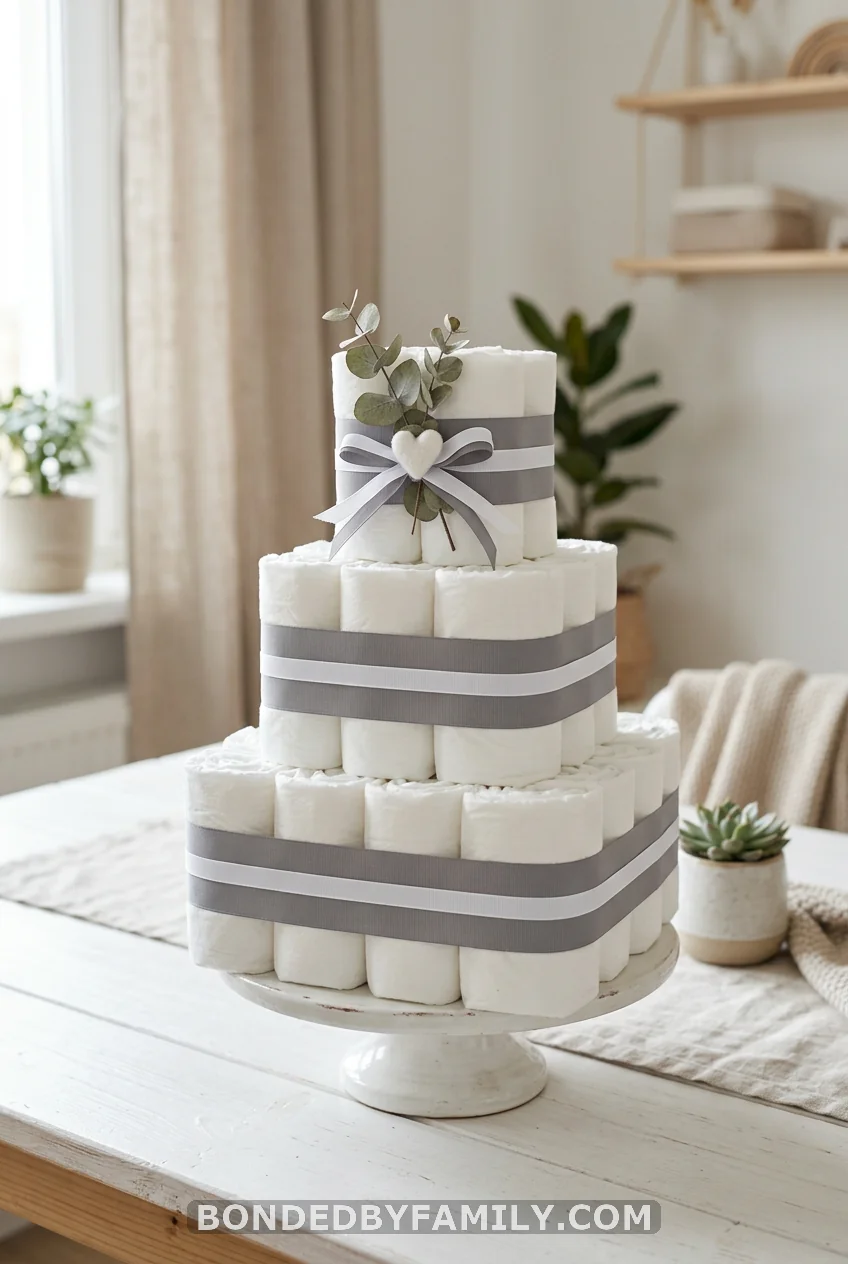
1. The Classic Three-Tier Round (Start Here)
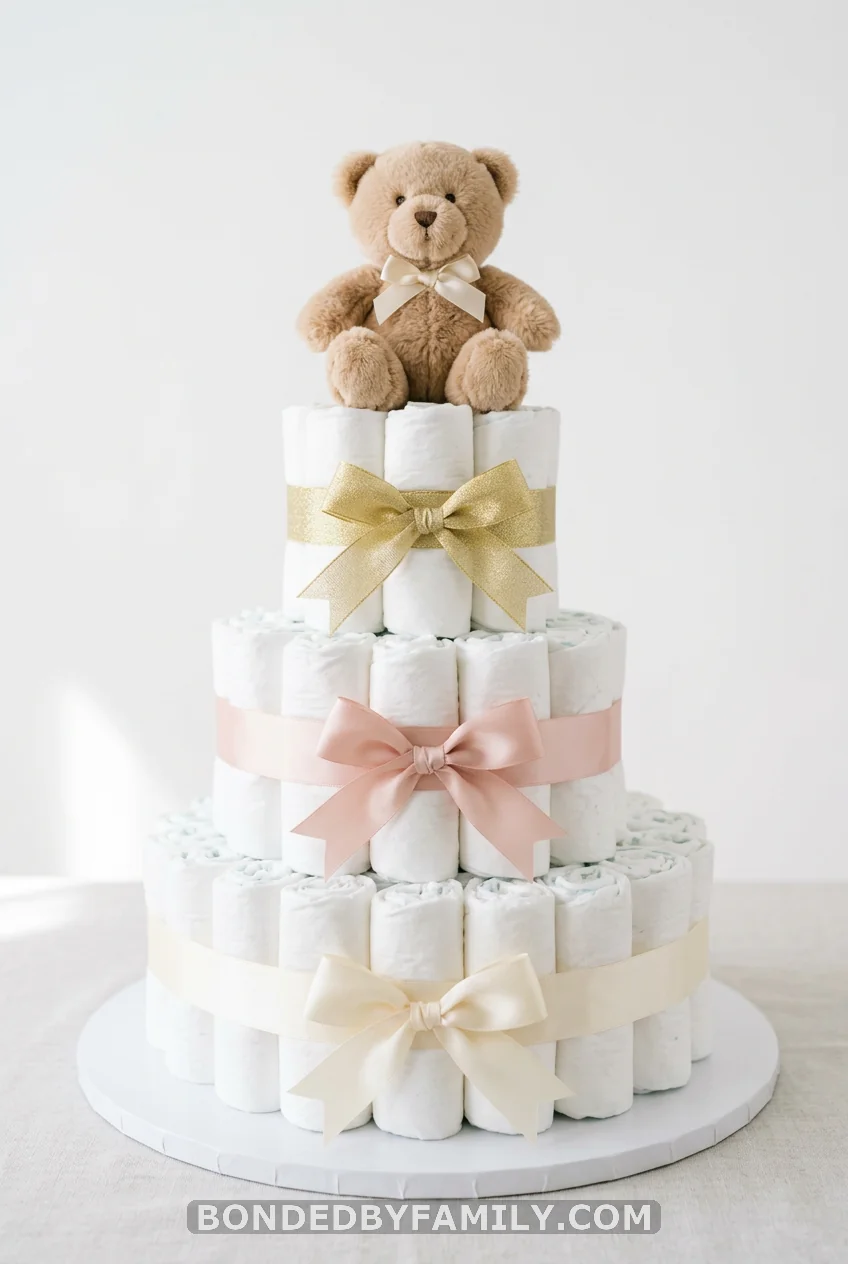
If you only learn one design, learn this one. The round tiered cake is the blueprint. Master it, and every themed cake later is just decoration on top of the same bones.
Why It Works
Rolled diapers fan out into a circle, and circles read as “cake” instantly. The shape hides imperfect rolling, holds its form during transport better than square builds, and gives you three clean bands to wrap with ribbon. It is the design competitors feature most, and for good reason.
What You Need
- About 50 to 64 size 1 diapers for a full three-tier round. Pampers Swaddlers stay white and roll tight, which is why so many makers swear by them.
- One empty paper towel tube for the center support (or swap in a baby bottle, lotion bottle, or a small wine bottle as a hidden surprise for mom).
- 60 small rubber bands plus 3 large ones.
- A round cake board or a Dollar Tree pizza pan as the base. Pizza pans run about $1.25 and look the part.
- Wide ribbon, roughly 2.5 inches, for each tier.
- A topper: plush toy, booties, or a wrapped onesie.
Budget reality: a homemade round cake costs around $35 to $55 all in, and most of that is the diapers, which mom keeps and uses. That’s the quiet beauty of it.
Step-by-Step
- Roll each diaper from the open waistband toward the back tab, white side out. Secure with a small rubber band. Roll them all before you build. Park yourself on the couch and knock it out.
- Stand your center tube on the base. Slip one large rubber band loosely around it.
- Build the bottom tier first. Stand rolled diapers around the tube, three diapers deep, until you have a full circle. Slide the big rubber band out to hold the whole ring.
- Repeat for the middle tier on top, dropping by one ring of diapers so it steps in.
- Add the top tier, smaller again.
- Wrap each tier with ribbon to cover the rubber bands. Pull it snug. Pin or tape the end at the back.
- Top it, tuck a few baby items between the rolls, and you’re done.
Common Mistakes to Avoid
Loose rolls are the killer. A floppy roll makes a floppy cake. Roll tight, band tight. Second mistake: skipping the center support. Without that tube or bottle, the middle collapses the second you lift it. Third: gluing the diapers. Never glue. Mom needs to unroll and use every one.
Pro Move
Tuck washcloths, socks, and a couple of chocolates between the diaper rolls. When Mom takes the cake apart, she finds little surprises. People remember that.
2. Mini Single-Roll Cakes
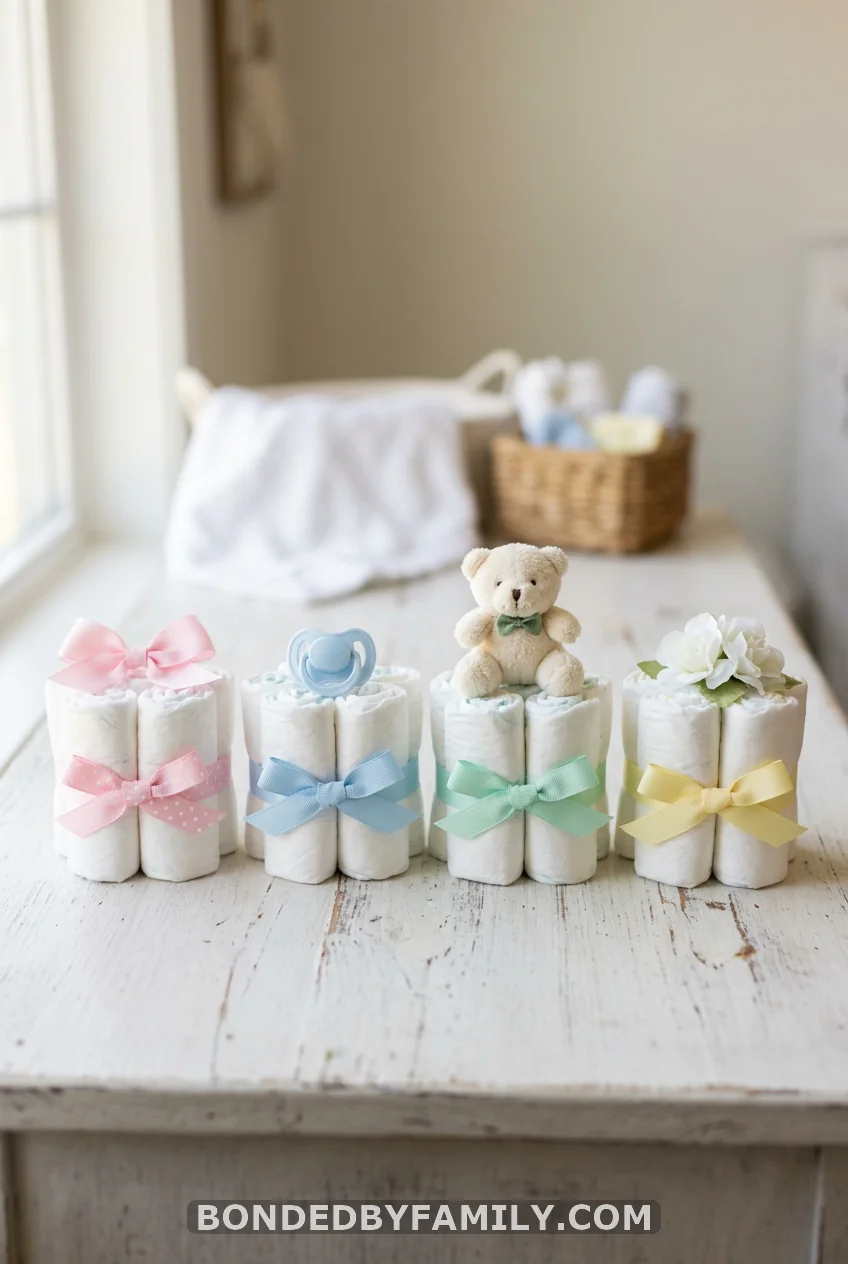
Short on time? Make minis. Seven to nine rolled diapers, banded together, ribbon around the middle, one cute item on top. Done in five minutes each. Line up a few as centerpieces down a long table. They cost almost nothing and fill space beautifully.
3. The Surprise-Inside Cake
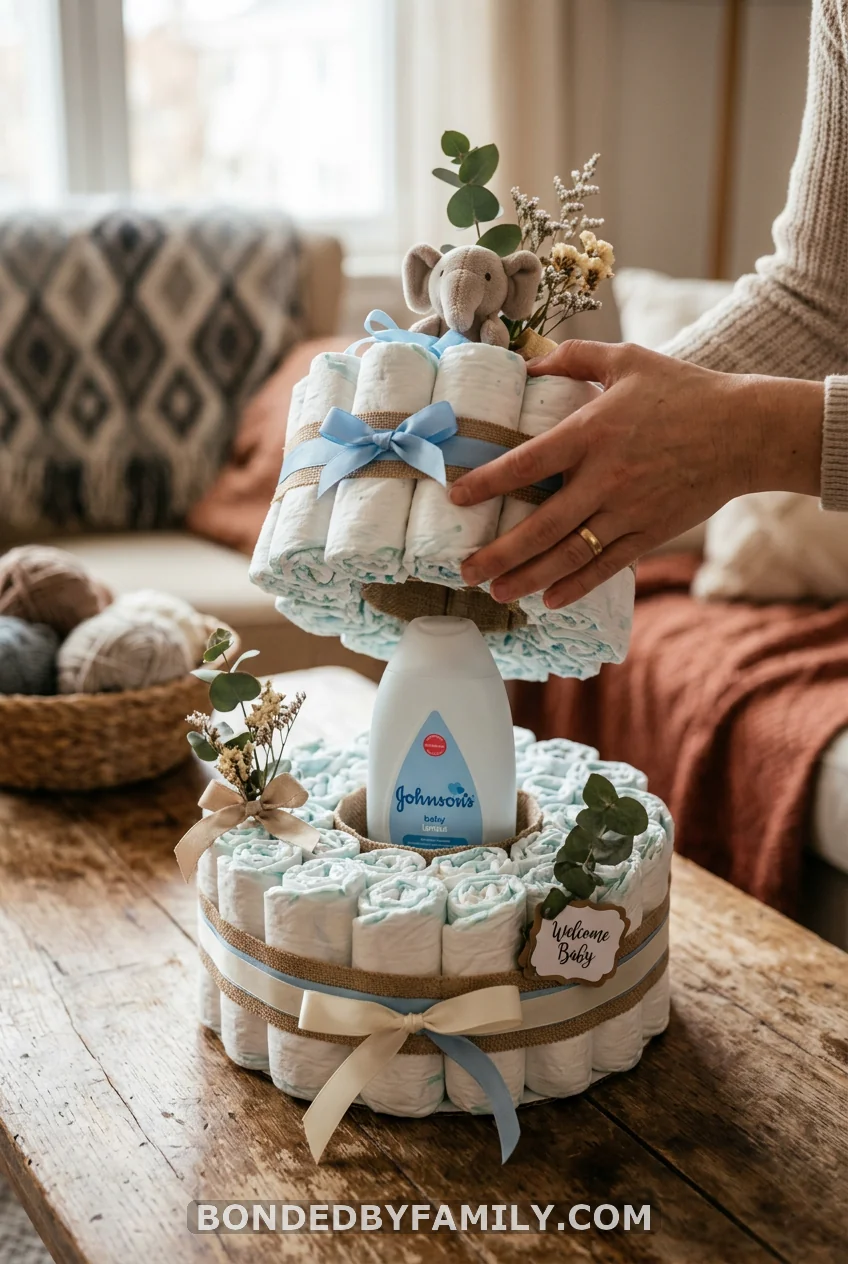
Same round build, one upgrade: swap the cardboard tube for something Mom will use. A bottle of baby wash, a “Best Mom Ever” travel mug, a mason jar packed with pacifiers and lip balm, even a bottle of bubbly for after the baby arrives.
The trick is matching the height. Your core item needs to reach the top tier, or your cake sinks in the middle. Measure before you build. A standard lotion bottle works for a two-tier. For three tiers, go taller or stack a small box under it.
This one always gets the “ooh, what’s inside?” moment when mom unpacks it later.
4. Princess Castle Cake
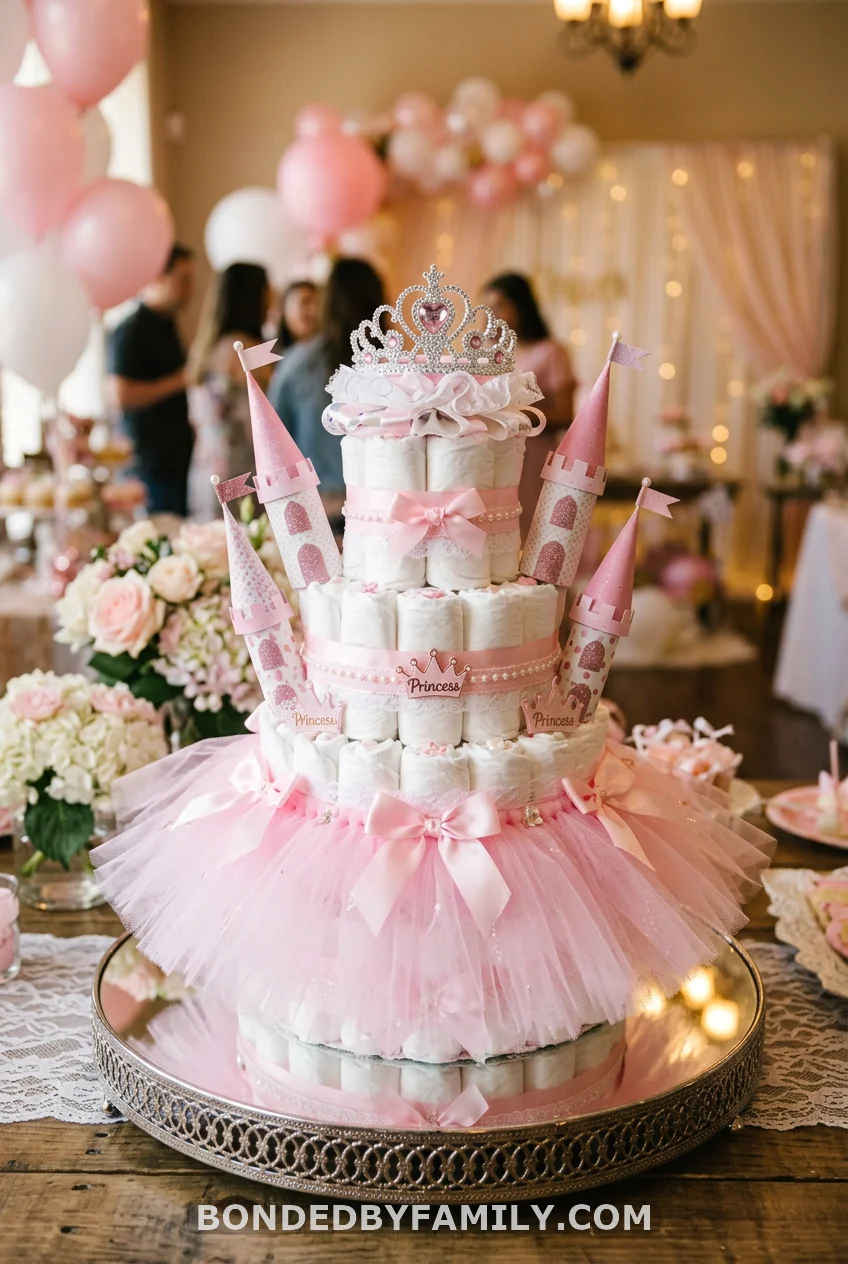
Having a girl? This is the showpiece. Build your three-tier round, then turn it royal.
Wrap the bottom tier in a tutu instead of ribbon. Just gather tulle and tie it around the diapers. Set a small tiara on top. For a true castle, add paper cones as turrets around the top tier and pin tiny flags to them. Stick with pink, blush, and white, with gold accents if you want it fancy.
The tutu-and-tiara combo does most of the work here. It reads “princess” from across the room, which is exactly what you want on a busy gift table.
5. No-Roll Modern Stack
Hate rolling? Don’t roll. Fold diapers flat, stack them into square tiers, and band each layer. The look is cleaner and more modern, and it goes faster. The catch: you need a square base and a steadier hand to keep the stack square. Worth it if rolling drives you up the wall.
6. Safari and Elephant Cake
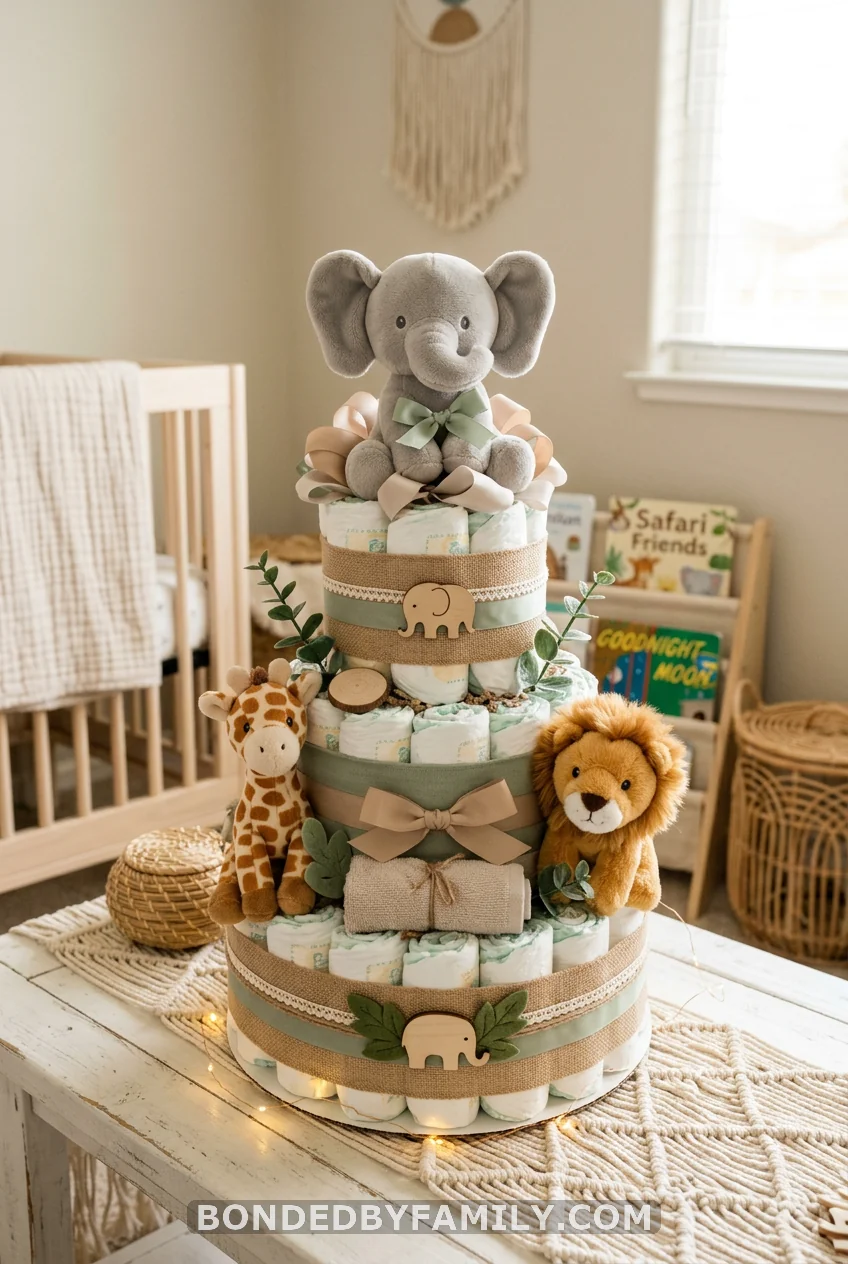
Gray, sage, and tan diapers (or white wrapped in those tones) make a calm, gender-neutral base. Top it with a plush elephant, the unofficial mascot of baby showers everywhere. Tuck a tiny giraffe or lion between the tiers. Burlap ribbon adds that warm, earthy feel.
Safari is the safe bet when you don’t know the baby’s sex or the nursery baby shower theme. It works for nearly everyone, and the plush animals become real toys afterward.
7. The Cake That Fell Apart in the Car
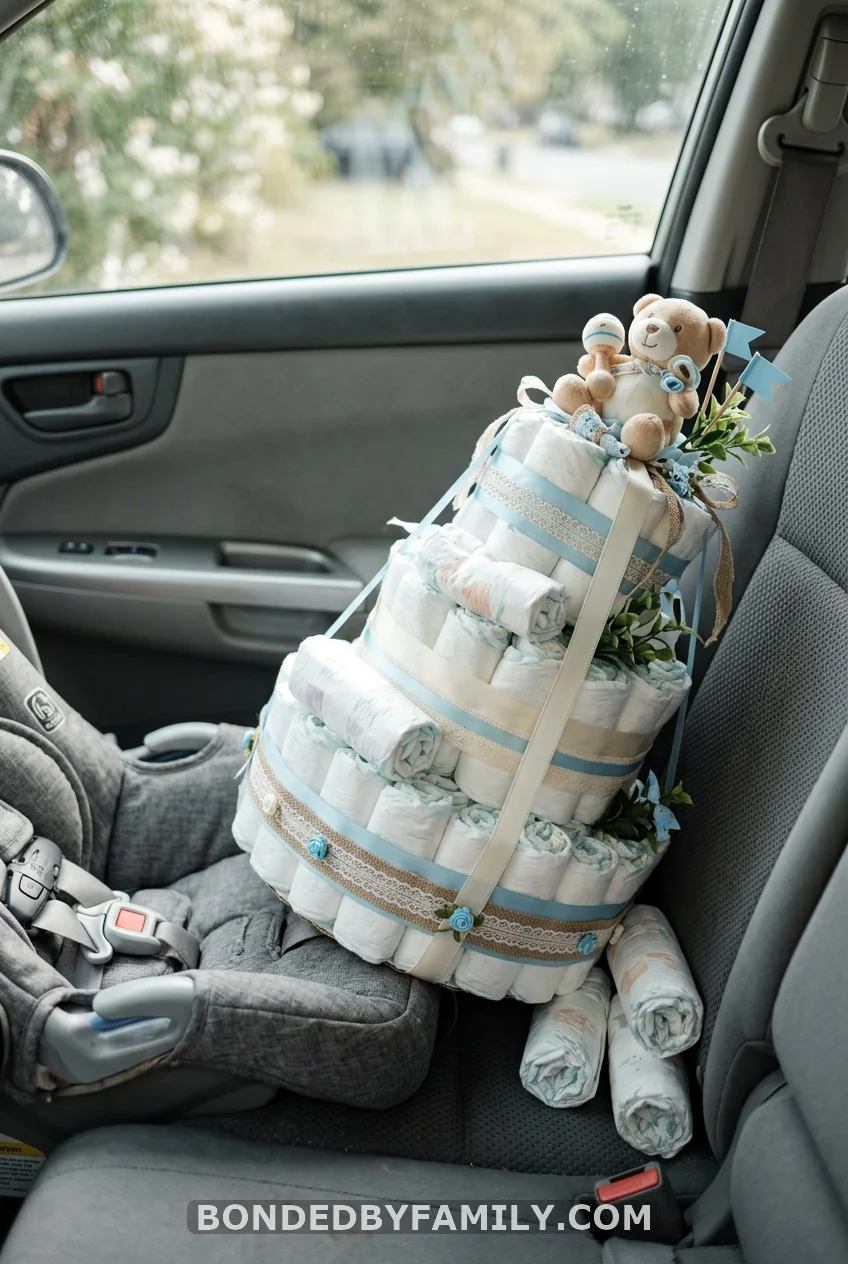
Let me save you from my own mistake.
My first cake was gorgeous. Three tiers, tidy ribbon, a bear on top that I was unreasonably proud of. I set it on the passenger seat, took one sharp turn out of my driveway, and watched it lean like a sad tower of pasta.
Here’s what went wrong. I had no center support running through all three tiers, just three stacked rings sitting on each other. Pretty on the table. Helpless in motion.
So now I always run one long dowel or paper towel tube straight up the middle, anchoring every tier to the core. I also carry the cake in a deep box wedged with rolled towels so it can’t slide. And I assemble the final decorations at the venue when the cake is fragile.
The lesson costs you nothing and saves the whole thing. Build for the drive, not just the photo. A cake that survives the trip beats a flawless one that arrives in pieces.
If you remember one warning from this entire post, make it this one.
8. Rubber Duck Bath-Time Cake
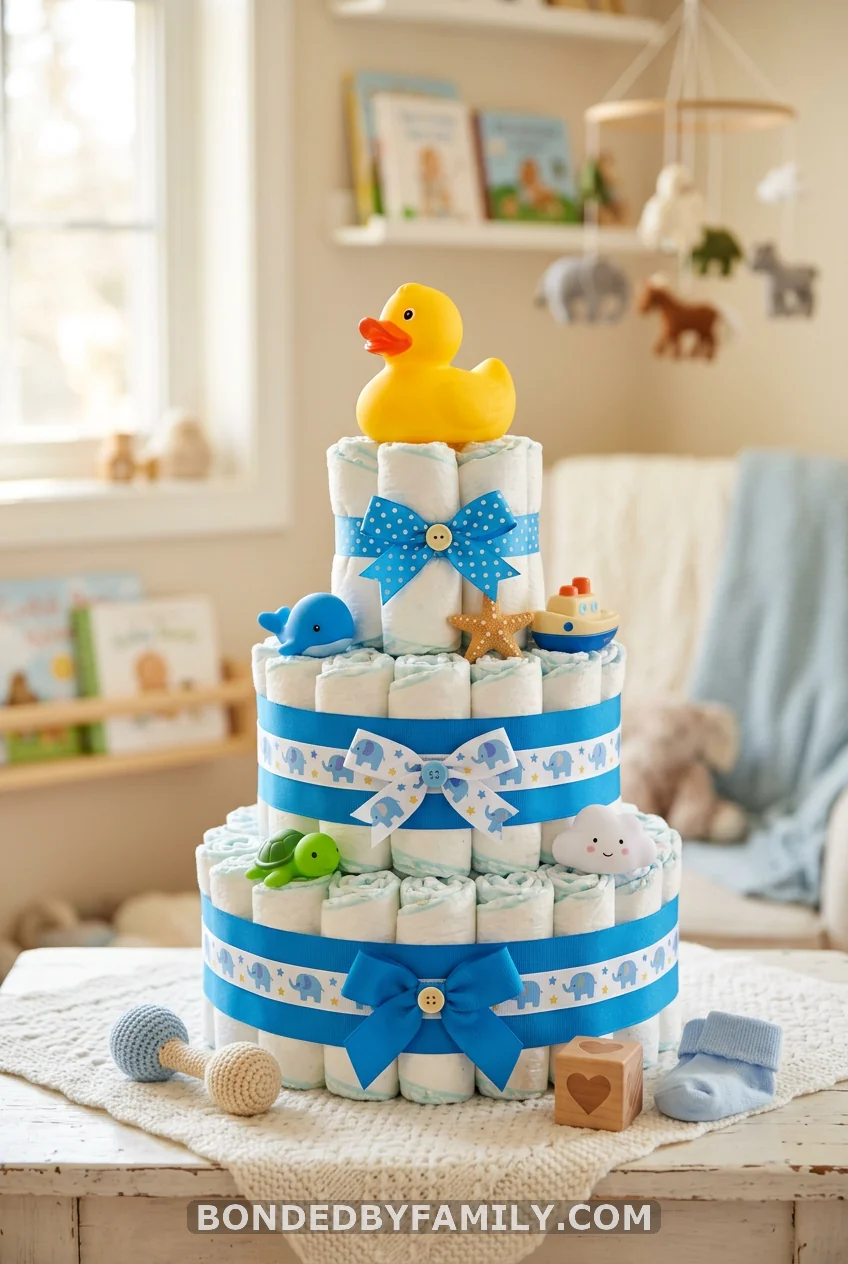
Yellow ribbon, a fat rubber duck on top, a couple of bath toys peeking out. That’s the whole idea. Bright, cheerful, and it works for boys, girls, and surprises alike. The bath toys are real gifts mom uses on day one.
9. Twinkle Twinkle Fairy-Light Cake
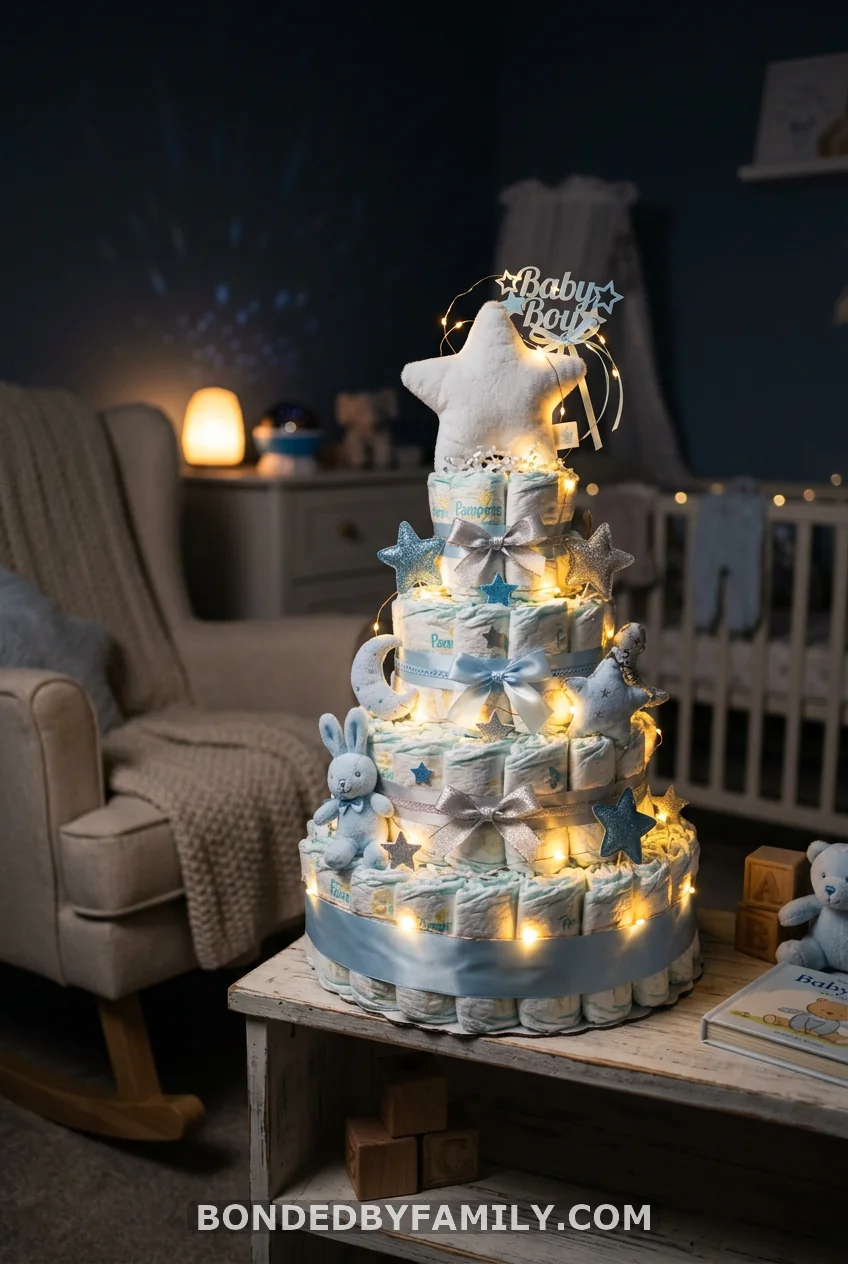
Want the wow factor? Add light. Order battery-powered fairy lights and wrap them around the outer edge of each tier. Tuck the battery pack into the back where nobody sees it.
A glowing cake on a dim gift table photographs like magic and stops every guest mid-conversation. Pair it with little star cutouts and a soft blue or silver palette for a “twinkle twinkle little star” theme. It is the single cheapest upgrade with the biggest payoff.
Just check that the battery pack sits within reach so mom can switch it off, and keep the lights on the outside, never buried where they could warm up against fabric.
10. Woodland Peter Rabbit Cake
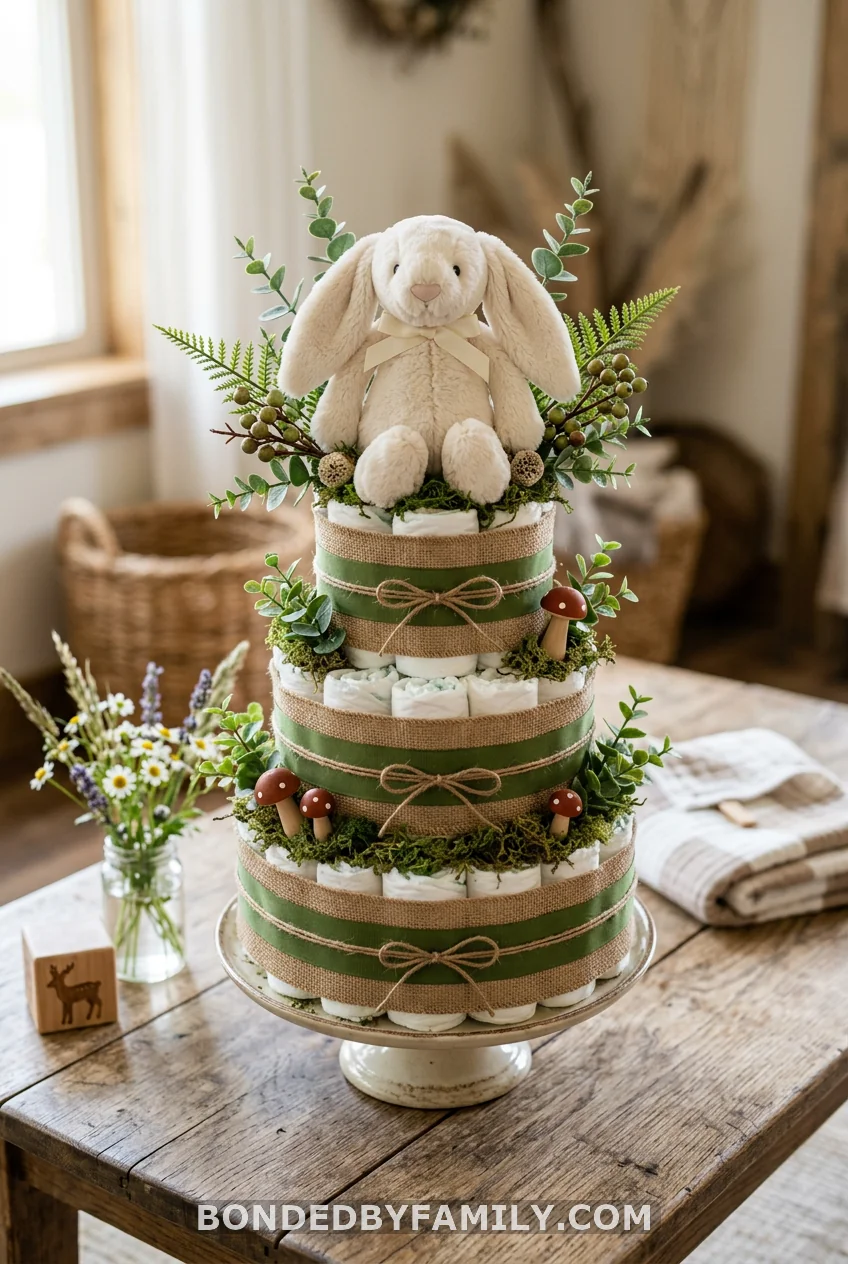
Woodland is having a moment, and diapers wear it well. Wrap tiers in burlap and a moss-green ribbon. Top with a plush bunny. Tuck in faux greenery, a few felt mushrooms, maybe a small board book to round it out.
If the shower asks guests to bring a favorite book for the baby, a little Beatrix Potter tucked at the base ties the whole gift together. Cohesive gifts feel more thoughtful, and this one looks like you fussed far more than you did.
11. Gender-Neutral Sage and Cream Cake
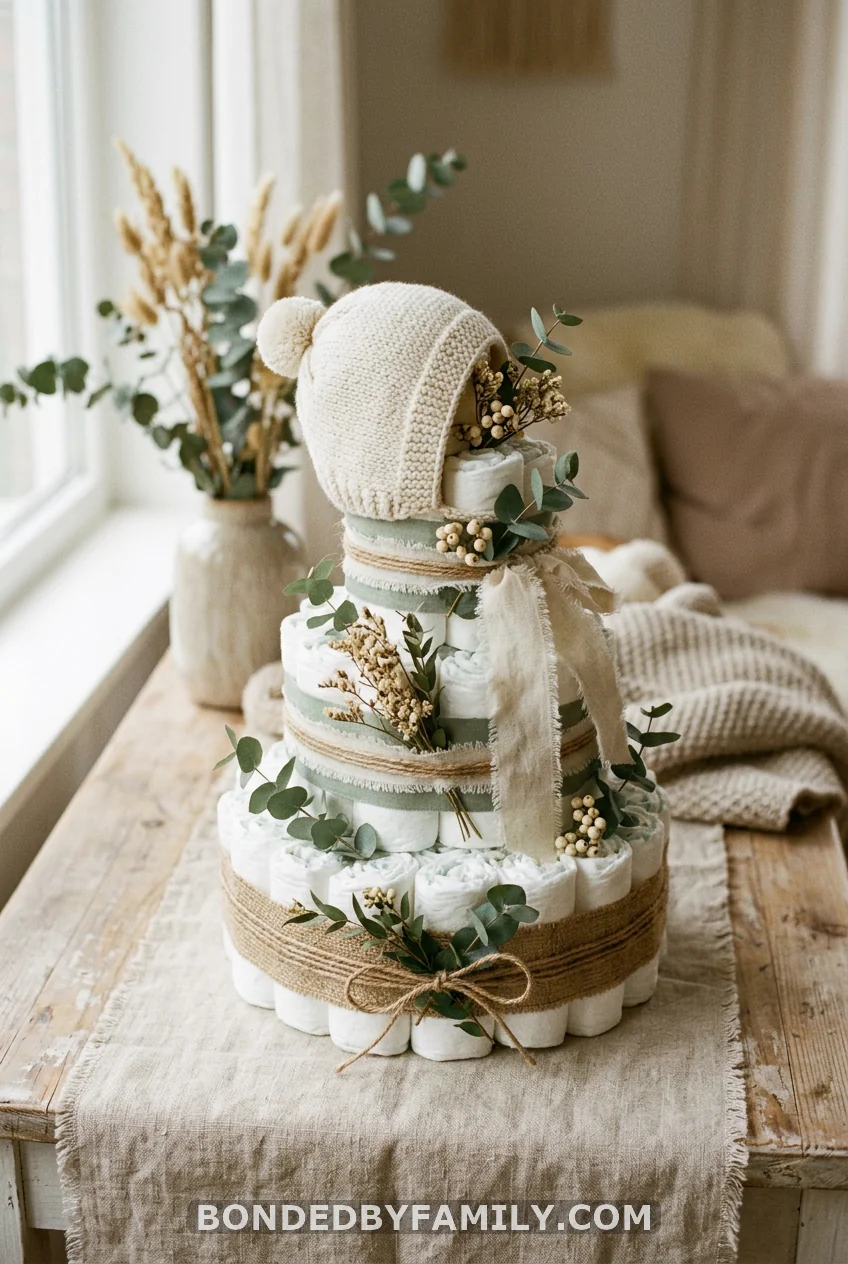
Tired of pink or blue being the only two options? Go sage and cream. Wrap white diapers in eucalyptus sprigs and natural twine, top with a little knit bonnet, and you have a cake that suits any baby and any nursery.
This palette also photographs beautifully against almost any backdrop, which matters if the host plans to share pictures. Calm, modern, and quietly elegant. It is my go-to when I want something grown-up rather than cutesy.
12. Myth: A Diaper Cake Wastes the Diapers
This worry stops people from making one, so let’s settle it.
What most people think: the diapers get handled, ruined, and tossed after the party.
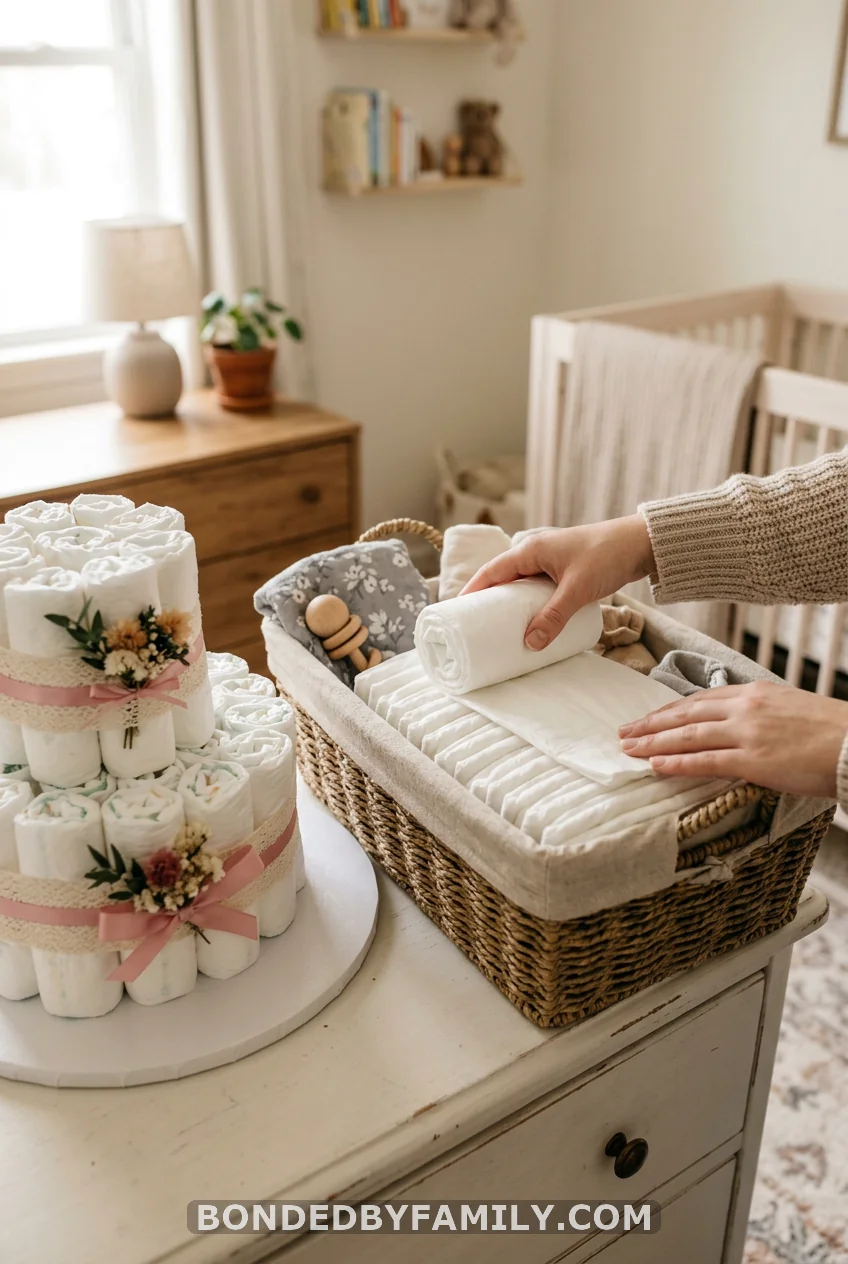
The reality: a diaper cake uses the diapers fully. Mom unrolls them and uses every single one. Nothing is wasted. To keep them fresh, roll with clean hands, never use glue or tape on the diapers themselves, and skip pins through the diaper (pin into the ribbon instead). Keep the cake out of pet hair and direct sunlight.
Do that, and you have handed mom 50-plus usable diapers dressed up as art. The cake is the wrapping. The diapers are still the gift.
13. Diaper Carriage or Tricycle Showpiece
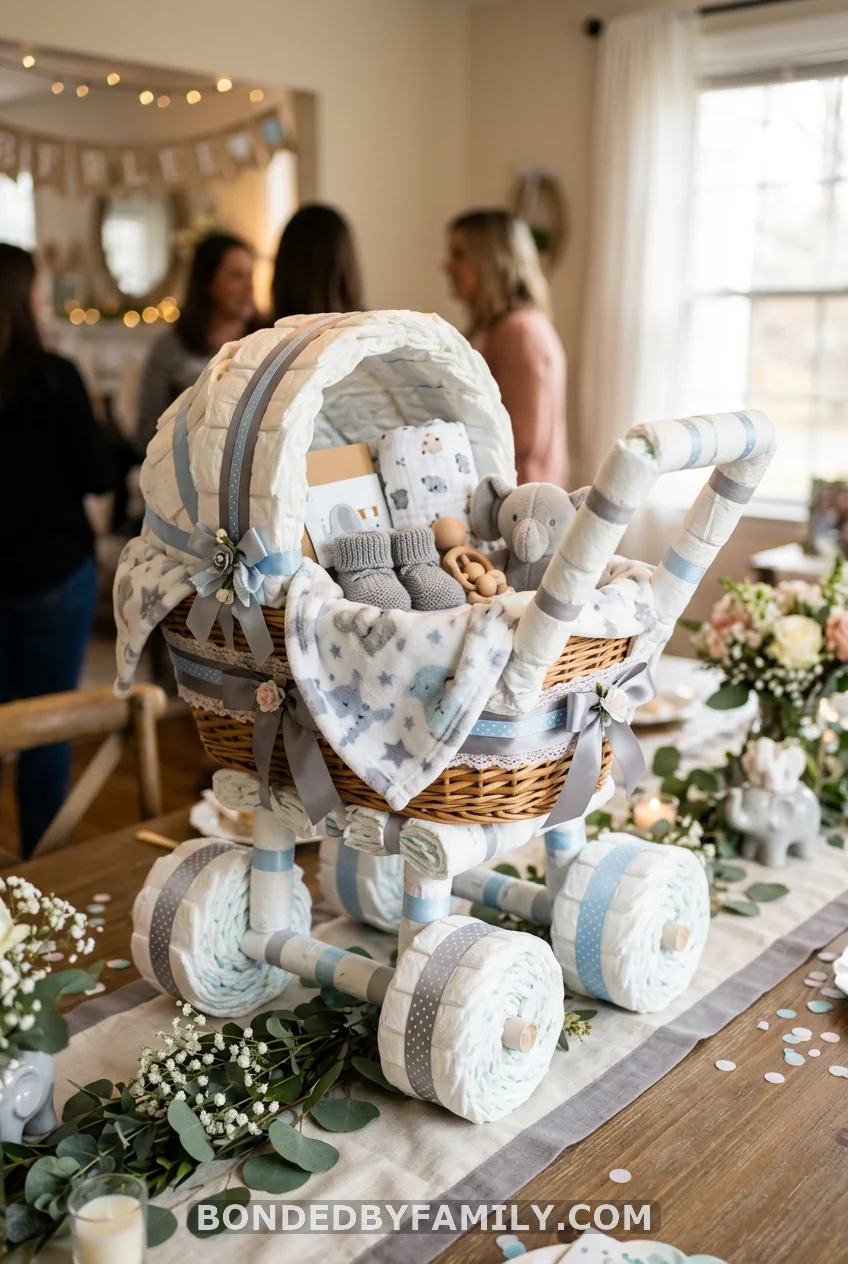
Ready for the advanced level? Skip the tier and build a shape. A diaper carriage uses rolled diapers as wheels and a folded blanket as the basket. A tricycle does the same with three wheels and a washcloth seat.
These take longer and need a little patience with rubber bands and wire, but they are the cakes people photograph from every angle. Save this one for the shower where you really want to show off. Build it on a sturdy tray so the wheels stay put.
Wrapping Up
You came in staring at a pack of diapers. Now you have 13 ways to turn them into the centerpiece everyone circles. Whether you keep it classic with the three-tier round or go all out with a glowing fairy-light cake, the bones are always the same: roll tight, support the center, build for the drive.
Pick the one that fits the mom-to-be, buy a few more diapers than you think you need, and give yourself an afternoon. You’ve got this, and she is going to love it.
Frequently Asked Questions
How many diapers do I need for a diaper cake?
For a full three-tier round, plan on 50 to 64 size 1 diapers. A two-tier needs around 35 to 45, and a mini cake uses just 7 to 9. Buy a few extra so you can roll loosely and still fill each tier.
What size diapers work best for a diaper cake?
Size 1 is the standard. It rolls neatly and gives mom diapers she’ll reach for in the early weeks. Avoid newborn size, since babies outgrow it fast, and skip very large sizes that roll bulky.
Do I have to glue or tape the diapers?
No, and you shouldn’t. Rubber bands hold each roll, and a long ribbon holds each tier. Glue and tape ruin the diapers and make them unusable. Pin into the ribbon, never into the diaper.
How far in advance can I make a diaper cake?
A day or two ahead is fine. Build it, then store it somewhere cool, dry, and away from pets and sunlight. Add delicate decorations and any fairy lights at the venue so nothing shifts during transport.
Can a diaper cake double as the baby shower gift?
Yes, and that’s the whole appeal. It works as a centerpiece during the party, then becomes a practical gift after. Tuck in extras like washcloths, socks, and toys to raise the value without raising the cost much.