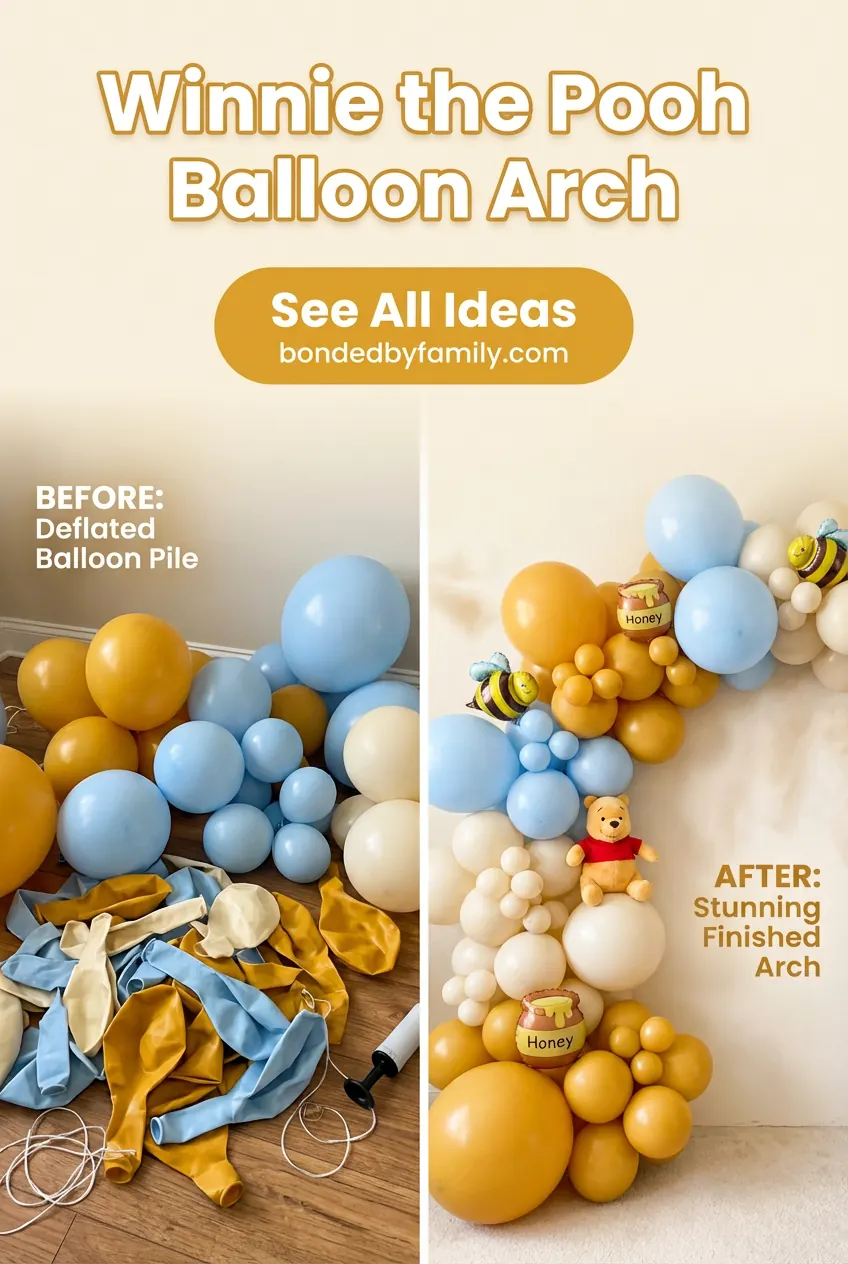
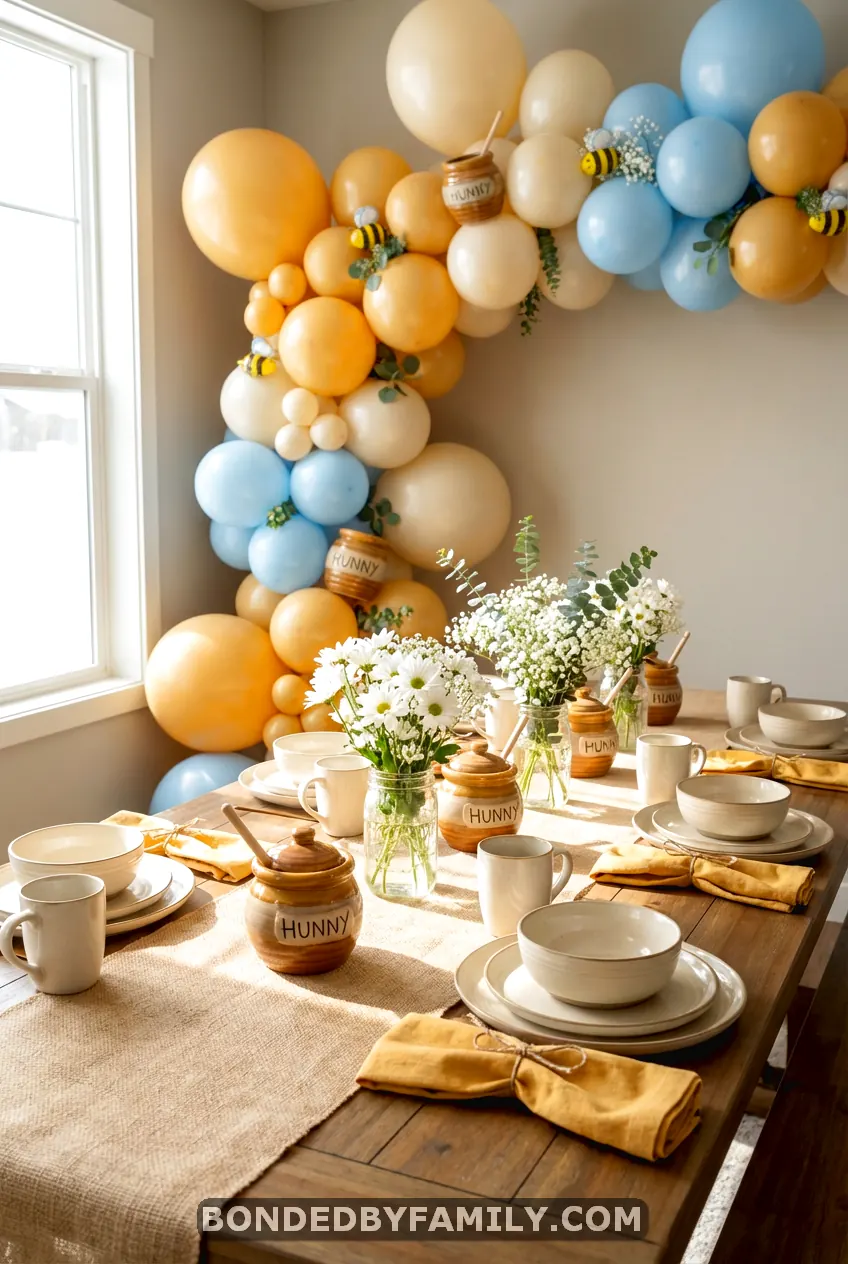
I’ll never forget the moment I saw my first Winnie the Pooh balloon arch in person at my best friend’s baby shower. The soft yellows reminded me of honey dripping from a jar, the gentle blues looked like a perfect spring day in the Hundred Acre Wood, and those tiny bee accents? Pure magic. But here’s what nobody tells you when you’re scrolling through those picture-perfect Pinterest photos: most of those arches cost $300-600+ from professional decorators, and DIYing one without guidance turns into a three-hour wrestling match with tangled balloon tape and asymmetrical nightmares.
I’ve created seven Winnie the Pooh balloon arches over the past two years – for baby showers, first birthdays, and gender reveals. I’ve made every mistake in the book (RIP to the arch that collapsed during cake cutting), and I’ve learned exactly what works. Today, I’m sharing the complete system that’ll save you from balloon-induced panic attacks and give you a gorgeous Hundred Acre Wood setup for under $75.
Why Traditional Balloon Arch Tutorials Fail (And What Actually Works)
Most balloon arch guides show you perfect, finished arches without addressing the three core problems every DIYer faces:
The Symmetry Trap: You try to make both sides match perfectly, waste 45 minutes adjusting, and end up with a stiff, artificial-looking arch. Real talk? The most beautiful Winnie the Pooh arches are intentionally asymmetric. They mimic organic garden growth, not geometric precision. I learned this after my first arch looked like a corporate event backdrop instead of the whimsical Hundred Acre Wood vibe I wanted.
The Inflation Time Bomb: Nobody warns you that hand-pumping 150+ balloons will take nearly two hours and leave your arms feeling like jelly. Or that balloon sizes vary wildly even from the same package, creating visual chaos if you don’t have a strategy.
The Color Curse: You think “yellow and blue” is simple until you’re standing in the party store staring at 12 different yellows ranging from neon construction-worker yellow to pale butter. Pick wrong, and your arch looks like a generic birthday party, not the vintage-Pooh aesthetic you’re dreaming of.
The Honey-Sweet Solution: Your Complete Balloon Arch System
Here’s the method that’s worked for hundreds of parents in my Facebook group, refined through trial and error until we got it foolproof:
Materials You Actually Need (No Fancy Stuff)
Forget the overpriced “balloon arch kits” with 200 balloons you don’t need. Here’s my tested list that costs $60-75 total:
Balloons (buy more than you think):
- 50 honey yellow 5-inch balloons
- 50 sky blue 5-inch balloons
- 30 white/cream 5-inch balloons
- 20 sage green 5-inch balloons
- 15 honey yellow 11-inch balloons
- 15 sky blue 11-inch balloons
- 10 white 11-inch balloons
- 5 coral red 5-inch balloons (for Pooh’s shirt accents)
Why these specific numbers? Small balloons fill gaps and create dimension. Large balloons anchor the structure. The color ratio gives you that classic Pooh palette without looking like someone just grabbed random pastels.
Structure & Assembly:
- 1 roll of 16-foot balloon decorating strip (the clear plastic tape with holes)
- 100 glue dots
- 1 electric balloon pump ($15-20, saves your sanity)
- Fishing line or clear command hooks for hanging
- Optional but recommended: 2-3 artificial eucalyptus stems ($12 for realistic greenery)
The 90-Minute Assembly Process (Timed and Tested)
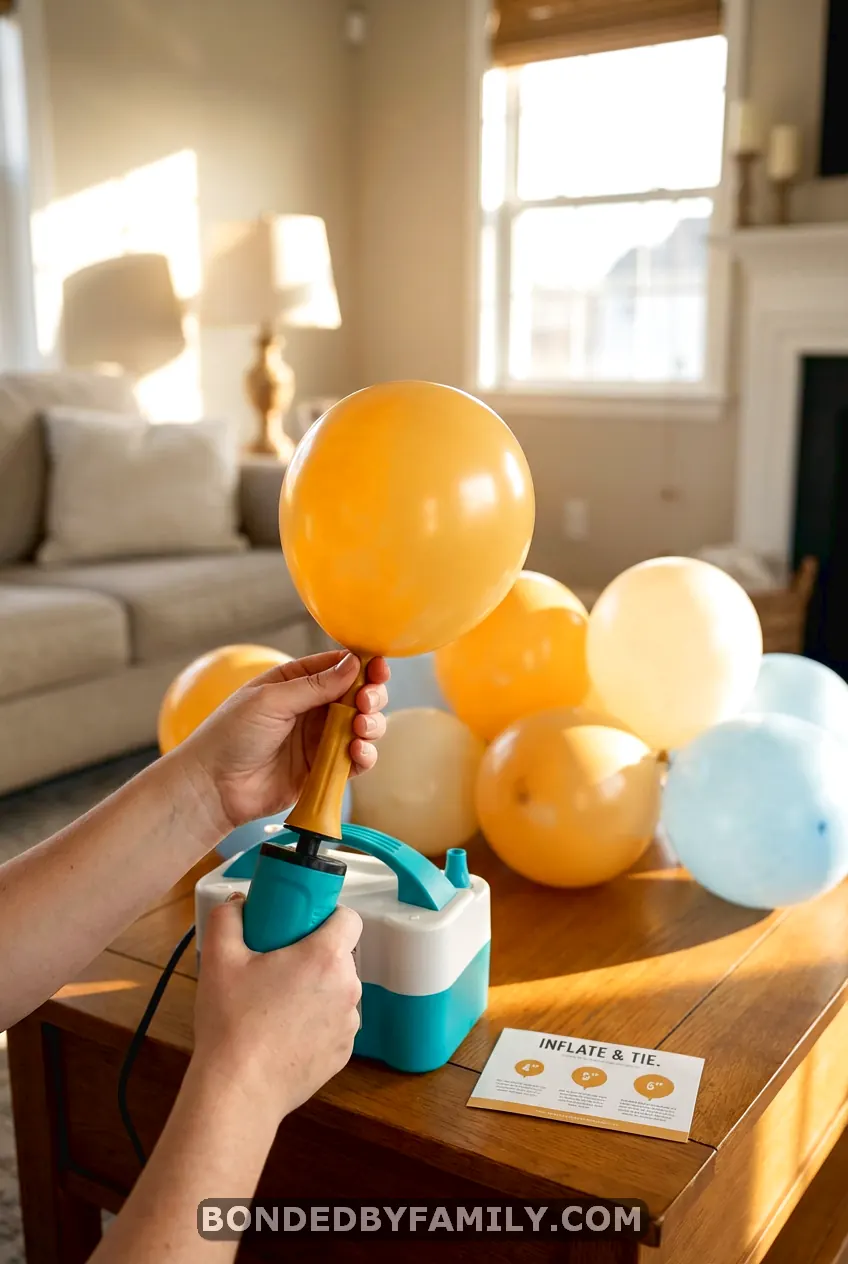
Phase 1: Strategic Inflation (40 minutes)
Don’t just inflate randomly. Use this sequence:
- Start with all large balloons (11-inch). Inflate to about 10 inches – slightly underinflated gives you that soft, organic look vs the about-to-pop tightness.
- Move to small balloons, but here’s the trick: deliberately inflate them to three different sizes. Some 4 inches, some 5 inches, some 6 inches. This variation is what creates visual interest and prevents that “cookie-cutter” look.
- Tie each balloon as you go. My trick for sore fingers: wrap the balloon neck around two fingers, pull the tail through the loop, and voila – perfect knot without the finger pain.
During this phase, I usually put on a podcast or have a friend over. It’s repetitive but not complicated, and the time passes quickly when you’re chatting.
Phase 2: Base Structure Creation (25 minutes)
This is where most people panic, but it’s actually the easiest part once you know the pattern:
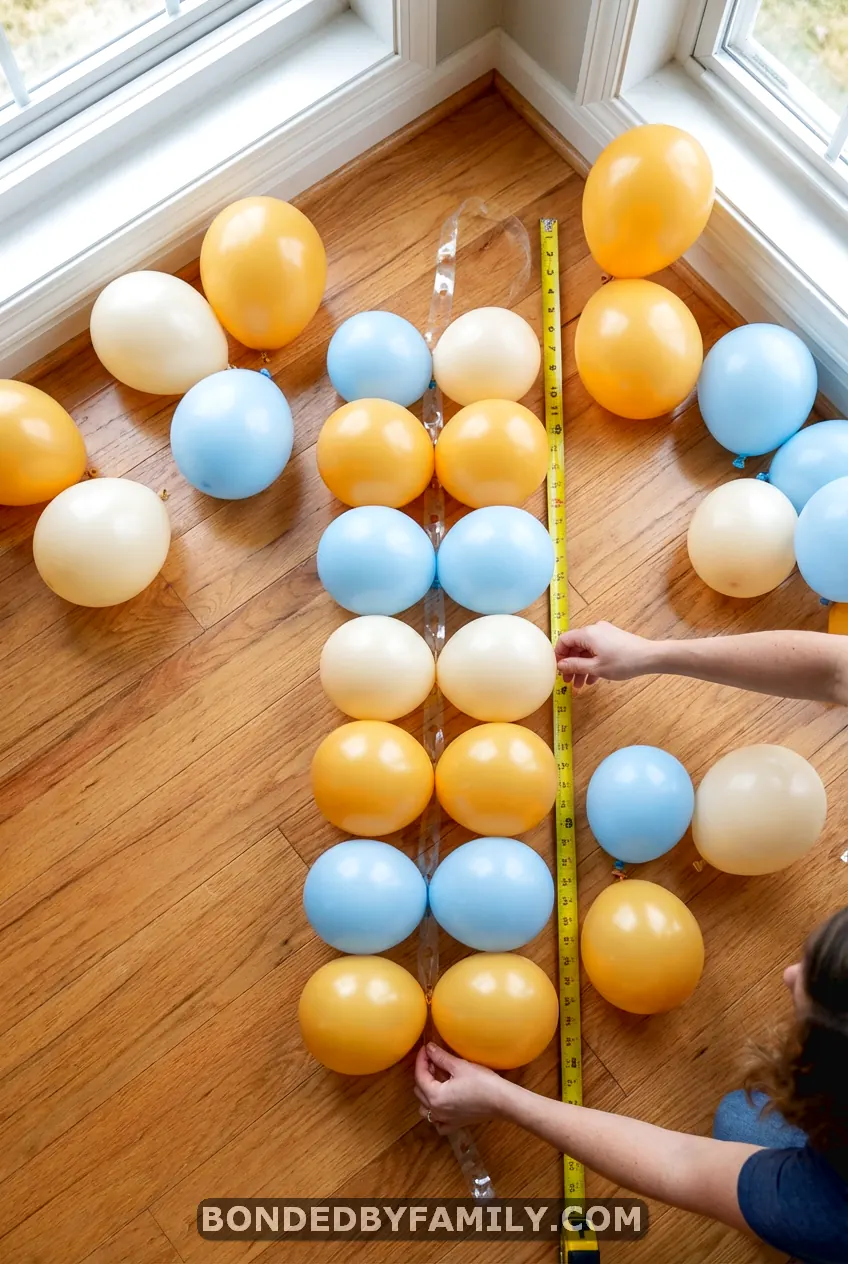
- Lay your balloon decorating strip on the floor or table. Don’t hang it yet.
- Start in the CENTER, not the end. This is crucial. Thread a large honey-yellow balloon through one hole, then a large sky blue balloon in the hole next to it.
- Work outward in both directions simultaneously. The pattern I use: large-small-small-large-medium-small-large. Alternate colors as you go, but don’t overthink perfect alternation. Natural randomness looks better.
- Use the double-balloon technique every 3-4 holes: thread two small balloons through the same hole, one slightly in front of the other. This creates dimensional clusters instead of a flat line.
- For the signature Winnie the Pooh look, create three “focal points” along your arch where you cluster 4-5 balloons close together with more yellow concentration. These become your visual anchors.
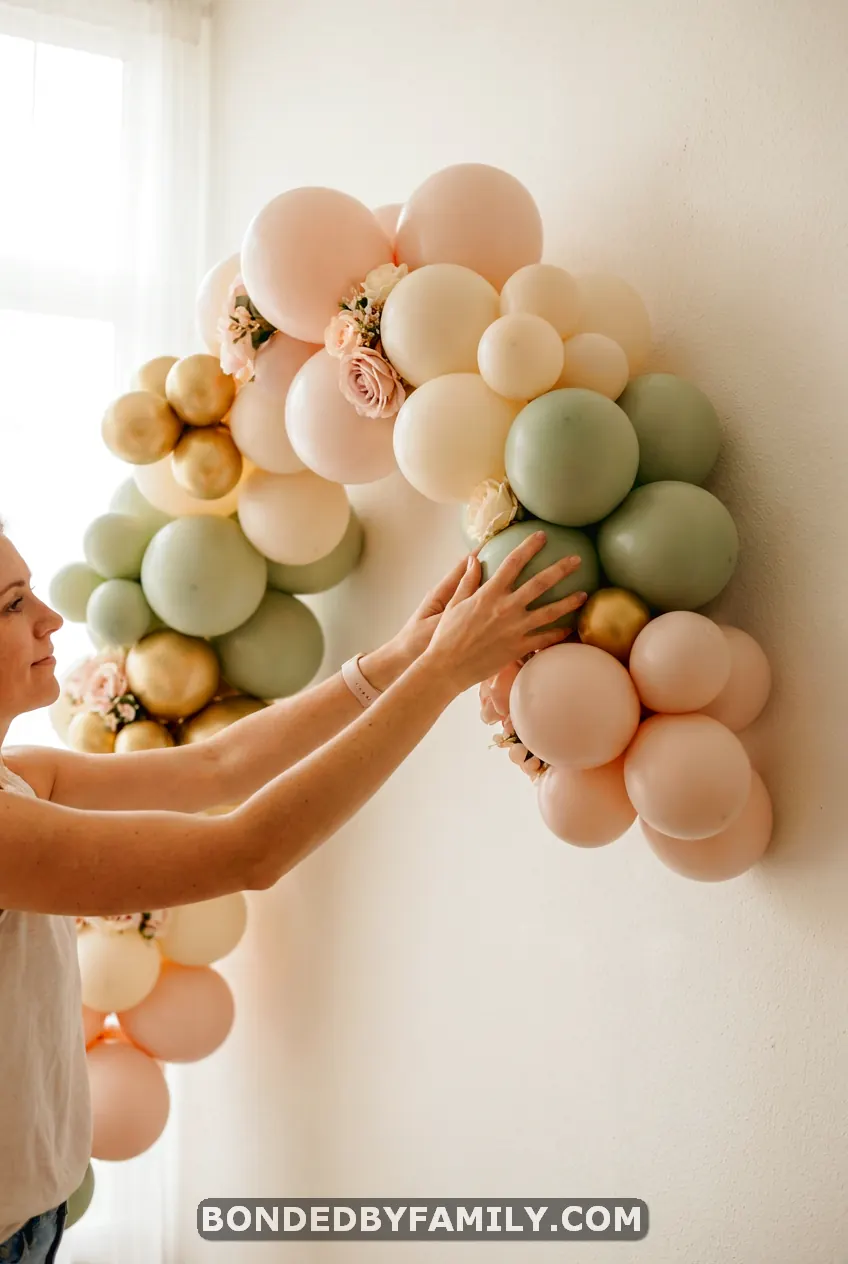
Phase 3: The Organic Curve (15 minutes)
Now comes the magic transformation from “string of balloons” to “enchanting arch”:
- Have someone help you hold both ends of your balloon strip. If you’re solo (been there), use painter’s tape to temporarily secure one end to the wall at your desired height.
- Create the curve by GENTLY bending the strip. Don’t force a perfect arch. Let it naturally droop in the middle – that’s the Hundred Acre Wood garden vibe you want.
- Secure with clear command hooks or fishing line tied to ceiling fixtures. I prefer three anchor points minimum: both ends and one in the middle.
- Step back and assess. This is when you add “fluffer” balloons using glue dots – those small balloons that fill gaps and add dimension. Stick them to existing balloons to create fullness.
The arch should look slightly wild, like it grew there organically. If it looks too perfect, you’ve overthought it.
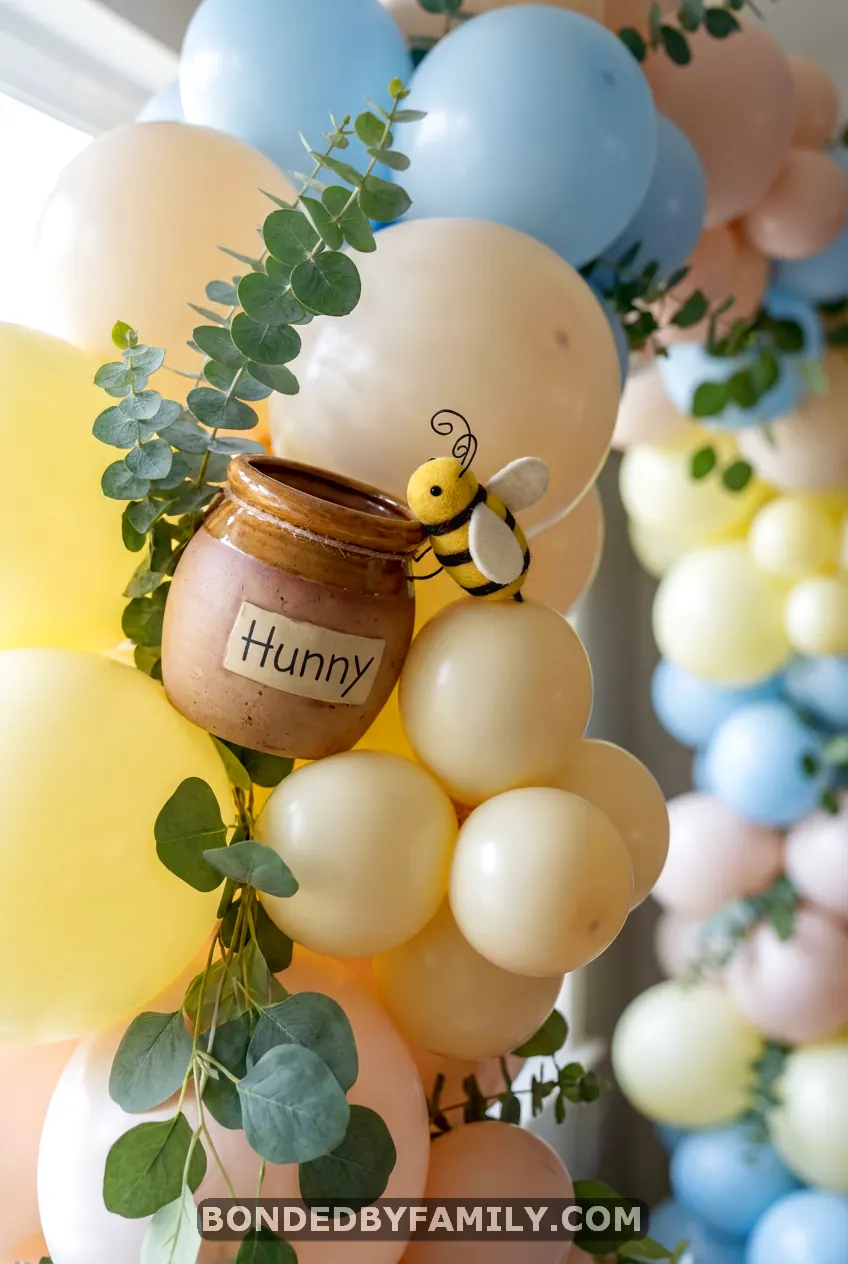
Phase 4: Hundred Acre Wood Details (10 minutes)
This is the difference between “balloon arch” and “Winnie the Pooh balloon arch”:
- Add 3-5 small honeypot props (foam or cardboard) using glue dots to attach to balloons. I found mine at Dollar Tree for $1 each.
- Integrate bee decorations – either foam stickers or small hanging bees on fishing line. Place them asymmetrically, as if they’re flying through.
- Weave in eucalyptus stems or other greenery. Thread them through balloon gaps, securing with glue dots if needed. This adds that “outdoor garden” texture.
- For the signature Pooh touch, add small coral-red balloon clusters (3-5 balloons) in two spots to reference Pooh’s red shirt. Subtle but recognizable.
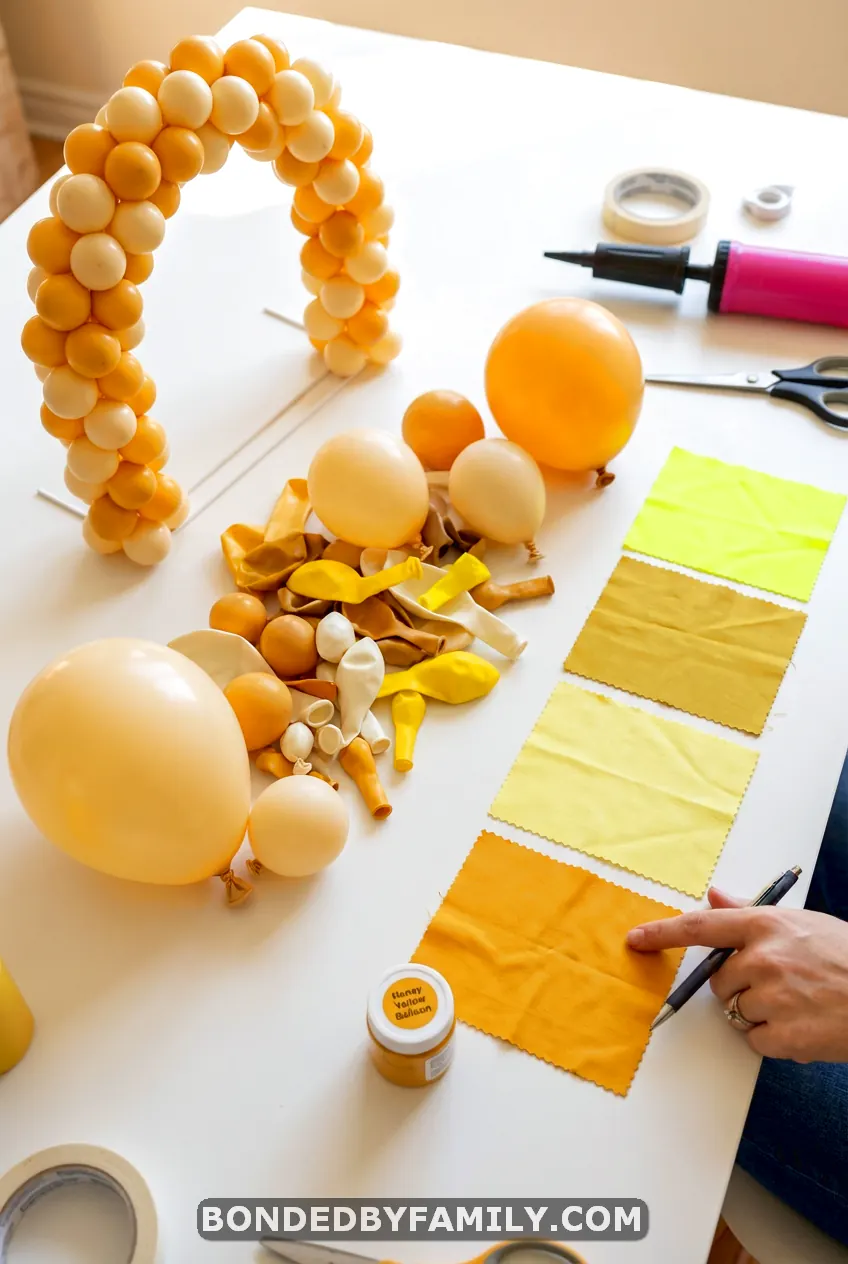
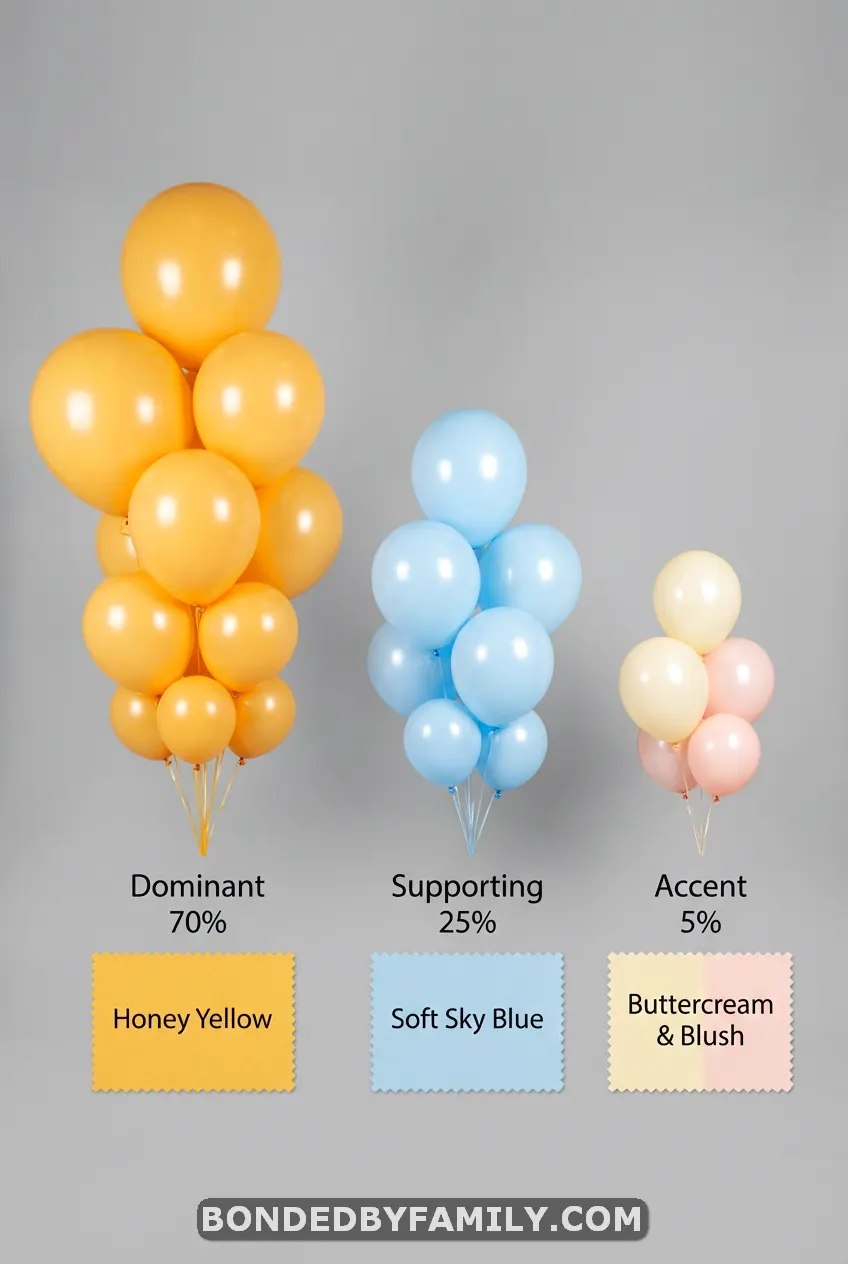
The Color Code That Makes or Breaks Your Arch
After seeing dozens of Pooh arches on Pinterest, I’ve identified the exact color formula that creates that “classic storybook” look vs the “random pastel party” look:
Dominant Colors (70% of balloons):
- Honey Yellow (not lemon, not mustard – think actual honey in a jar)
- Sky Blue (powder blue, not royal or navy)
- Cream/Ivory White (warmer than stark white)
Supporting Colors (25% of balloons):
- Sage Green (muted, dusty green)
- Peach/Apricot (optional but adds warmth)
Accent Color (5% of balloons):
- Coral Red (specifically for Pooh’s shirt reference)
The ratio matters tremendously. Too much sage green and you’ve got a eucalyptus wedding. Too much blue and it reads “baby boy shower” not “Hundred Acre Wood.” The yellow should slightly dominate – it’s the honey, after all.
When shopping, test the colors together BEFORE buying. Hold three yellows next to three blues and one white under store lighting. If the yellow looks neon or the blue looks primary, keep looking.
Budget Breakdown: DIY vs Professional
I’ve priced this out both ways multiple times:
Professional Balloon Arch (6-8 feet):
- Setup fee: $200-400
- Balloons & materials: $100-150
- Delivery & installation: $50-100
- Total: $350-650
DIY Following This Guide:
- Balloons (purchased from party supply store): $35-45
- Balloon decorating strip & glue dots: $8
- Electric pump: $18 (one-time purchase, use forever)
- Props (honeypots, bees, greenery): $15-20
- Total: $60-75
Savings: $275-575
But here’s what the price comparison doesn’t show: the DIY version takes 90 minutes of active work. If your time is worth $100/hour, maybe the professional route makes sense. If you enjoy crafting or want to customize every detail, DIY wins hands down.
One major advantage of DIY: you can adjust size on the fly. Guest count lower than expected? Make a smaller arch. Need to fill more wall space? Add more balloons to the ends. Professionals don’t offer that flexibility day of.
Common Mistakes I’ve Watched People Make (So You Don’t Have To)
Mistake 1: Inflating balloons days in advance
Latex balloons lose volume fast. Air-filled (not helium) balloons stay full for 12-24 hours max before noticeable deflation starts. I learned this the hard way when my Friday-night prep resulted in sad, wrinkly balloons by Sunday afternoon. Inflate 3-6 hours before the event, no earlier.
Mistake 2: Mixing matte and metallic balloons
Those shiny gold “honey yellow” metallic balloons look great in packaging but clash horribly with matte pastels. They create visual noise. Stick with one finish throughout – matte for classic Pooh, all metallic if you’re going full glam.
Mistake 3: Forgetting to account for helium vs air
Helium makes balloons float. Air makes them stay put. For an arch, you WANT air-filled balloons because they’re easier to shape and secure. Helium creates weird floating sections that pull away from your structure. Unless you’re creating a specific floating element, skip the helium entirely.
Mistake 4: Over-tying balloon knots
When you tie too tightly, balloons deflate faster because you’re creating pressure points. Tie snug but not strangling. The balloon should feel slightly firm, not rock-hard.
Mistake 5: Hanging the arch before adding details
It’s so much easier to add honeypots, bees, and greenery when the arch is on a table vs when it’s 6 feet in the air. Complete your decorating at ground level, THEN hang.
Three Arch Variations for Different Spaces
The Classic Doorway Arch (6-8 feet)
Perfect for: Entry photos, dessert table backdrop
Balloon count: 120-150
Hanging method: Command hooks on the door frame
Assembly time: 90 minutes
Best for small to medium parties where you want one statement piece.
The Grand Wall Installation (10-12 feet)
Perfect for: Gift table, photo booth backdrop
Balloon count: 200-250
Hanging method: Ceiling command strips with fishing line
Assembly time: 2 hours
This is the show-stopper that makes people audibly gasp when they walk in. Worth the extra effort for milestone birthdays or large baby showers.
The Minimalist Table Runner (3-4 feet)
Perfect for: Dessert table, gift table, accent
Balloon count: 60-80
Placement: Laid directly on the table surface, woven around other decor
Assembly time: 45 minutes
Great for smaller venues or when you want balloon elements without dominating the space.
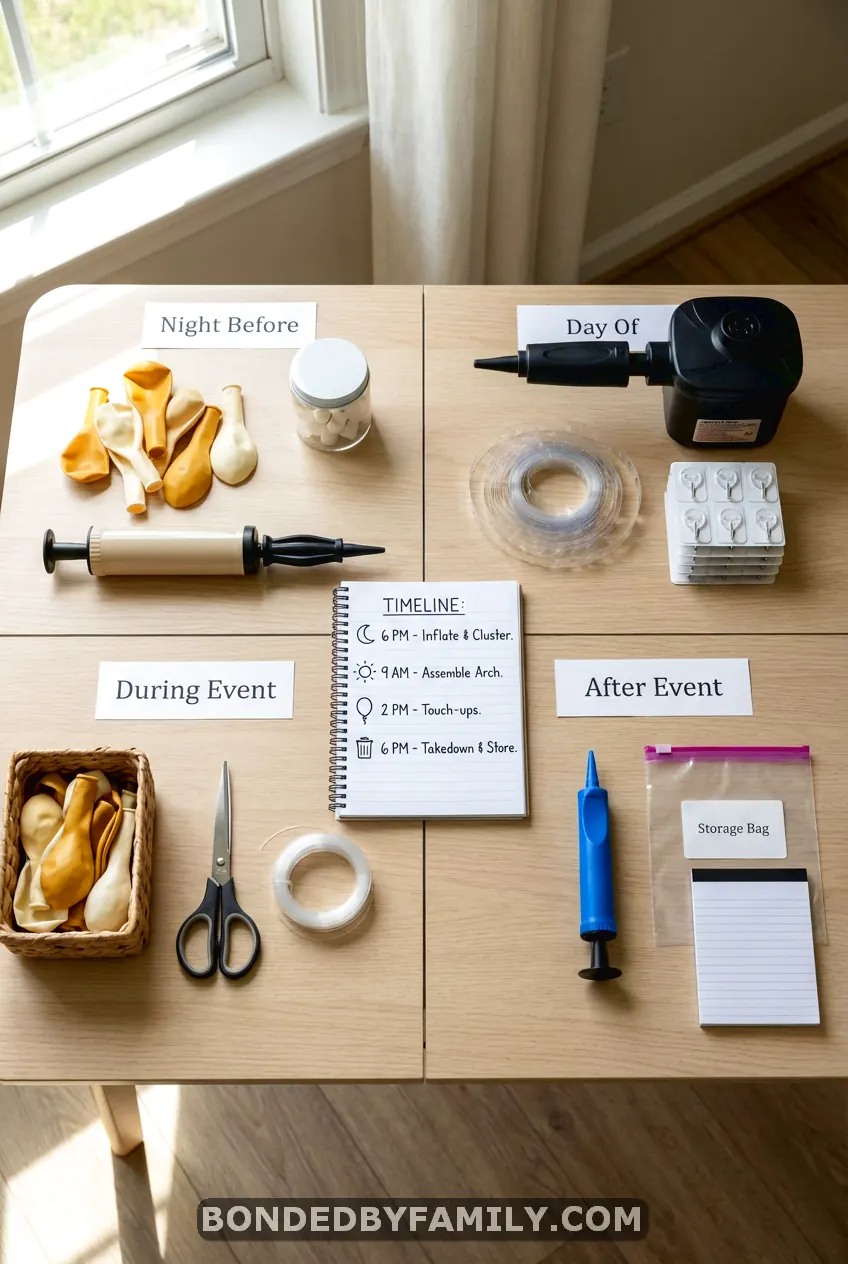
Making It Last: Setup Timeline & Maintenance
The Night Before (Optional but Recommended):
- Inflate 10-15 test balloons to check color accuracy and sizing
- Organize all materials in one location
- Measure and mark your hanging points
- Assemble any honeypot or bee props
Day of Event (3-6 Hours Before):
- Hour 1: Inflate all balloons using your three-size method
- Hour 1.5: Thread balloons onto decorating strip
- Hour 2: Hang basic arch structure
- Hour 2.5: Add fluffer balloons and create dimensional clusters
- Hour 3: Integrate honeypots, bees, greenery
During Event:
- Keep 10-12 extra inflated balloons in a back room for emergency replacements
- A balloon or two will pop (it’s just statistics) – don’t panic, just swap it out
- Avoid placing an arch near candles, heat sources, or direct sunlight
- If outdoors, secure extra well – even light wind can destabilize
After Event:
- Don’t try to save the arch for reuse; deflating and re-inflating never looks as good
- Pop balloons methodically vs letting them slowly deflate for days (less creepy)
- Save the balloon decorating strip for your next project – it’s reusable 5-10 times
When to DIY vs When to Hire
I recommend DIY if:
- You have 2+ hours of uninterrupted time day of
- You enjoy hands-on projects and don’t stress about minor imperfections
- Budget is tight ($300+ makes a difference)
- You want complete creative control
- You’re okay with a “charming handmade” aesthetic vs magazine-perfect
Hire a professional if:
- You’re hosting 75+ guests and have zero spare time
- The event is ultra-formal, where every detail must be flawless
- You have mobility issues that make prolonged standing/reaching difficult
- You’re juggling multiple major event responsibilities already
- You want insurance (pros guarantee their work and fix issues)
There’s no shame in either choice. I’ve done both depending on the circumstances. For my daughter’s first birthday, I DIY’d because I wanted that personal touch. For my sister’s baby shower, where I was also managing catering coordination, I hired out because I was already maxed.
The Winnie the Pooh Palette: Beyond Balloons
Once you’ve mastered the balloon arch, extending the color palette to other party elements creates cohesion:
Tableware: Cream plates with honey-yellow napkins
Backdrop: White or light wood (avoid busy patterns that compete with balloons)
Table runner: Burlap or natural linen (brings in that “Hundred Acre Wood” earthiness)
Florals: White daisies, sunflowers, or eucalyptus (simple, garden-inspired)
Lighting: Warm white string lights or honey-pot lanterns
The key is keeping everything soft and storybook-simple. Winnie the Pooh isn’t about sophistication or glam – it’s about gentle, nostalgic charm. Every element should feel like it could exist in A.A. Milne’s Hundred Acre Wood.
Your Balloon Arch Journey Starts Now
You’ve got the color formula that mimics actual honey and spring skies. You know the three-size inflation technique that creates organic dimension instead of cookie-cutter uniformity. You understand why timing matters (don’t inflate three days early), why finish matters (matte over metallic), and why asymmetry beats perfection.
Most importantly, you’re not going to panic when a balloon pops during setup or when the curve doesn’t look exactly like that professional photo you saw on Pinterest. Because here’s the truth nobody shares: those “perfect” arches in photos often took 3-4 hours to create and were adjusted seventeen times before the photographer captured that one flawless angle.
Your handmade Winnie the Pooh balloon arch will have personality. It’ll have that slightly-wild garden quality that matches the Hundred Acre Wood aesthetic. And when someone asks, “Did you make that yourself?” you’ll be able to say yes with pride, knowing you saved $300+ and created something meaningful with your own hands.
Now go forth and create some honey-sweet magic.