Your kid has announced the theme about 40 times this week. Paw Patrol. Non-negotiable. You’ve said yes, and now you’re standing in your living room, wondering how to make it look like Adventure Bay without spending $300 at Party City.
I’ve planned more than a few of these parties — including one where I spent way too much on store-bought supplies and another where I did most of it myself for under $50. The second one got more compliments. Kids don’t see price tags. They see paw prints and Chase’s blue and red colors, and they completely lose their minds.
These 19 paw patrol party decorations are ranked from completely free to full showstopper, so you can pick your level and build from there. Each one comes with what it costs, how long it takes to set up, and the things most party guides never bother to mention — like which decorations children notice and which ones go straight into the trash by 4 p.m.
Before Guests Even Arrive: Entrance Decorations
1. The Chalk Paw Print Trail
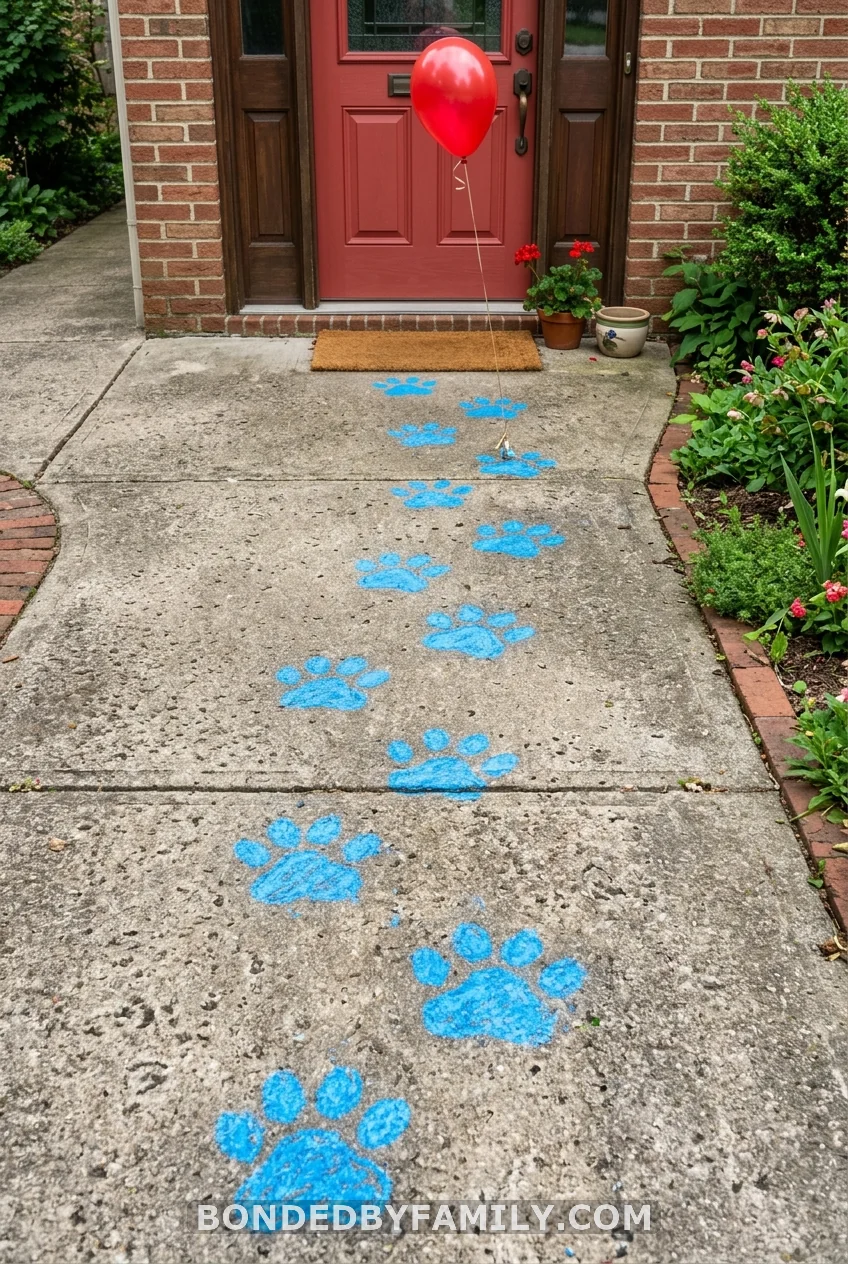
Grab blue or red sidewalk chalk and draw a trail of paw prints from the curb to your front door. Takes 10 minutes. Costs nothing if you already own chalk. Every single child arriving at the party will stop, point, and say “paw prints!” — usually twice. Do this the morning of the party, not the night before. Wet pavement erases it.
2. “Welcome to Adventure Bay” Foam Board Sign
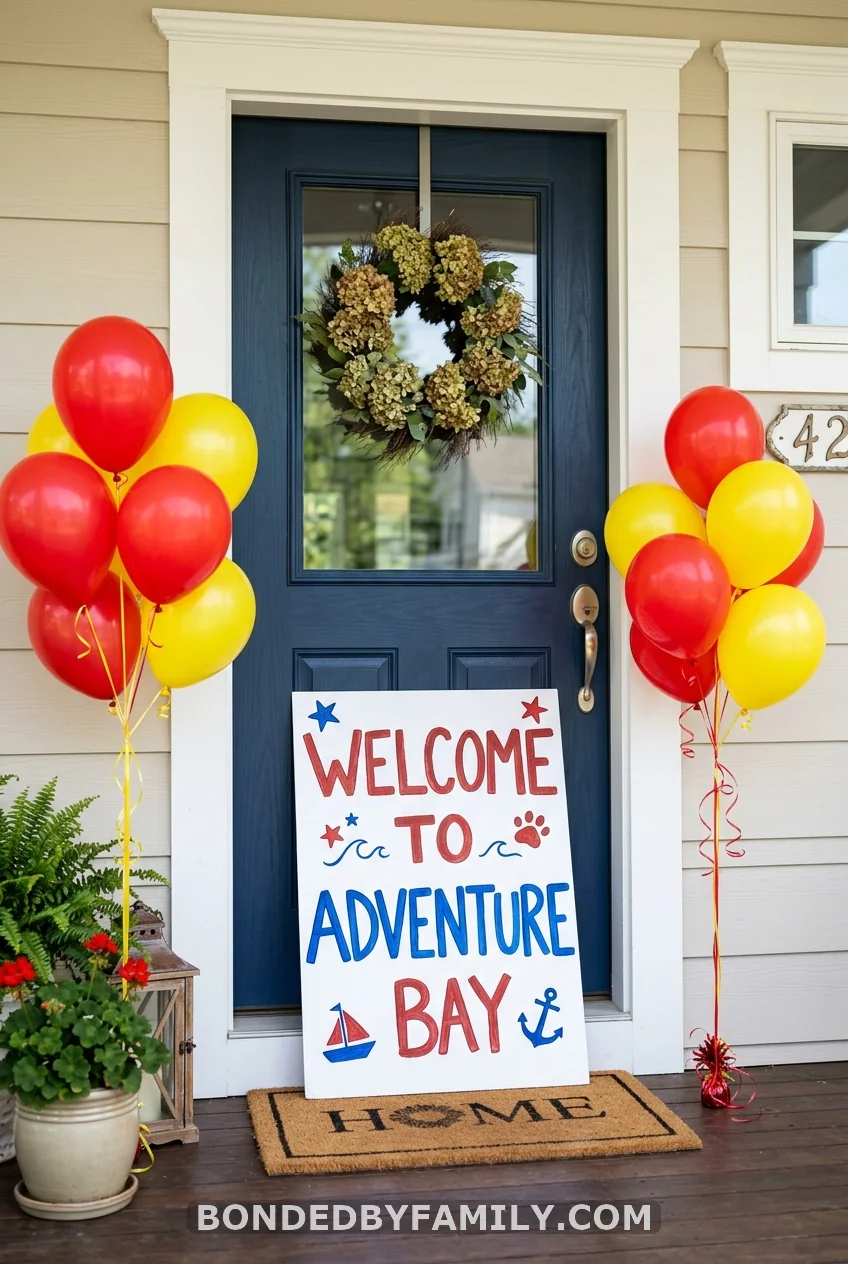
One piece of white foam board from Dollar Tree ($1.25), blue and red markers, and 20 minutes of your time. Write “Welcome to Adventure Bay” in large block letters. Draw a paw print in the corner. That’s the whole project.
You do not need a Cricut. Freehand works at party scale — no four-year-old is auditing your calligraphy. Prop it against the front door or tape it to the entrance wall. Add two or three red and blue balloons on either side to frame it, and you’ve made the kind of entrance photo parents want to take the moment they walk in.
Cost: $1.25–$3. Setup time: 20 minutes.
3. The DIY Balloon Arch: Your Room’s Biggest Statement Piece
This is the decoration that changes the entire feel of the room. When children walk in and see a balloon arch framing the dessert table, something shifts — their faces go from excited to completely overwhelmed. It’s also the piece parents photograph most, which means it ends up exactly where you want it.
Most balloon arch tutorials show you the beautiful finished product and skip the part where you’re untangling 50 balloons at 11 p.m. with the party starting in 12 hours. This one doesn’t.
What You’ll Need
| Item | Source | Cost |
|---|---|---|
| 11″ latex balloons — red, blue, yellow, white (100-count) | Amazon | $12–16 |
| Balloon arch kit with pump and strip | Amazon | $10–13 |
| Balloon arch stand (optional but recommended) | Amazon | $18–25 |
| Zip ties or fishing line | Dollar Tree | $1.25 |
| Low-tack command hooks | Dollar Tree | $1.25 |
Total with stand: $42–56 | Without stand: $24–31
If you’re hanging the arch from a wall or doorframe, skip the stand. Freestanding behind the dessert table? The stand is worth every cent — it gives you mobility and height.
Step-by-Step Instructions
Step 1: Sort and inflate Separate balloons into four color piles: red, blue, yellow, white. Inflate 80% to 11 inches and 20% to 5 inches. The small ones fill gaps. Use the hand pump. Inflating 80 balloons by mouth will leave you lightheaded before the first guest rings the doorbell.
Step 2: Build color clusters The most-saved Paw Patrol balloon arches on Pinterest don’t alternate colors one by one. They cluster them. Grab four balloons — one red, one blue, one yellow, one white — and twist them together at the base so they form a single puffed unit (a “quad”). Make 15–20 quads total.
Step 3: Attach to the strip or stand Using a balloon strip: push the knotted base of each balloon through the holes in the plastic strip. Alternate your quads along the strip, then fill visible gaps with the 5-inch filler balloons in white or yellow. Using a stand: start at the bottom and twist quads directly onto the metal frame, working upward in a spiral.
Step 4: Shape from six feet back Step away from the arch and look at it from the distance a guest would see it. That’s your actual view. Adjust any quads that stick out at an awkward angle. Tuck the small filler balloons wherever you see a gap or a flat spot.
Step 5: Anchor it Balloon arches tip over. They slide. They fall at the worst possible moment, which is always when the birthday child is mid-blowing-out-candles. Secure the base of the stand with a full water bottle zip-tied to each leg, or tape the strip ends to the wall with command strips. This step takes two minutes and prevents the single most common balloon arch disaster.
Pro Move: Skew the Color Balance
Most parents do equal thirds — red, blue, yellow. But if your child is obsessed with Chase specifically, double the navy blue and reduce the yellow. Skye party? Swap in pink and purple entirely and replace yellow with silver. The arches that get the most saves on Pinterest are the ones clearly built around one pup, not the ones that look like a primary-color school supply display.
Common Mistakes to Avoid
- Overinflating: Balloons blown past 11 inches will pop when they touch each other or the command strip in warm rooms. 11 inches is the ceiling.
- Building the night before: Latex balloons shrink noticeably after 12–18 hours at room temperature. Build it the morning of the party.
- No filler balloons: The 5-inch whites and yellows are what separate a full, lush arch from a sparse one. Do not skip them.
- Skipping the anchor: An unanchored arch falls over. Plan for it and prevent it.
Setup time: 45–60 minutes. It is absolutely worth every minute.
4. Free Printable Badge Banner
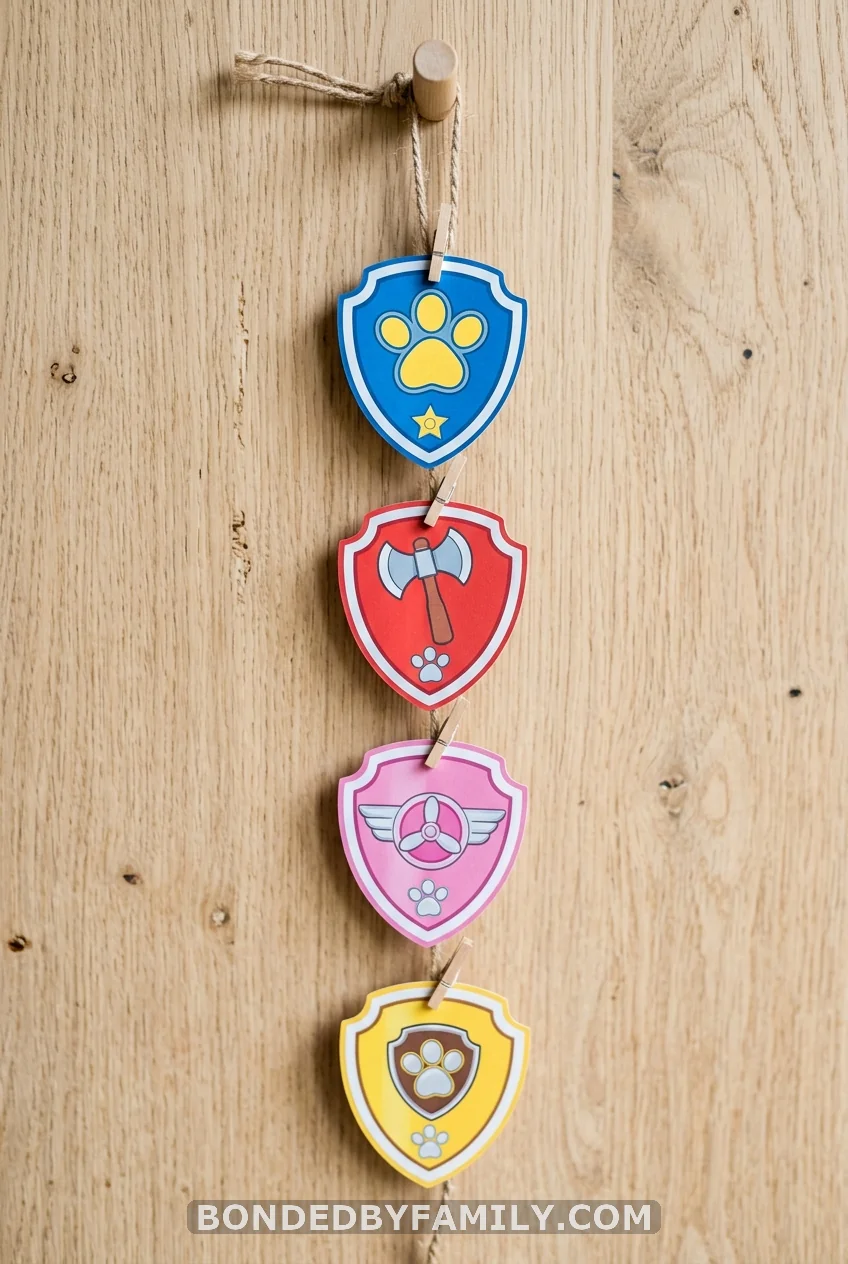
Search “free Paw Patrol badge printables” on Pinterest or go directly to the Nickelodeon Parents website. Print on cardstock ($8 for 250 sheets at Walmart), cut out, hole-punch the top corners, and thread twine through each badge. Span it across a wall or doorframe. Total cost with paper and ink: $2–4.
For a longer banner, print two full sets and alternate badges with paw print cutouts from the same sheets. This is the kind of decoration that looks custom and costs almost nothing.
The Dessert Table Zone
5. Lookout Tower Centerpiece

The Lookout Tower is the most recognizable structure in the entire Paw Patrol world. Kids clock it within seconds. Building your own costs almost nothing.
Take a large Quaker Oats cylinder — the round cardboard kind, about 10 inches tall. Cover the outside in blue-grey construction paper or hit it with one coat of grey spray paint. Wrap a strip of red cardstock around the top third for the tower’s distinctive red band. Print a Paw Patrol logo image at home, cut it out, and glue it to the side.
Place the tower at the center of the dessert table. Arrange a few Paw Patrol figurines your child already owns around the base — action figures, small vehicles, whatever’s in the toy bin. Add two small balloons in red and blue on either side. The figurines your kid already owns become the decoration. No extra cost. If your child has the actual toy Lookout Tower (retails at $49–85 at Target), put it on the table. It reads as a deliberate centerpiece and doubles as the present reveal moment.
DIY cost: Under $2. Time: 20 minutes.
6. DIY Fire Hydrant from an Oatmeal Container
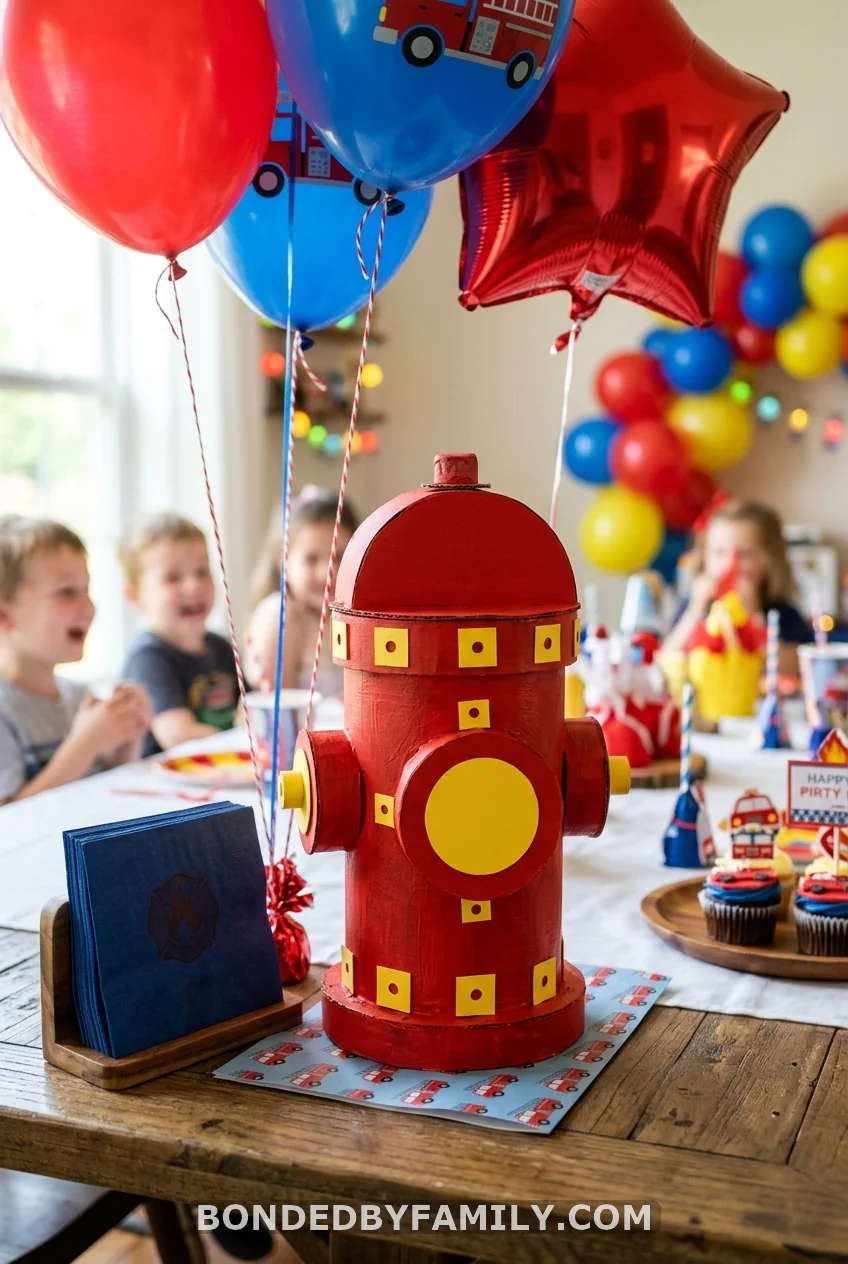
Same oatmeal container concept, different pup. This one’s Marshall’s territory.
Paint the outside of a large Quaker Oats canister red — two coats of acrylic craft paint ($1.99 at Hobby Lobby or Michaels) covers the label cleanly. Let it dry fully (about 30 minutes between coats). Cut two small hexagonal “bolt” shapes from yellow cardstock and glue them to opposite sides. Cut a rounded cap shape from red cardstock, slightly wider than the top of the canister, and tape it on to create the classic hydrant dome.
Make two or three of these and scatter them along the dessert table or use them as end caps framing the food layout. Children respond to this decoration with immediate recognition — which is the entire point.
Cost: $2–4 per hydrant. Time: 15–20 minutes each.
7. Dollar Tree Tin Bucket Centerpieces
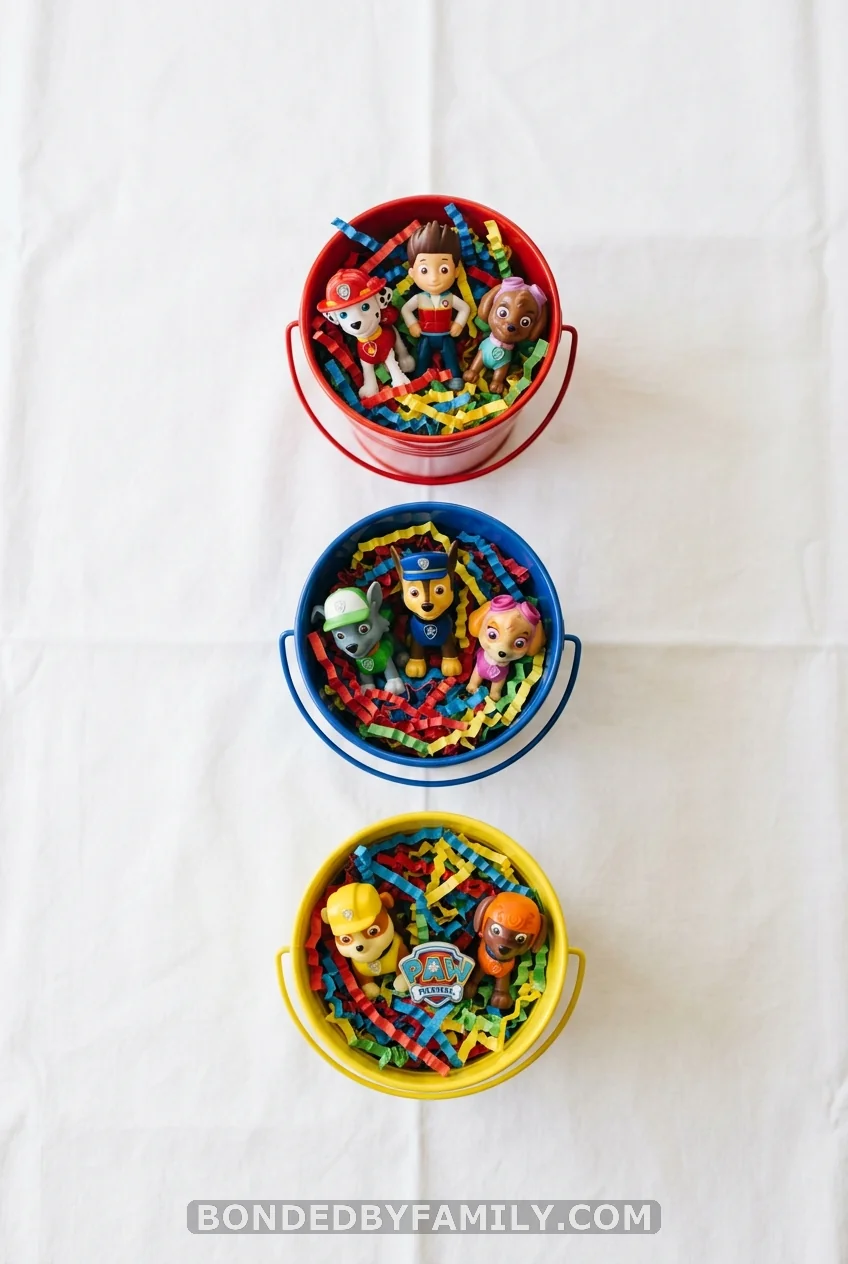
Dollar Tree tin buckets. Three colors: red, blue, yellow. Fill with matching tissue paper. Tuck in a small figurine or a printed character cutout. One at each end of the dessert table. Done. Total cost: $3–5. Time: 5 minutes.
8. Backdrop: Bought vs. DIY
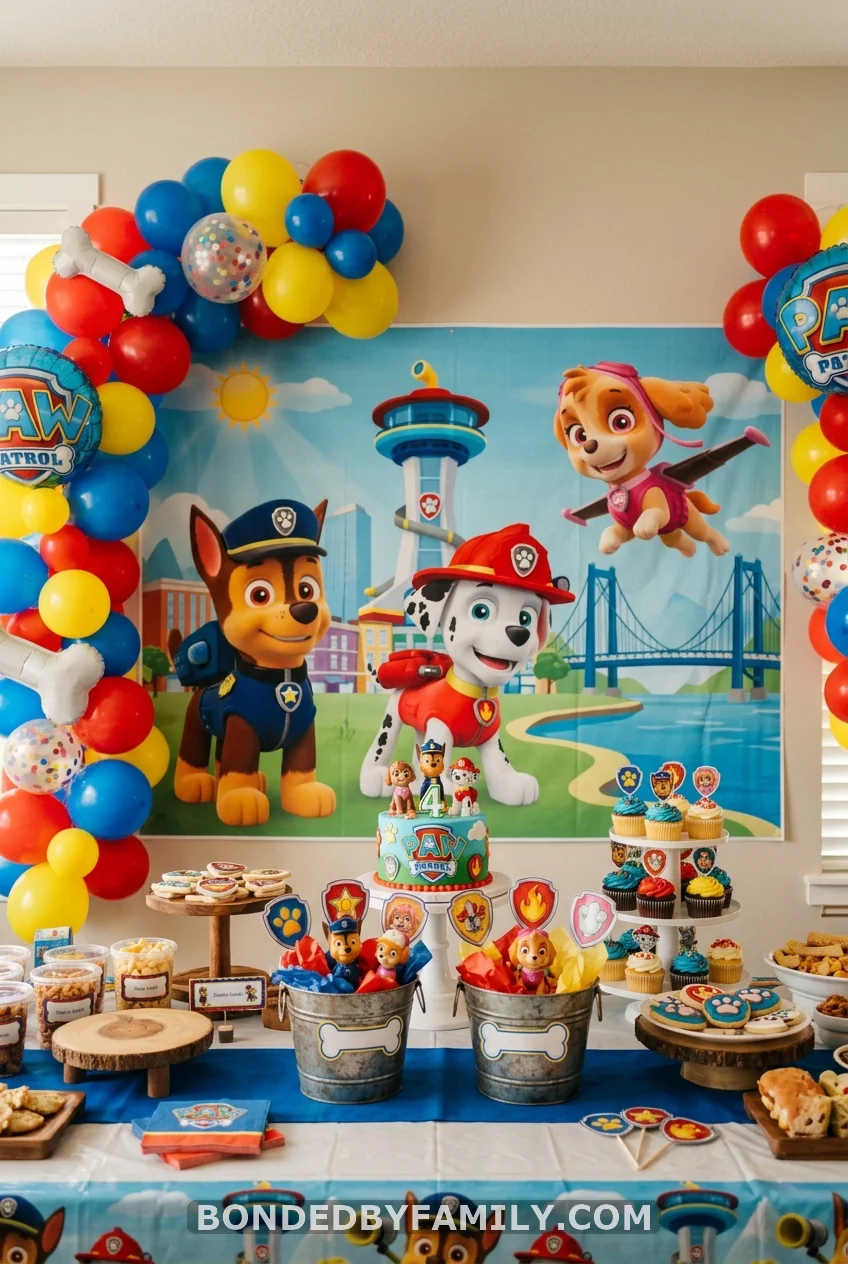
Purchased Paw Patrol backdrops run $12–18 on Amazon — search “Paw Patrol party backdrop” and filter to polyester (holds up better than the thin paper versions). The 5×3 foot size covers a standard dessert table. The 7×5 fills a wall and photographs better.
DIY version: Tape together three sheets of large blue butcher paper (Walmart sells rolls for $8) to cover a 5-foot wall section. Print character images at a copy shop — full-color 8×10 prints at Staples or FedEx cost $1.50–2 each. Tape them across the paper at child height. Stamp or stencil a row of paw prints along the bottom edge using red craft paint and a foam stamp ($2 at Michaels).
The DIY version takes 45 minutes. The bought version takes 5 minutes. Both photograph well. Choose based on your time budget, not aesthetics — the difference in a photo is minimal.
What Kids Notice Most
9. Character Mask Photo Booth Wall
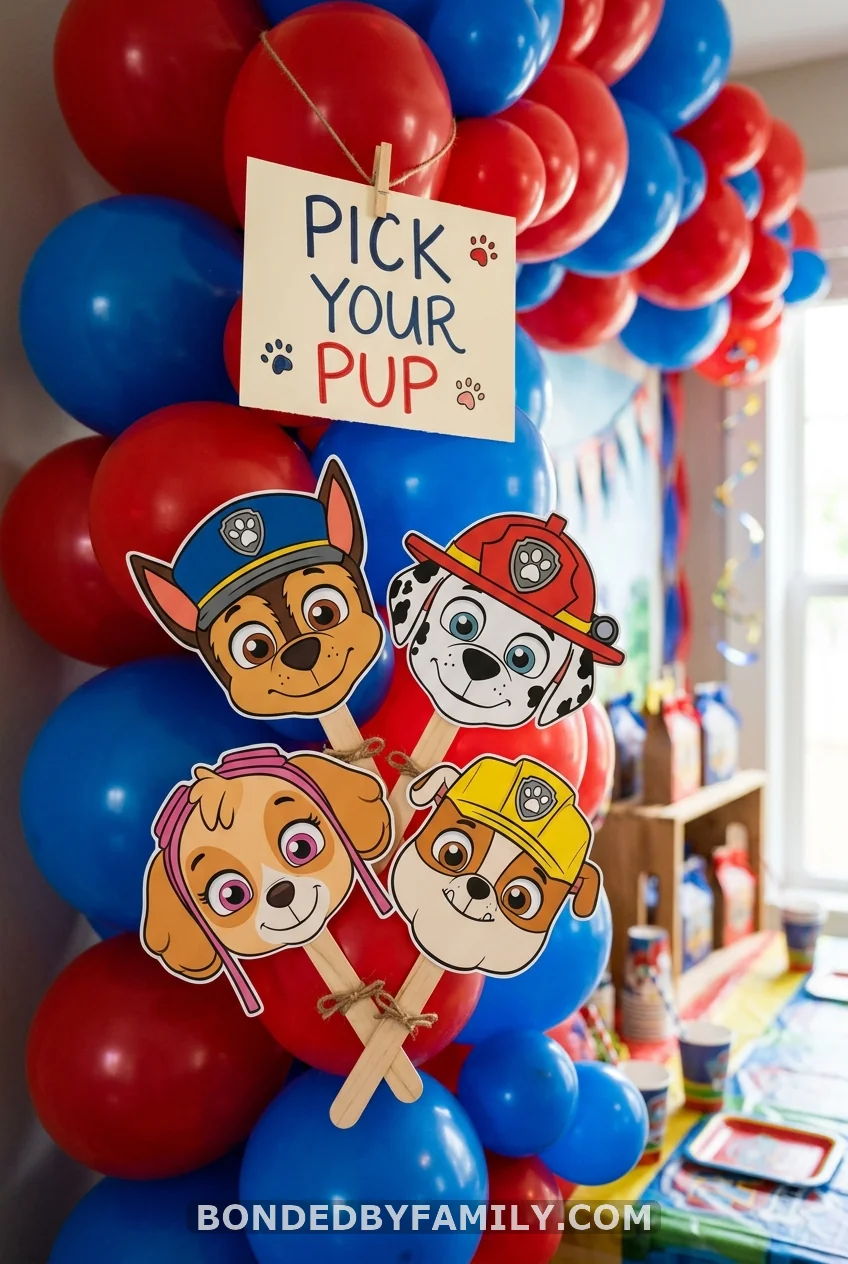
Print free character masks from the Nickelodeon Parents website — they have Chase, Marshall, Skye, Rubble, and Zuma. Print on cardstock, cut along the outlines, and tape a craft stick or wooden dowel to the back of each one. Pin them to a foam board or wall section with a notecard that says “Pick Your Pup.”
Kids spend 10 minutes at this station choosing their character. They wear the masks during cake. They take them home. This is also your party favor, sorted, for under $3 total.
10. Party Hat Station: Marshall’s Fire Hat and Rubble’s Hard Hat
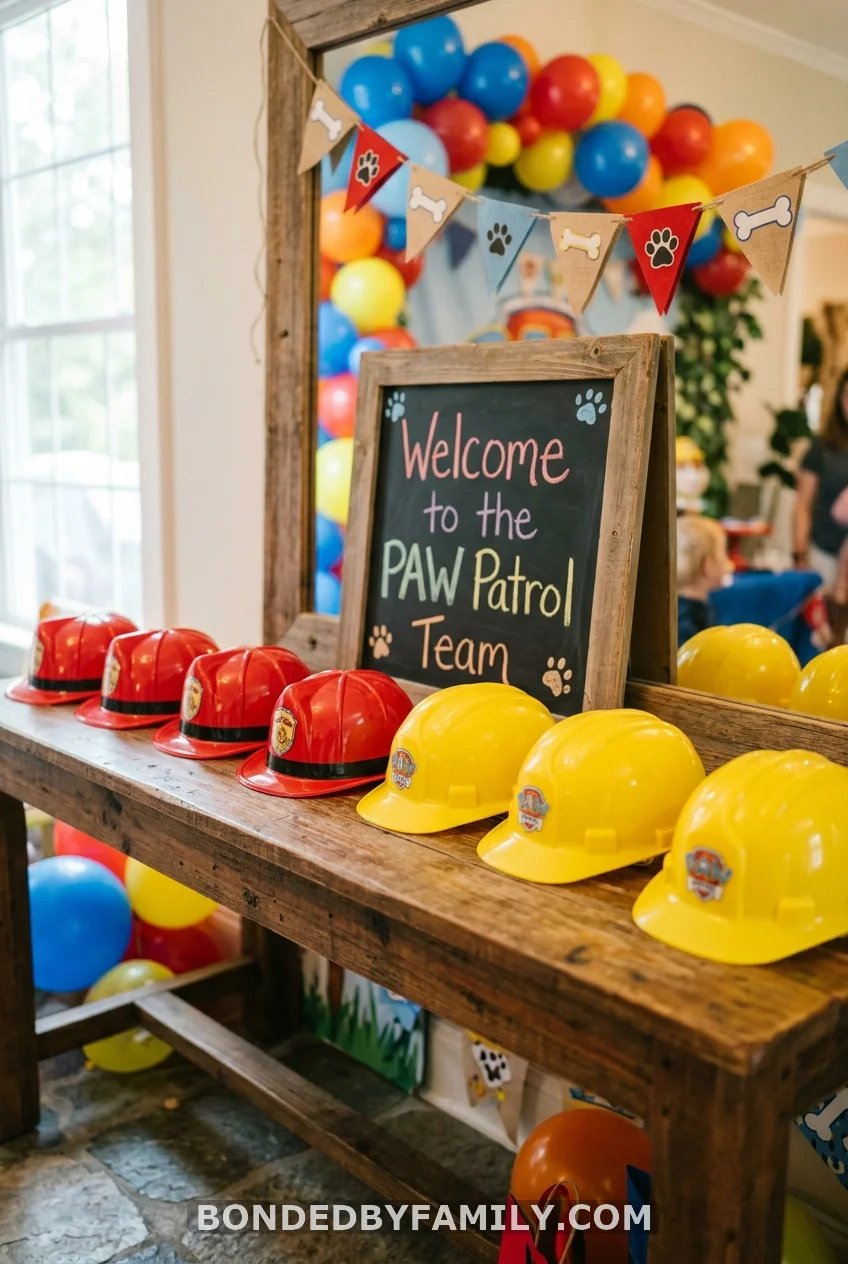
Red plastic firefighter hats (Marshall) and yellow construction hard hats (Rubble) run $1–1.50 each in bulk on Amazon or at Party City. Set them out near the entrance with a handwritten sign: “Welcome to the PAW Patrol Team — Pick Your Hat!”
When a child chooses between being Marshall or Rubble, you’ve made them feel like a character in the show. That moment of identity costs about $8 total for a party of 12 and produces more party photos than the balloon arch.
For girls, add pink hats with a cardstock helicopter blade or a set of wings glued to the front for Skye. Five minutes of prep, outsized payoff.
11. Paw Print Chair Backs

Cut paw print shapes from red or blue cardstock. Tie one to each chair back with a length of ribbon. Under $3. Takes 15 minutes. This small touch photographs beautifully and costs almost nothing.
12. Color-Coded Balloon Clusters by Character
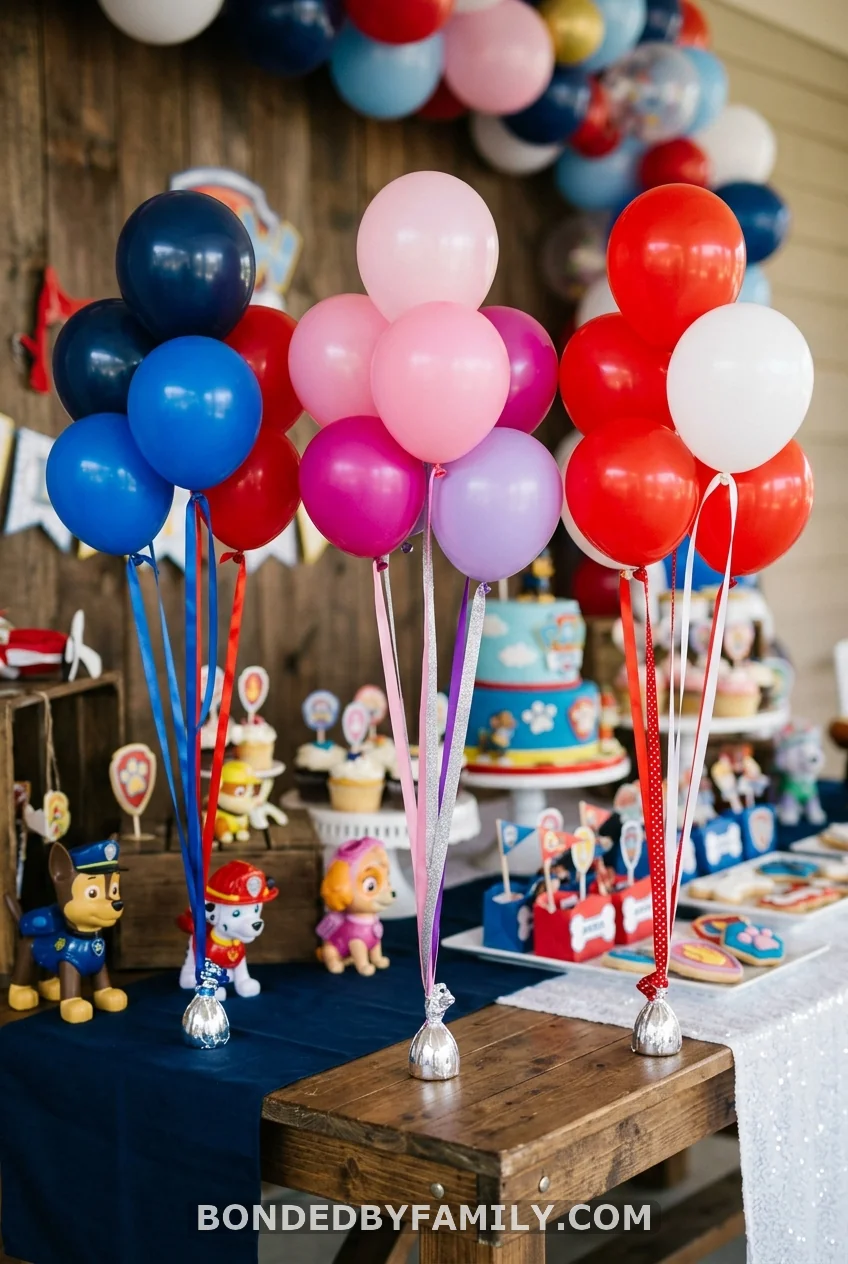
Instead of a generic balloon mix dumped in a vase, make small clusters and assign each one to a specific pup. Chase = navy blue and red. Marshall = bright red and white. Skye = pink and purple. Rubble = yellow and orange. Zuma = teal and orange.
Place these clusters at the corners of your party room or along the edges of the dessert table. The kids who know their characters by color — and at age 3–5, many of them absolutely do — respond to this with immediate glee. It also gives adults who aren’t familiar with the show something to talk about.
Cost: $8–12 for a mixed latex balloon pack. Time: 20 minutes.
13. DIY Dog Bone Birthday Banner
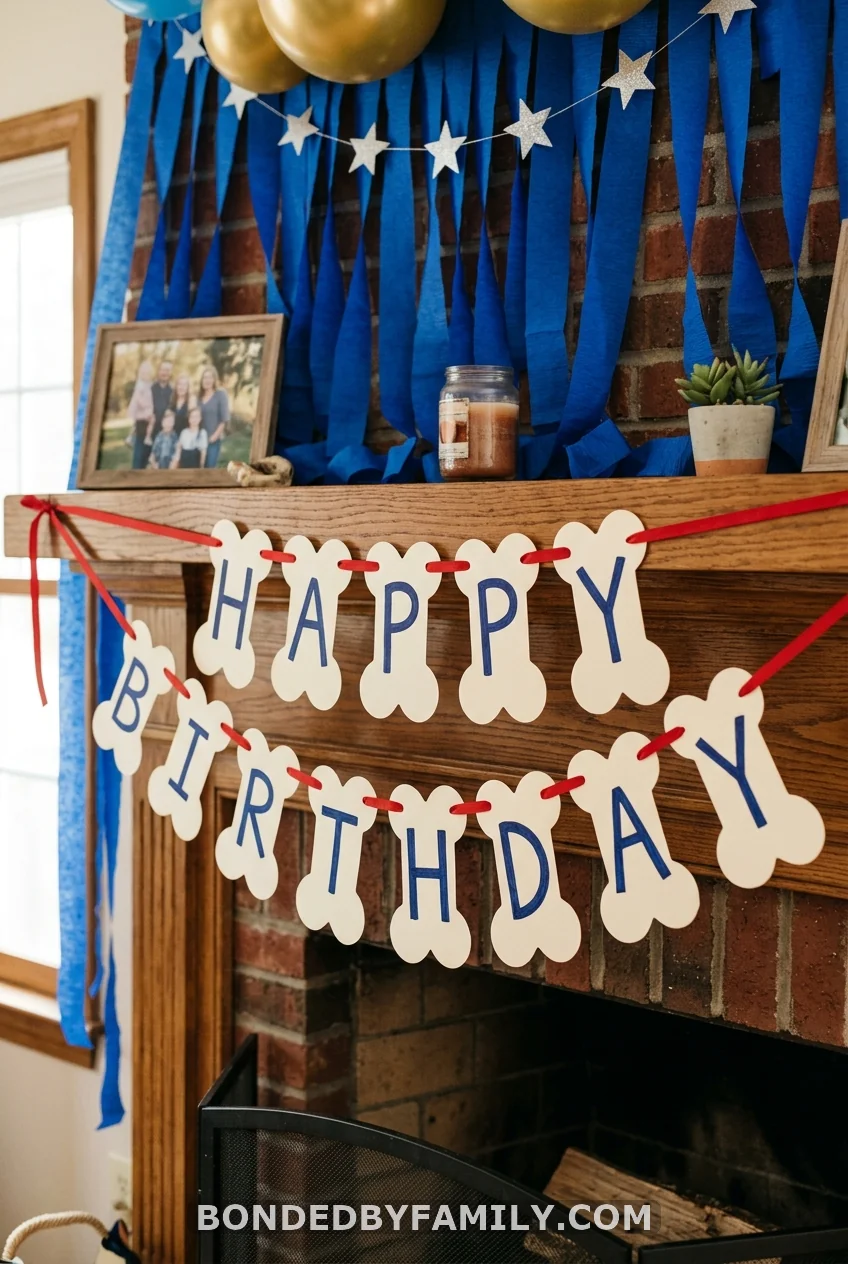
Draw and cut 13 dog bone shapes from white cardstock — one per letter in “HAPPY BIRTHDAY” (12 letters, plus one blank spacer between the two words). Write one letter per bone in bold red or blue marker. Punch two holes at the top of each bone and thread red ribbon through, spacing bones evenly.
The charm of this banner isn’t that it’s pristine. It reads as handmade, which at a kids’ party reads as thoughtful. Parents photograph it the same way they photograph $14 Party City alternatives.
Specifics: – Cardstock: 2 sheets of white ($0.50 at Walmart’s craft section or use heavy printer paper) – Ribbon: 3 yards of red, $2.50 at any craft store – Markers: Whatever you have – Time: 30 minutes – Total cost: $3–4
Hang it above the dessert table, across a mantel, or over the doorway. The bone shapes carry the dog theme without requiring a character logo in sight.
14. Dollar Store Layered Tablecloth System
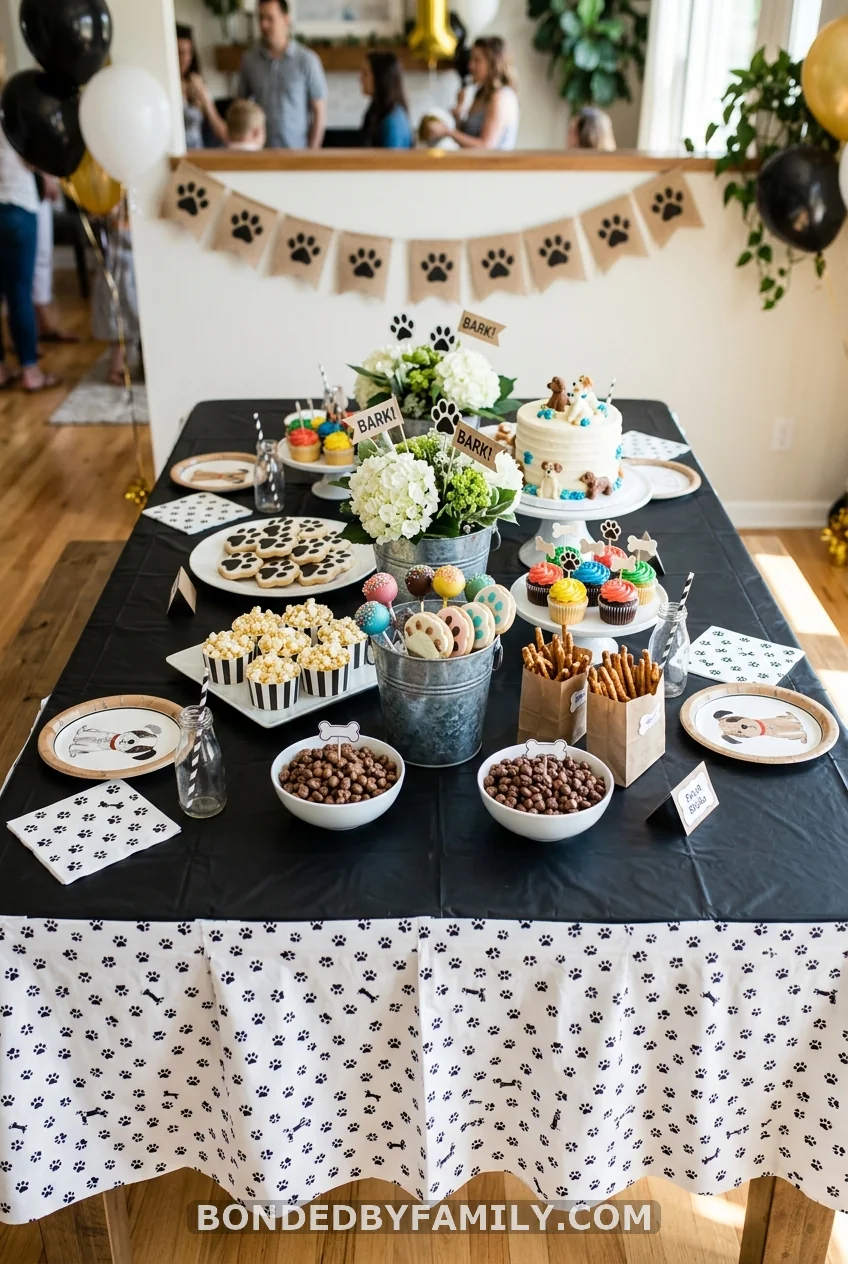
Black tablecloth flat on the table surface. Paw print tablecloth draped over the front edge as a skirt, taped to the top cloth at intervals. This layered approach — shared repeatedly by real parents on Pinterest — photographs far better than a single flat tablecloth, makes the table look intentional, and costs $2.50 total at Dollar Tree.
The Mistake Most Parents Make — And What to Do Instead
15. Why Themed Party Kits Almost Never Deliver
My son’s third birthday. I bought the official Paw Patrol party kit — the shrink-wrapped box with plates, napkins, cups, and tablecloth. Cost: $27 at Target. The plates went in the trash after lunch. The cups got knocked over within 20 minutes. The tablecloth had a juice stain before the cake came out.
Meanwhile, the decorations people photographed all afternoon? The chalk paw prints on the sidewalk (free). The fire hydrant from an oatmeal container ($2). The balloon arch built the morning of the party ($38).
Here’s the actual math:
| Store-Bought Kit Item | Cost | Lifespan at Party |
|---|---|---|
| Character plates (16 ct) | $6–8 | 45 minutes |
| Matching napkins | $4–5 | One course |
| Themed cups | $5–7 | Until first spill |
| Tablecloth | $4 | Until cake |
| Foil balloons (5 ct) | $8 | Deflate within 2 days |
| Total | $27–33 | Mostly in the trash by 4 p.m. |
What that same $27 buys in DIY decorations: – Balloon arch kit + 100 balloons: $22 – Craft paint for fire hydrants: $4 – Cardstock for banners and printables: $1
The DIY version lasts through the whole party and looks better in photos. The kit version is convenient, and that’s its only real advantage.
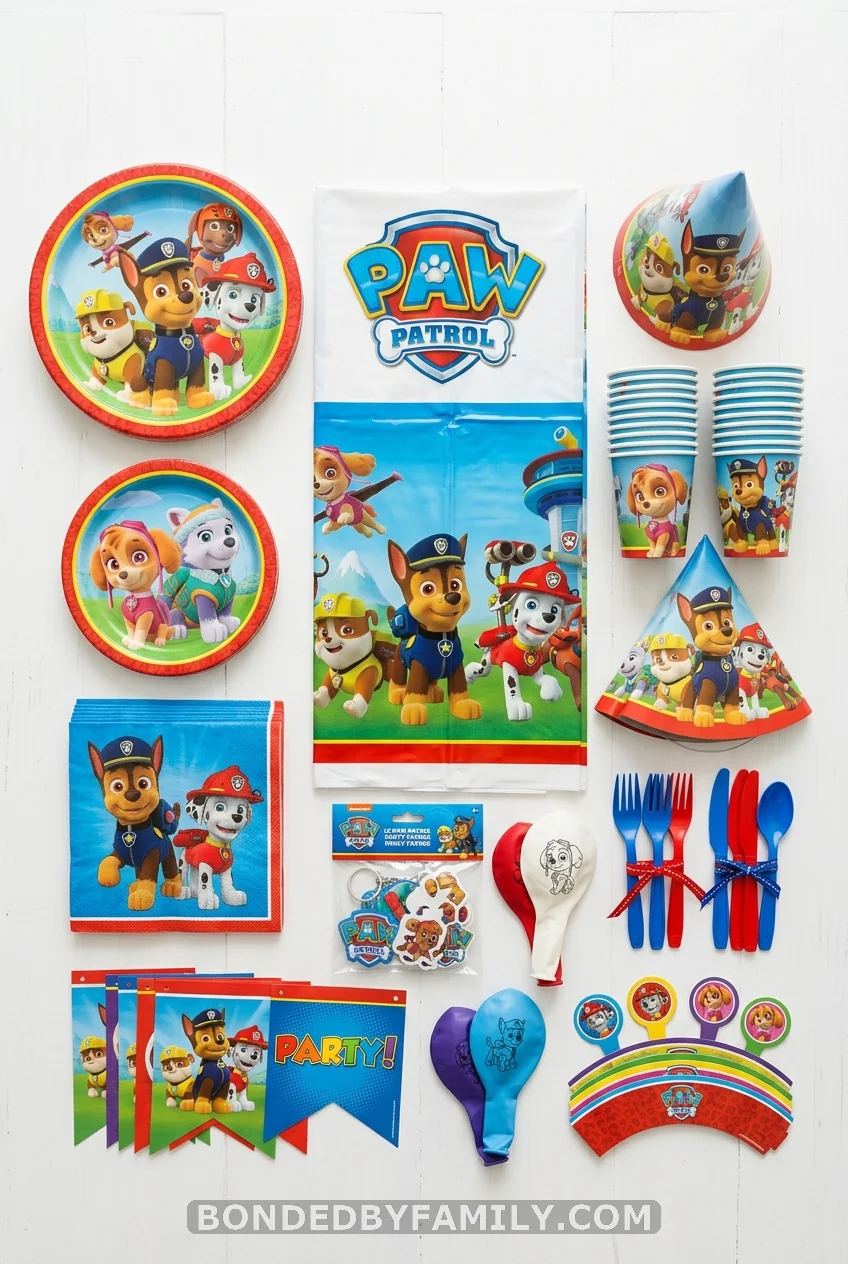
The exception: Buy the themed paper plates and napkins. They’re low-cost, convenient, and nobody in the history of children’s birthday parties has made their own plates. Everything else — buy plain or DIY.
Budget Touches That Pull the Room Together
16. Character Catchphrase Signs

Print or hand-write the pups’ catchphrases on cardstock, drop them into cheap clip frames from Dollar Tree ($1.25 each), and arrange them on shelves, a windowsill, or the mantel. Marshall: “I’m fired up!” Chase: “Chase is on the case!” Skye: “This pup’s gotta fly!” Rocky: “Don’t lose it, reuse it!” Adults who know the show laugh. Kids who recognize the lines squeal. Total cost: free with printer paper and markers.
17. DIY Cardboard Doghouse Photo Prop
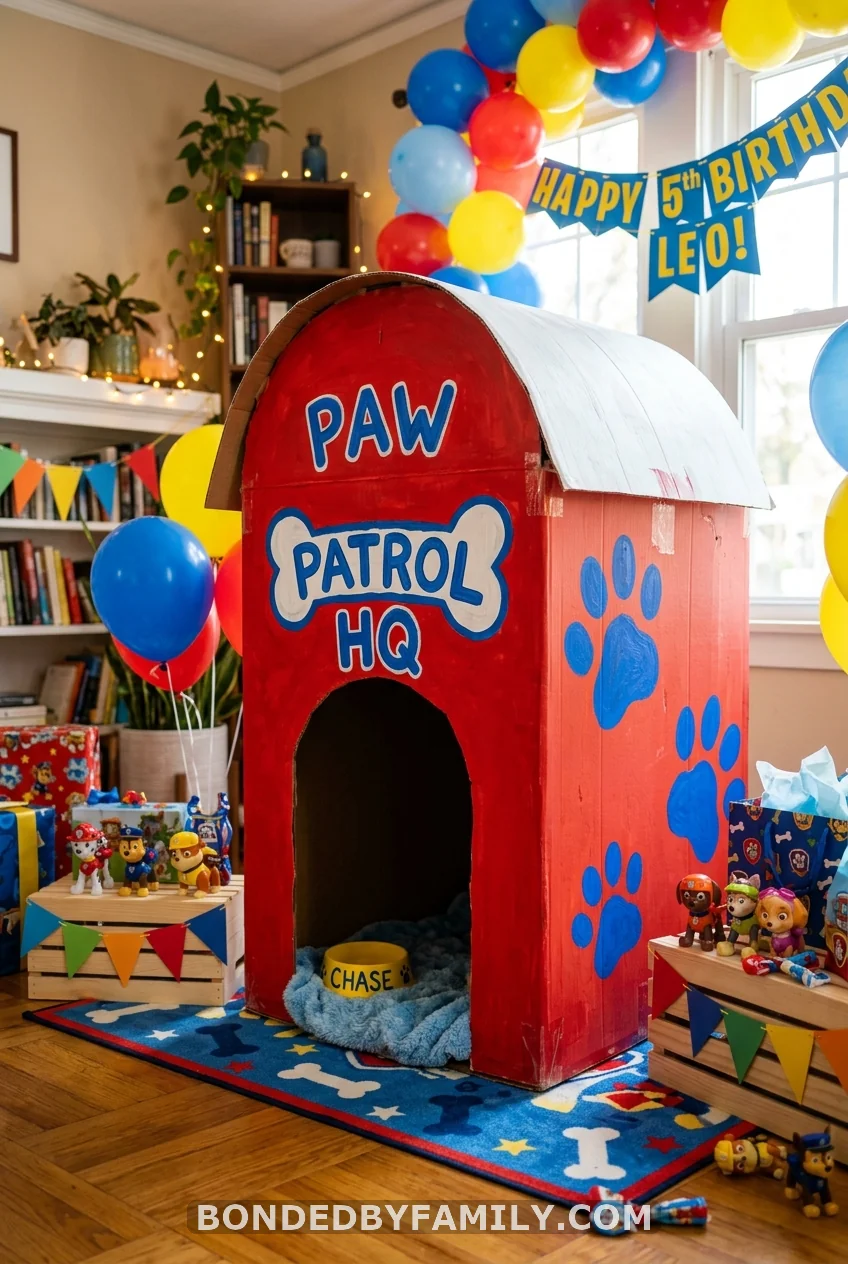
Ask an appliance store or furniture store for a large cardboard box — many give them away for free. Cut a rounded door arch in the front panel. Paint the outside red with white roof details, using $3–5 worth of acrylic craft paint. Draw paw prints on the sides with a black marker and write “PAW PATROL HQ” above the doorway in blue.
Children will go in and out of this box for the duration of the party. It becomes the photo station, the role-play station, and the decoration all in one. No store-bought piece gets this much use.
Cost: Free–$5 for paint. Time: 45 minutes, including drying.
18. Mason Jar Character Vignette Centerpieces
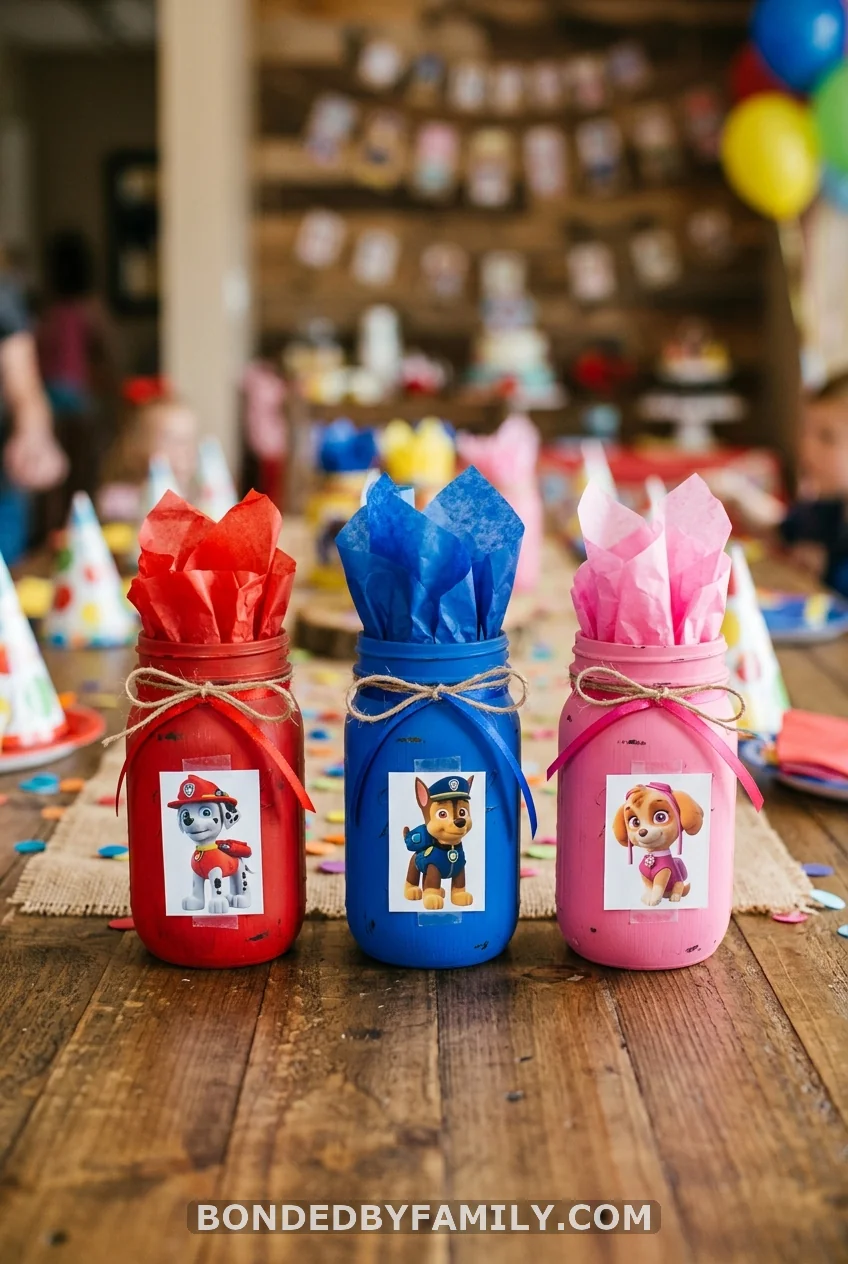
Take three 12 oz wide-mouth mason jars ($8 for a 12-pack at Walmart). Paint the outside of each one in a character color — red for Marshall, blue for Chase, pink for Skye. Fill with matching tissue paper. Tape a printed 3×3 photo of the corresponding character to the front.
Group all three as a centerpiece cluster on the dessert table or at the center of the kids’ seating table. Completely reusable: wash off the paint post-party, and you have 12 mason jars back in your cabinet. Cost: $3–6 per table.
19. The Full Skye-Themed Variation
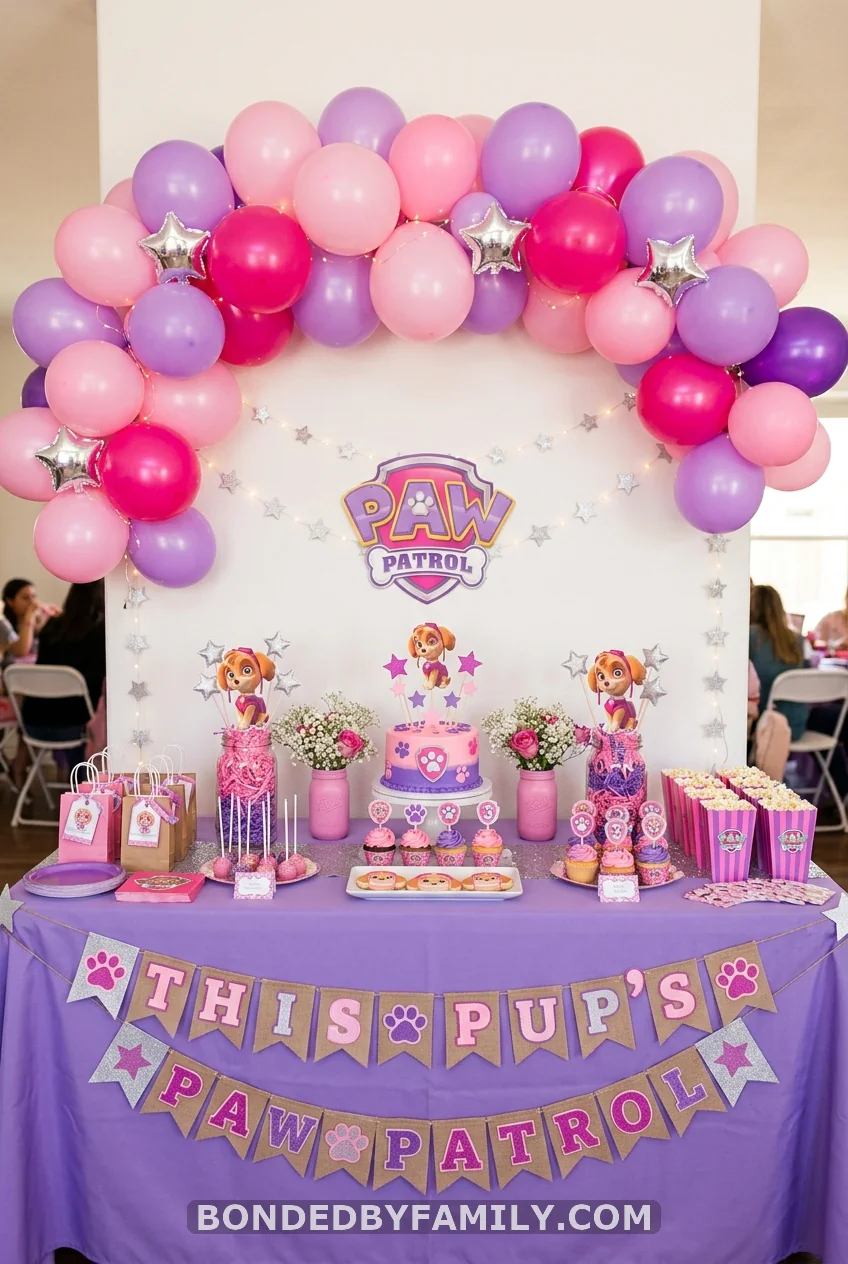
Most Paw Patrol party guides default to the blue-and-red Chase and Marshall palette and stop there. If your birthday child is a girl who loves Skye — or Everest, or Liberty — the entire color system shifts.
Skye’s palette: hot pink, purple, silver, and white. Red balloons become hot pink. Blue becomes lavender or purple. Yellow streamers become silver star garland. The character cutouts shift to Skye, Everest, and Liberty. The hat station adds a DIY Skye helicopter hat (pink party hat with cardstock helicopter blades attached). Catchphrase signs read “This pup’s gotta fly!” and “Sky’s the limit!” printed in pink frames.
Same structural decisions as the classic setup. Completely different atmosphere. And far more personal for a little girl who chose Skye specifically and doesn’t want a Chase party with pink balloons thrown on top.
Wrapping It Up
Nineteen paw patrol party decoration ideas. Some cost nothing. One — the balloon arch — costs around $45 and takes an hour to build. The rest land somewhere in between.
What every high-save item on this list has in common: the decorations children remember are the ones they can touch, wear, or walk through. The chalk trail they pointed at when they arrived. The doghouse they crawled into. The hat they chose at the door. Not the $8 foil balloon that deflates by 5 p.m.
Build your party around the pieces that create those moments — the arch, the doghouse, the hat station — and fill the rest with free printables and dollar store finds. Your child will not be disappointed. Your bank account will thank you.
Start with the chalk trail. It takes 10 minutes, and it sets the tone from the sidewalk.
Frequently Asked Questions
How far ahead should I set up Paw Patrol party decorations?
Most paper and foam decorations — banners, signs, backdrops, mason jar centerpieces — can go up the day before the party. Hold the balloon arch until the morning of. Latex balloons shrink noticeably after 12–18 hours at room temperature, so an arch built the night before looks half-deflated by party time. Build it 2–3 hours before guests arrive for peak fullness.
What is the standard Paw Patrol party color scheme?
The core Paw Patrol palette is red, blue, and yellow — the primary colors that run through the show’s main branding. For character-specific parties: Chase = navy blue and red; Marshall = bright red and white; Skye = pink and purple; Rubble = yellow and orange; Zuma = teal and orange; Rocky = green and grey. If you’re not committing to a single character, red, blue, and yellow covers the whole team.
Are Paw Patrol decorations more for boys or girls?
The standard Chase and Marshall setup leans toward boys through its blue-and-red palette. The Skye and Everest variation works well for girls. But follow your child’s actual preference — plenty of girls love Chase and plenty of boys love Skye. The decoration decisions should follow the birthday child, not what a party supply company printed on the box.
What Paw Patrol decorations can I skip entirely?
Skip: official themed party kits (plates + napkins + cups + tablecloth bundled together — overpriced for what they are), pre-made foil character balloons (they deflate within 2 days), and expensive character centerpiece sets (DIY mason jars cost 80% less). Keep: a strong backdrop, a balloon arch or cluster, and something interactive for kids — hats, masks, or the cardboard doghouse.
How many decorations do I need for a small home party?
For 10–15 children at home, you need four to six decoration decisions: one backdrop, one balloon statement piece (arch or clusters), one dessert table centerpiece, and two or three accent pieces (signs, chair backs, jar centerpieces). That’s it. Start with the highest visual-impact items — the arch and the backdrop — and fill in the rest based on whatever time and budget remain.