Winnie the Pooh baby shower treats look gorgeous in every Pinterest photo. What those photos skip: the batch that ended up in the bin before the camera came out. Cracked chocolate cups. Cake pops sliding off their sticks. Rice Krispie treat shapes that vaguely resembled a collapsed hive. I have made every one of those mistakes, so you do not have to.
This list covers 16 treats that hold together – some require real technique, and some require almost none. Costs, timing, and the specific mistakes that trip people up are included because those are the details other party planning guides consistently leave out.
1. Chocolate Hunny Pot Dessert Cups
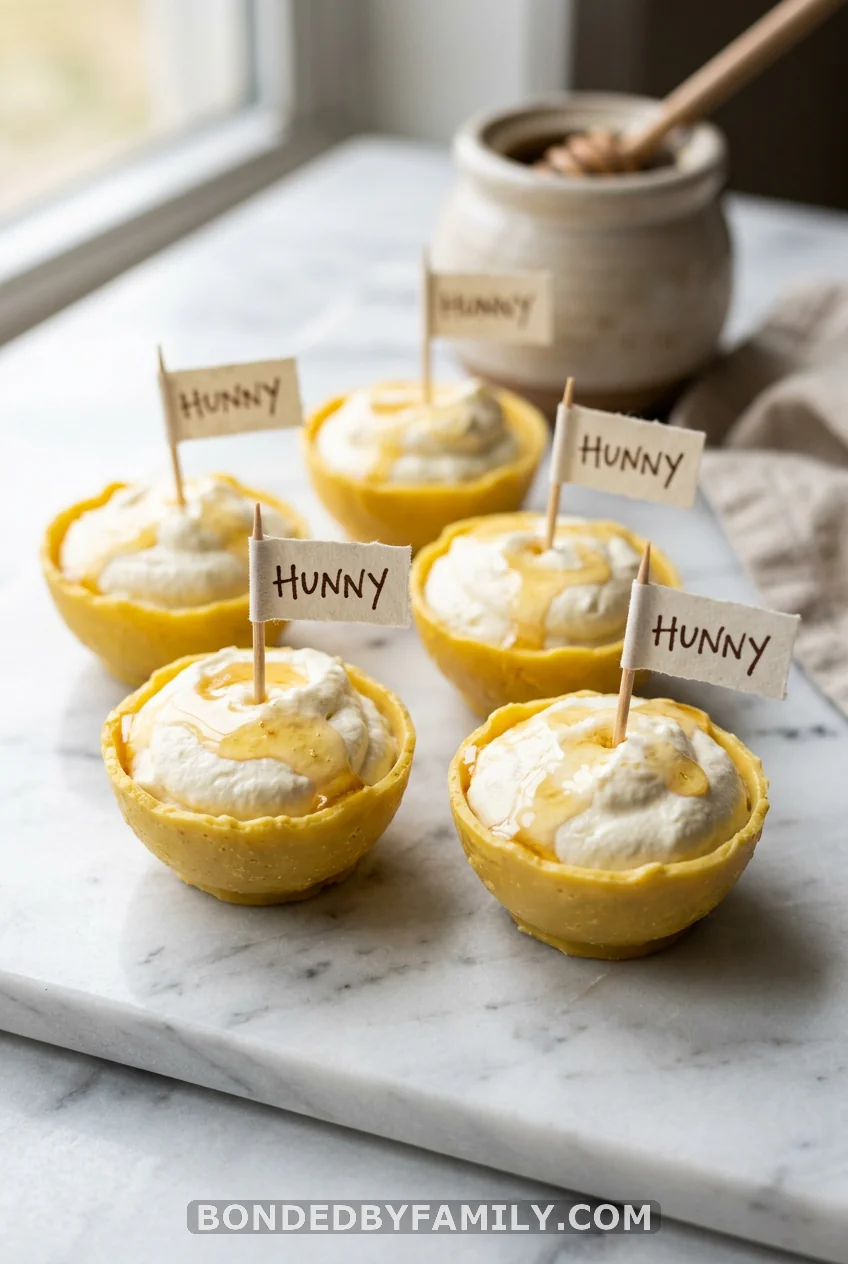
These are the showstoppers of the table. They look like they came from a professional bakery. They also have more moving parts than anything else on this list – which means they are worth planning for rather than winging the morning of the shower.
Here is everything you need to know to pull them off.
Two Ways to Make the Cups
Option A – The Balloon Method
Blow up balloons to roughly 4 inches in diameter. Dip the rounded bottom halfway into melted yellow chocolate, let the excess drip for a full 10 seconds, then place on parchment paper. This gives you organic, pot-shaped bowls. Plan for two coats – one coat is too thin and cracks when you fill it.
Option B – Silicone Mold Method
A hunny pot silicone mold (Amazon, $8-14 for a set of 6) removes the balloon variables entirely. Pour the melted chocolate in, tap out air bubbles, freeze for 15 minutes, and unmold. Less dramatic to watch, far more reliable to execute.
Honey White Chocolate Mousse Filling
This filling is the reason this treat earns the top spot. It is light, make-ahead friendly, and takes about 15 minutes of active time.
You will need:
– 1/2 cup heavy cream (for heating)
– 1 cup heavy cream (for whipping)
– 2 tablespoons raw honey
– 4 oz white chocolate, finely chopped
– 1 teaspoon unflavored gelatin (Knox brand)
– 1 tablespoon cold water
Step-by-Step Instructions
- Sprinkle gelatin over cold water in a small bowl. Let it bloom undisturbed for 5 minutes – it will puff and absorb.
- In a small saucepan, heat 1/2 cup cream and the honey over medium-low heat until the mixture steams. Do not boil.
- Stir the bloomed gelatin into the warm cream until fully dissolved.
- Place the chopped white chocolate in a heatproof bowl. Pour the warm cream mixture over it. Whisk continuously until smooth and glossy.
- Set aside to cool to room temperature – about 20 minutes. This step matters. A warm base deflates the whipped cream you are about to fold in.
- Whip the remaining 1 cup of cold cream to soft peaks only. Stop when it just holds its shape. Stiff peaks produce a dense mousse.
- Fold the whipped cream into the cooled chocolate base in three additions. Use slow, sweeping folds.
- Pipe or spoon mousse into chocolate cups. Refrigerate for at least 2 hours.
- Right before guests arrive: warm raw honey briefly (10-15 seconds in the microwave) until pourable, drizzle over each cup, and add a small paper “HUNNY” flag on a toothpick.
Materials and Costs for 12 Cups
| Item | Where to Get It | Estimated Cost |
|---|---|---|
| Merckens Yellow Chocolate Wafers (1 lb) | Amazon or restaurant supply | $8-12 |
| Balloons (50-pack) or silicone mold | Amazon | $3-14 |
| White chocolate (4 oz bar) | Grocery store | $2-4 |
| Heavy cream (1 pint) | Grocery store | $3-4 |
| Raw honey (8 oz jar) | Grocery or farmers market | $6-8 |
| Knox unflavored gelatin (4-pack) | Grocery store | $3 |
| Total | $25-45 |
Make-Ahead Timeline
- Chocolate cups (empty): up to 1 week ahead, stored airtight in a cool dry spot – not the fridge (condensation destroys them)
- Mousse filling: up to 3 days ahead, covered and refrigerated
- Assembled cups: no more than 2 hours before guests arrive
Common Mistakes to Avoid
Chocolate is too hot when you dip. Above 95 degrees Fahrenheit, warmth transfers to the balloon and produces uneven cups. Let melted chocolate cool to 90-95 degrees before dipping.
Skipping the second coat. Single-layer cups crack under filling weight or when guests pick them up. Two coats minimum.
Mousse is still warm when you fold in the cream. This collapses the whipped air before it sets. Cool the base to room temperature first.
Rushing the balloon release. Once popped, wiggle the balloon gently rather than pulling straight up. That straight pull cracks the rim at the top every time.
Honey and infants: Raw honey is not safe for anyone under 12 months. If babies will be at a combined sip-and-see, label accordingly or use honey-flavored extract in those servings.
2. Tigger Tail Pretzel Rods
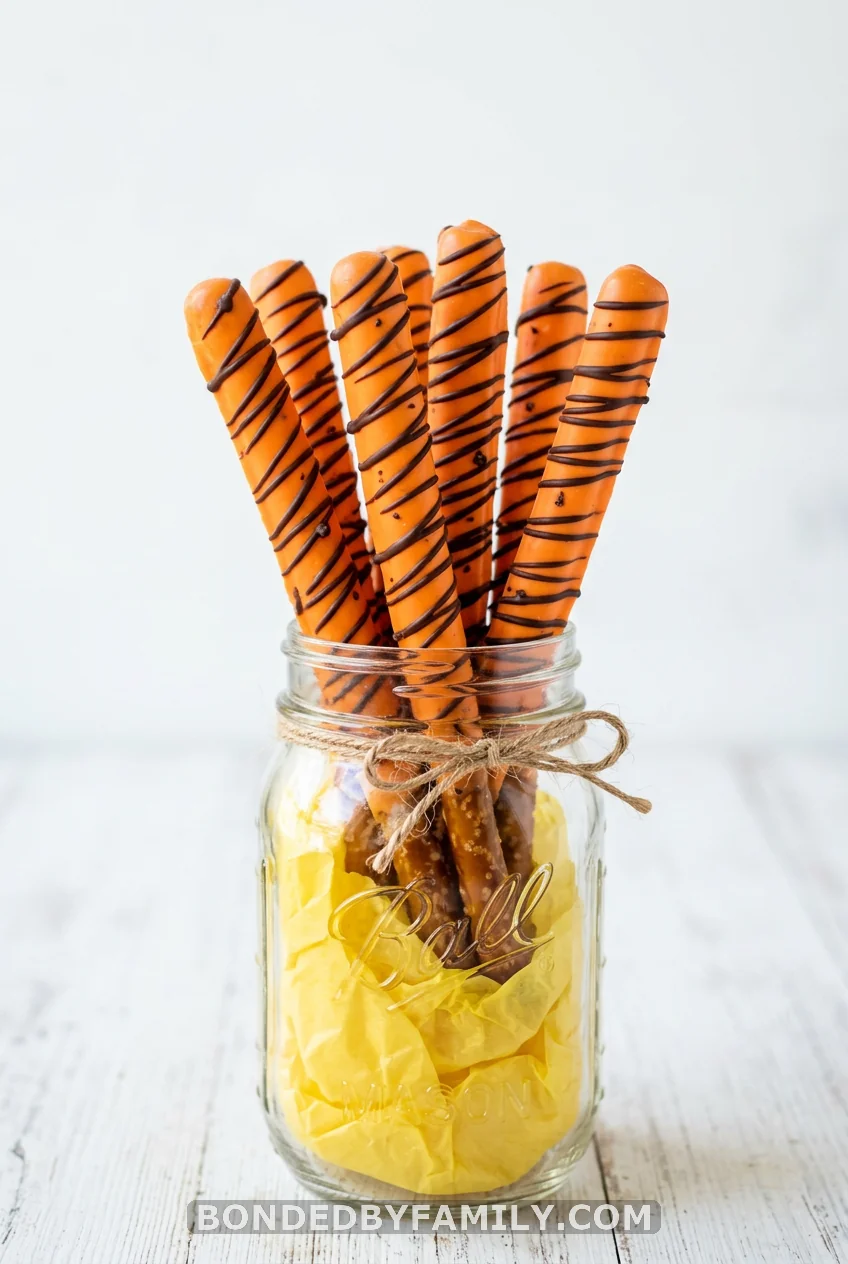
These are the most-grabbed treat at any Pooh-themed party and the most forgiving one on this list to make the day before.
Use standard pretzel rods, not thin pretzel sticks – thin sticks snap during dipping. Melt Wilton Orange Candy Melts ($3-4 per bag at Michaels, Walmart, or Amazon) in a tall, narrow glass for easier full-coverage dipping. Dip each rod about two-thirds of the way up, let excess drip for 10 seconds, then lay on parchment. Once set (15-20 minutes), melt dark chocolate chips and drizzle in diagonal stripes using a fork or small piping bag.
One bag of orange melts covers 20-25 rods. A full party batch of 30 costs under $10.
Serve them upright in a Mason jar filled with yellow tissue paper or honeycomb filler. Guests can grab without touching every rod in the jar. They photograph well, and your table gets instant height.
3. Beehive Cupcake Tower
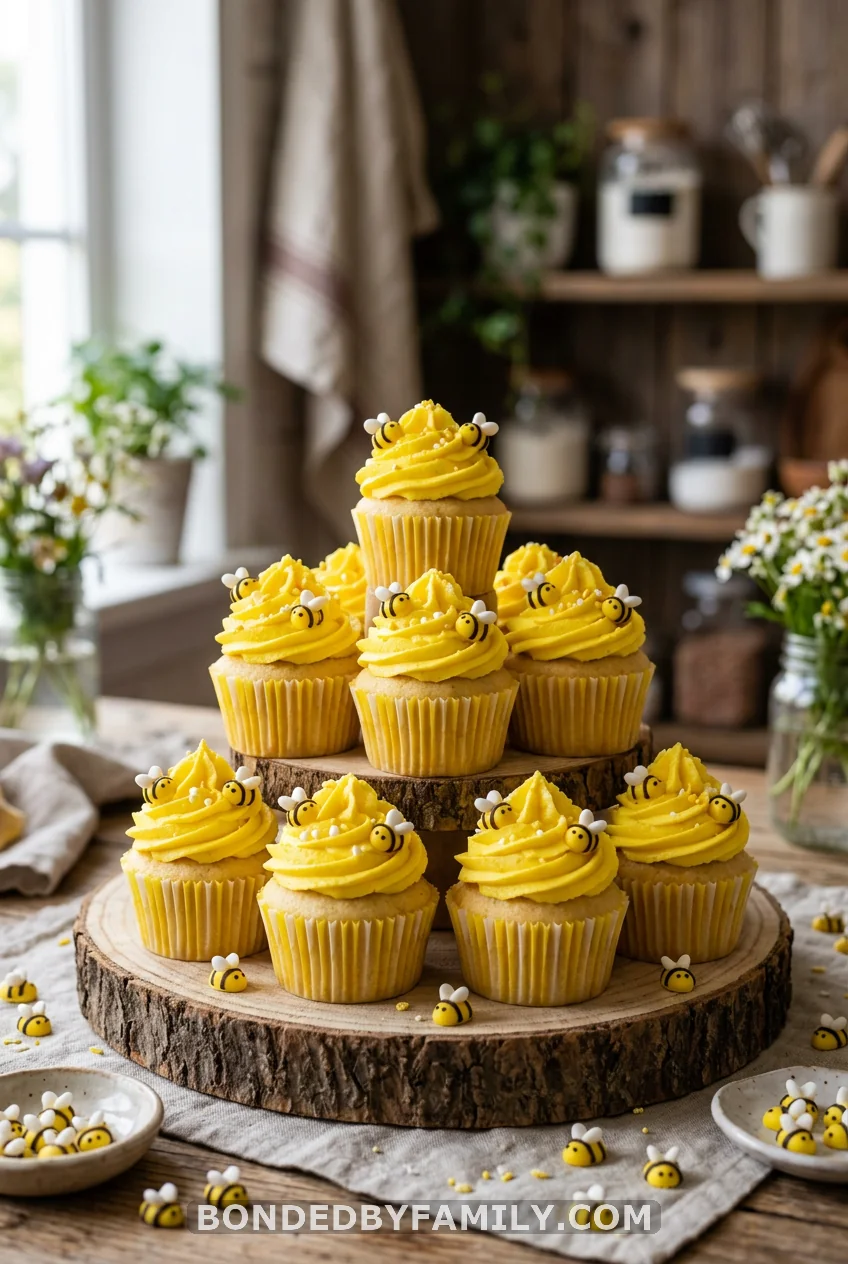
Arrange yellow-frosted cupcakes in a pyramid – widest base at the bottom, three rows high. The frosting acts as mortar between layers, which means it needs to be firm. Use American buttercream or Swiss meringue buttercream. Whipped cream collapses under weight and ruins the stack.
For the hive texture: a Wilton number 1M tip swirled in a circular motion from outside to center reads as honeycomb layers from across the room. Start at the outer edge of each cupcake and spiral inward.
Edible sugar bee decorations ($4-6 per pack at cake decorating stores or Amazon) pressed into the top swirl and scattered around the wooden base do the rest.
Honey buttercream variation: replace half the butter in your standard buttercream with raw honey, volume for volume. The color shifts to natural amber, and the flavor is noticeably warmer against vanilla or lemon cake.
A 12-cupcake tower serves about 20 guests when other treats are also on the table.
4. Honey Jar Sugar Cookies
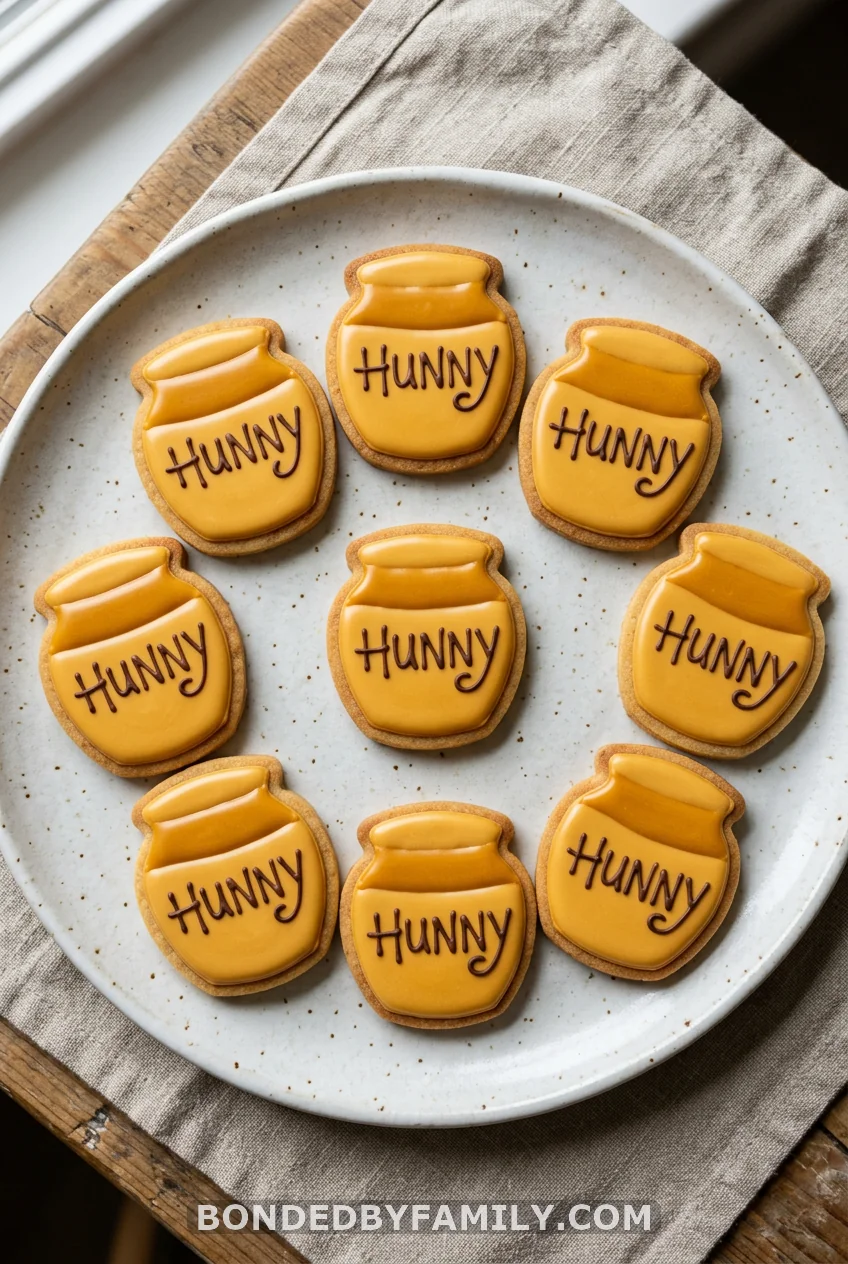
Use a honey jar cookie cutter ($5-8 for a set on Amazon) with a standard sugar cookie recipe. Decorate with flood-consistency royal icing in amber yellow. While the base coat is still wet, use a toothpick or thin piping tip to write “HUNNY” in brown – the lettering sinks flush as the icing dries.
Royal icing takes 6-8 hours to fully set. Make these on a Monday for a Saturday shower and skip that weekend rush entirely. They hold well in an airtight container for 5 days.
Wilton Meringue Powder ($5-7), mixed with powdered sugar and water, is all the royal icing you need. A hand mixer does the job.
5. Piglet’s Pink Lemonade Punch
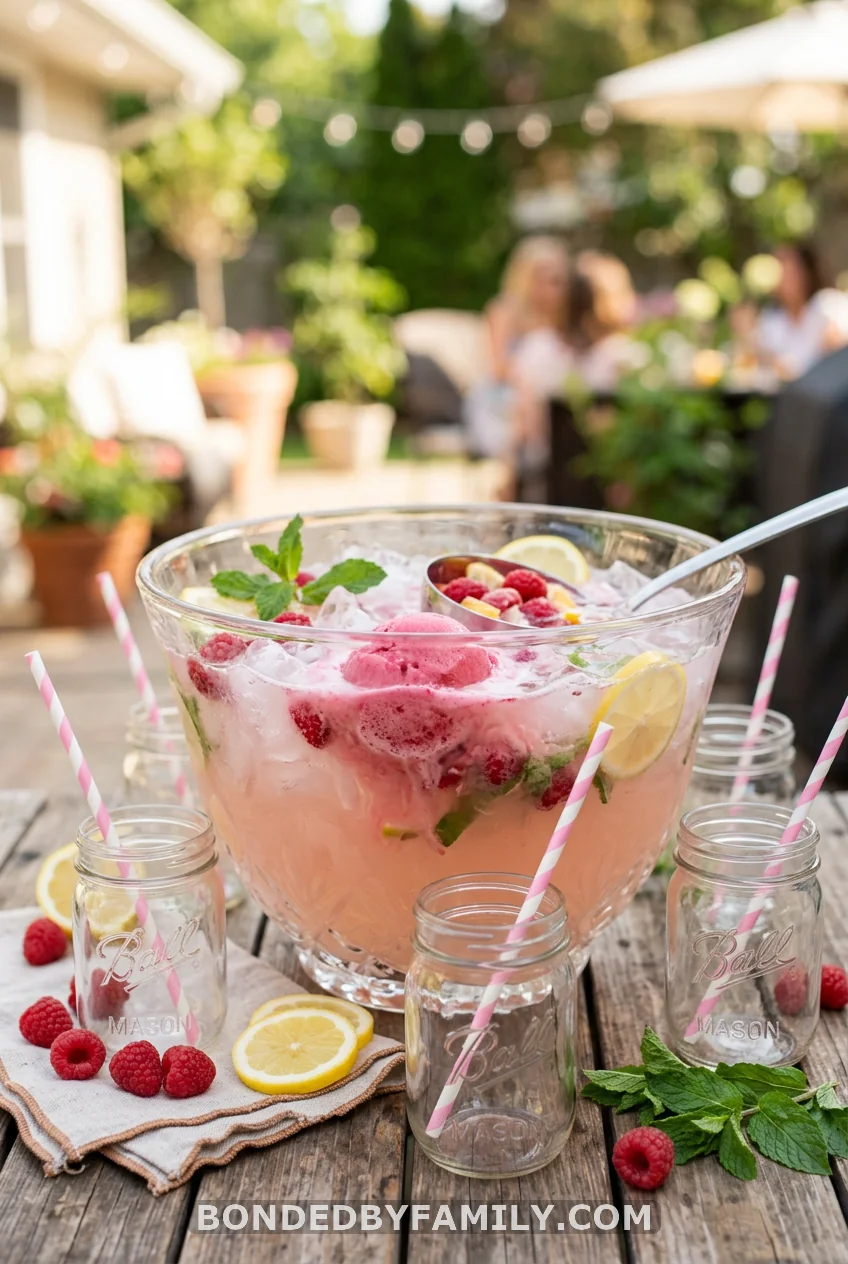
One can of frozen pink lemonade concentrate, two cans of cold water, and one 2-liter of lemon-lime soda. Add three scoops of raspberry sorbet just before guests arrive.
Four minutes. One bowl. Looks like a themed drink.
6. Beehive Cereal Treat Clusters
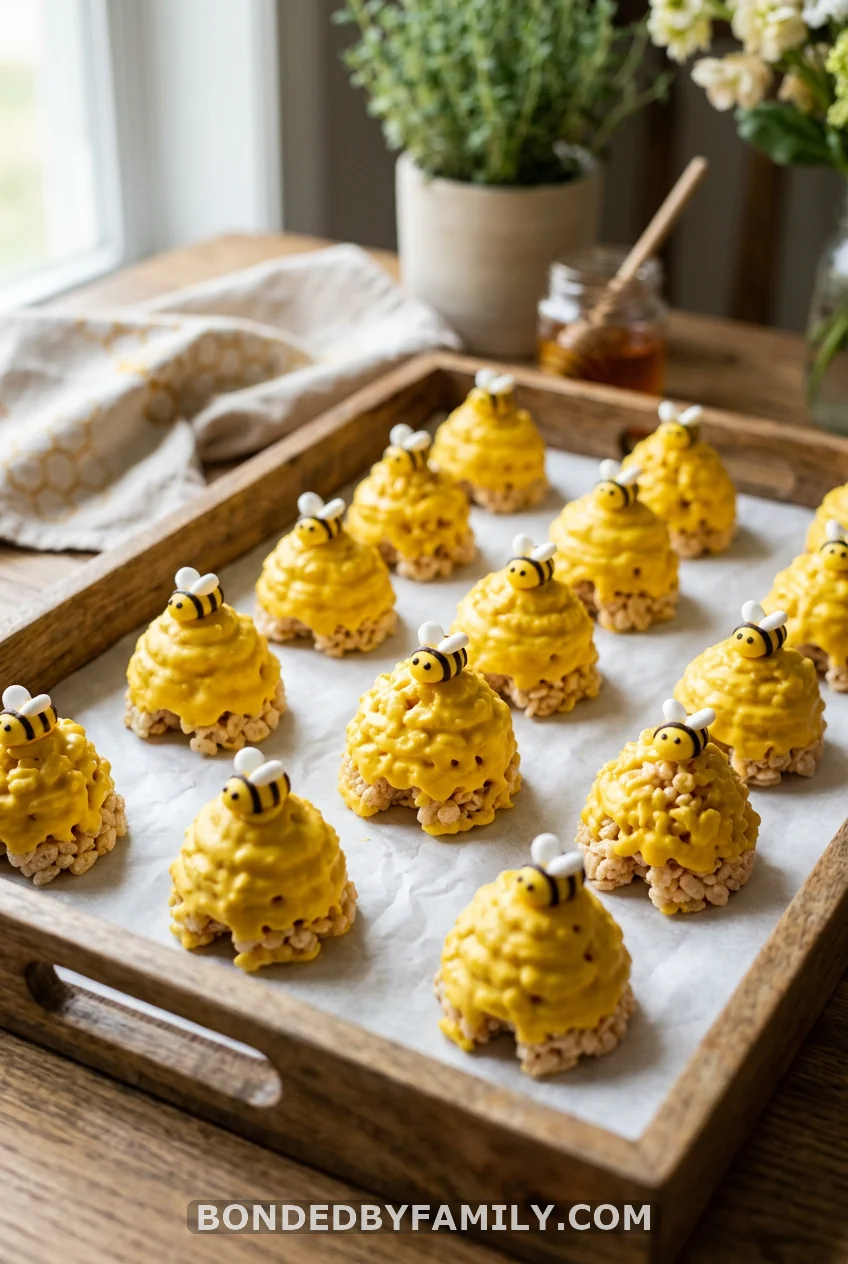
Swap Honeycomb cereal or Honey Nut Cheerios into your standard marshmallow treat recipe in place of Rice Krispies. The honey flavor comes through in the finished cluster, the color runs warm naturally, and the texture holds its shape better during molding.
Melt one 16-oz bag of mini marshmallows with 3 tablespoons of butter over medium-low heat, stirring constantly. Remove from heat. Stir in 6 cups of Honeycomb cereal. Cool just enough to handle without burning – about 3 minutes.
Shape into beehive mounds: taller than wide, slightly narrowed at the top.
Once cooled (30 minutes), dip each cluster in melted yellow candy melts and press a small candy bee on top before the coating sets.
Full batch: 30-35 minutes. Makes about 20 clusters. Cost: under $15.
7. Mini Hunny Pot Cheesecake Cups
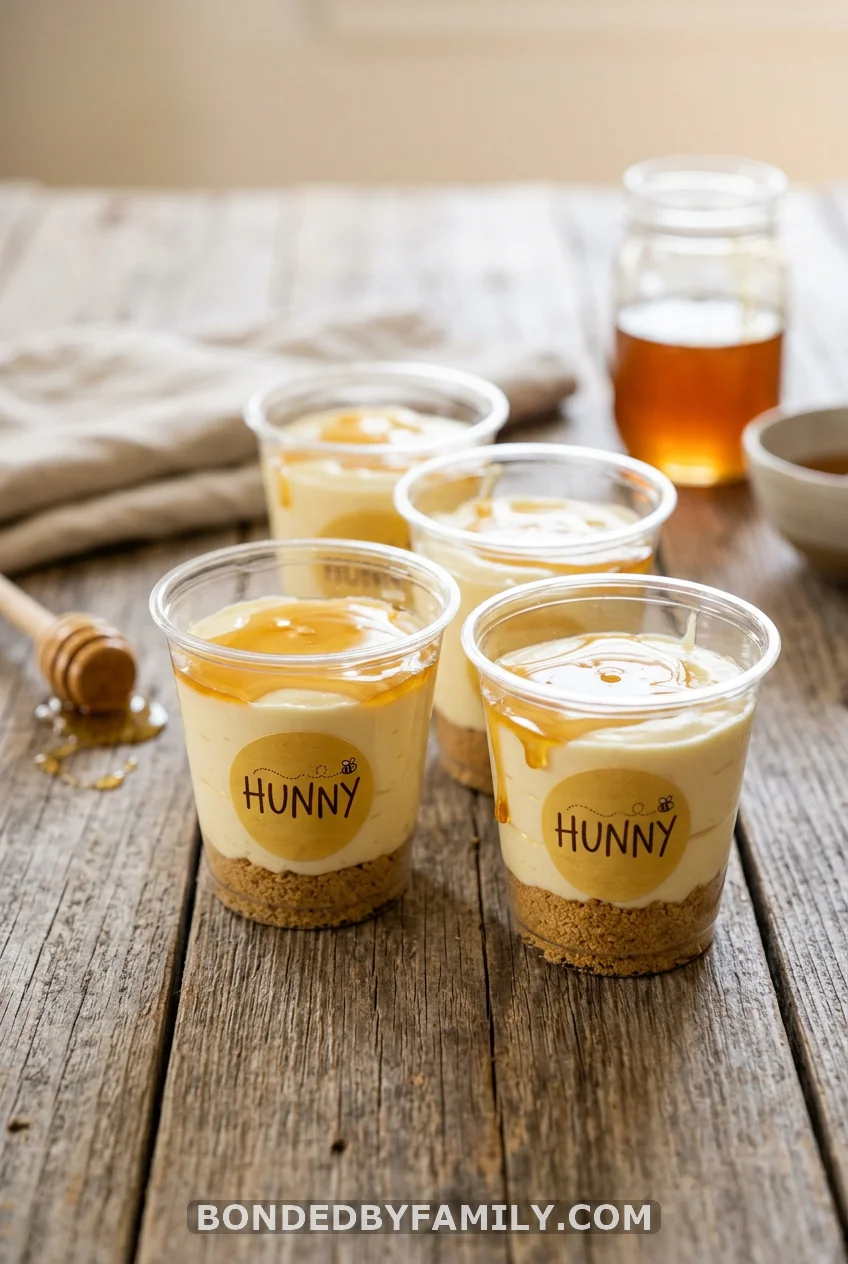
Layer graham cracker crumbs in the bottom of 4-oz clear plastic cups ($3-5 for a pack of 25 at any party supply store). Fill with no-bake cheesecake – cream cheese, powdered sugar, vanilla extract, and heavy cream beaten until thick. Drizzle warm raw honey on top right before the table goes out.
Print mini “HUNNY” labels at home on Avery address label sheets and stick them to the outside of each cup. That one detail takes 10 minutes and pushes the presentation from generic dessert cup to intentionally themed.
These must be refrigerated. Assemble up to 24 hours ahead. Pull them 15 minutes before serving.
8. Eeyore’s Blueberry Muffins
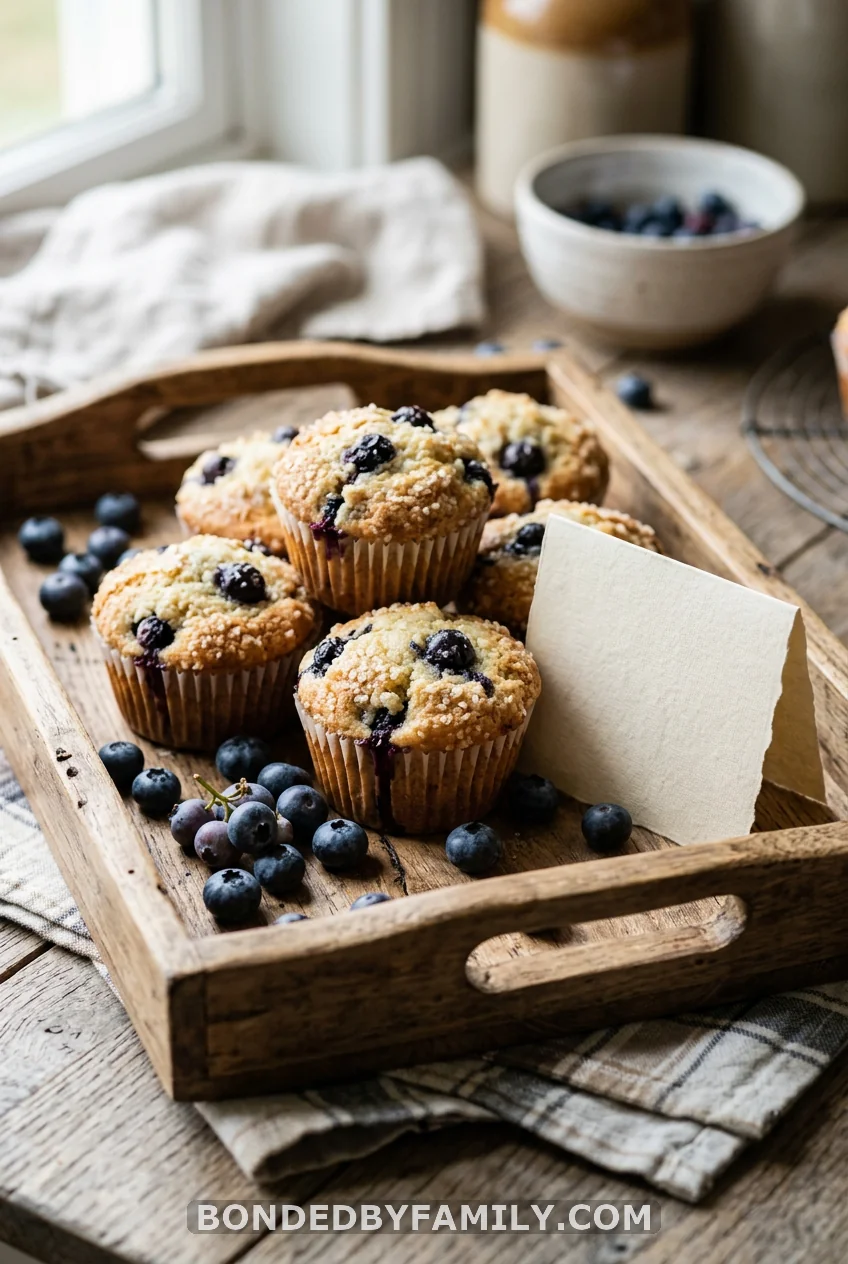
One bowl, one batch, any store-bought mix or your standard recipe.
The only effort: a small card beside the tray with Eeyore’s “Thanks for noticing me” printed on it. Every guest reads it, smiles, and reaches for a muffin. The blue berries do the rest.
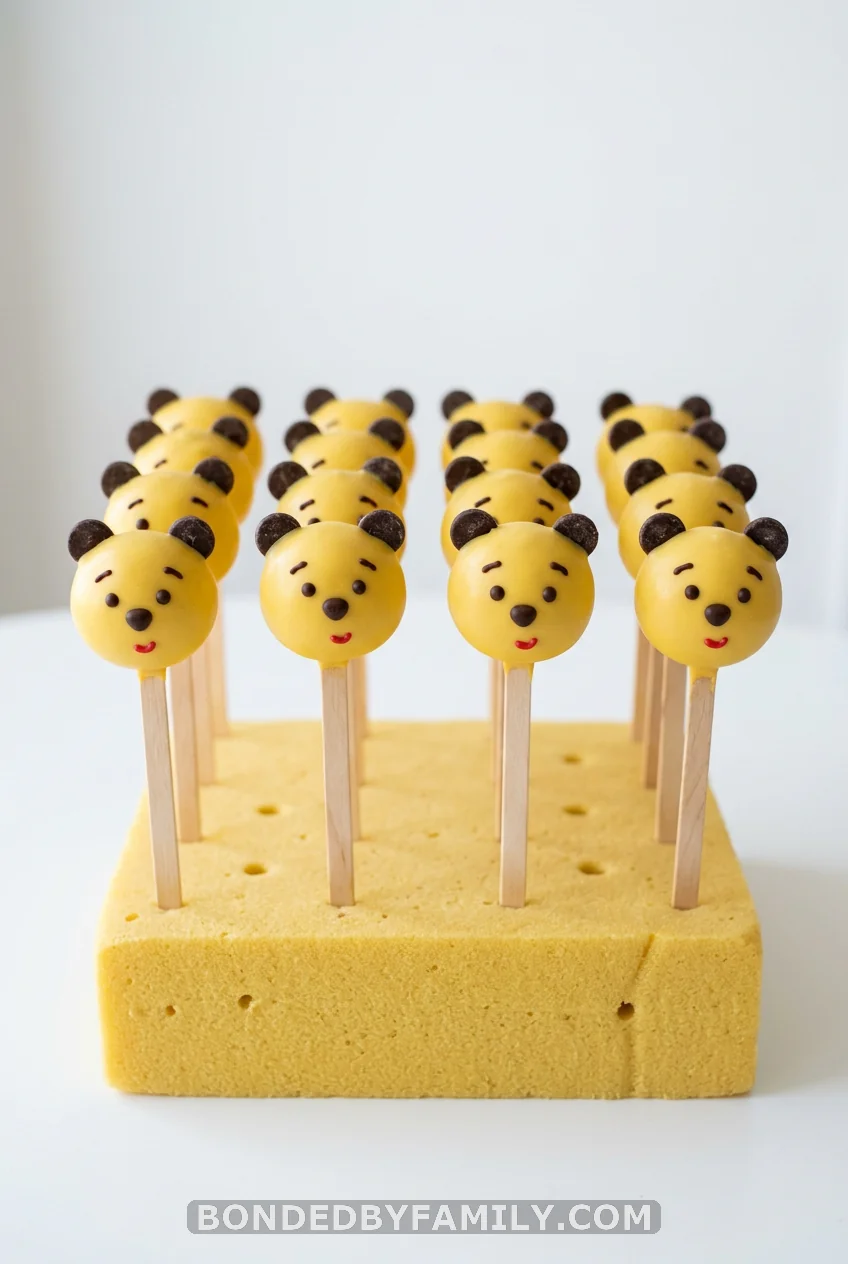
9. Pooh Bear Cake Pops – The Truth About Them
What Most People Think Going In
Cake pops are a fast, crowd-pleasing treat anyone can pull together the night before.
What Is Really True
Cake pops have the highest failure rate of any treat on this list. They slide off sticks. They crack when warm candy coating hits a cold cake center. They slump during drying. Professional bakers who make them weekly know these failure points by feel. First-timers hit every one of them.
This is not a reason to skip them. It is a reason to know what you are walking into.
The Fix That Changes Everything
Temperature control. That is it.
Cake pop balls should be cold from the refrigerator – not frozen, just cold. Candy coating should be between 90 and 95 degrees Fahrenheit. Warm enough to flow, cool enough that contact with the cold cake does not cause cracking.
The anchor step most people skip: dip the stick two inches into melted candy coating first, then insert it into the cake ball. Let that set 2-3 minutes before dipping the full pop. That coated stick is what keeps the pop from sliding off. Without it, gravity wins every time.
When dipping: lower the pop slowly, let excess drip for a full 10 seconds while holding the stick vertically, then stand upright in a foam block immediately. Do not tap, shake, or rotate. Let it set completely before adding any detail.
For Pooh-specific decorating: once the yellow coating is dry, draw eyes and a nose with an Americolor black edible marker (about $4 per pen). A small red icing dot for the mouth. Chocolate chips pressed at the top with a dab of melted chocolate act as ears.
Whether to Make Them at All
If you have 2 hours to practice the dipping technique before the shower, make them. They are beautiful when done right and guests love them.
If you are stretched thin on party day, source them from a local baker. They are the one treat on this list where the result-to-effort ratio does not favor a first attempt under time pressure.
10. Honey-Drizzled Chocolate Oreos
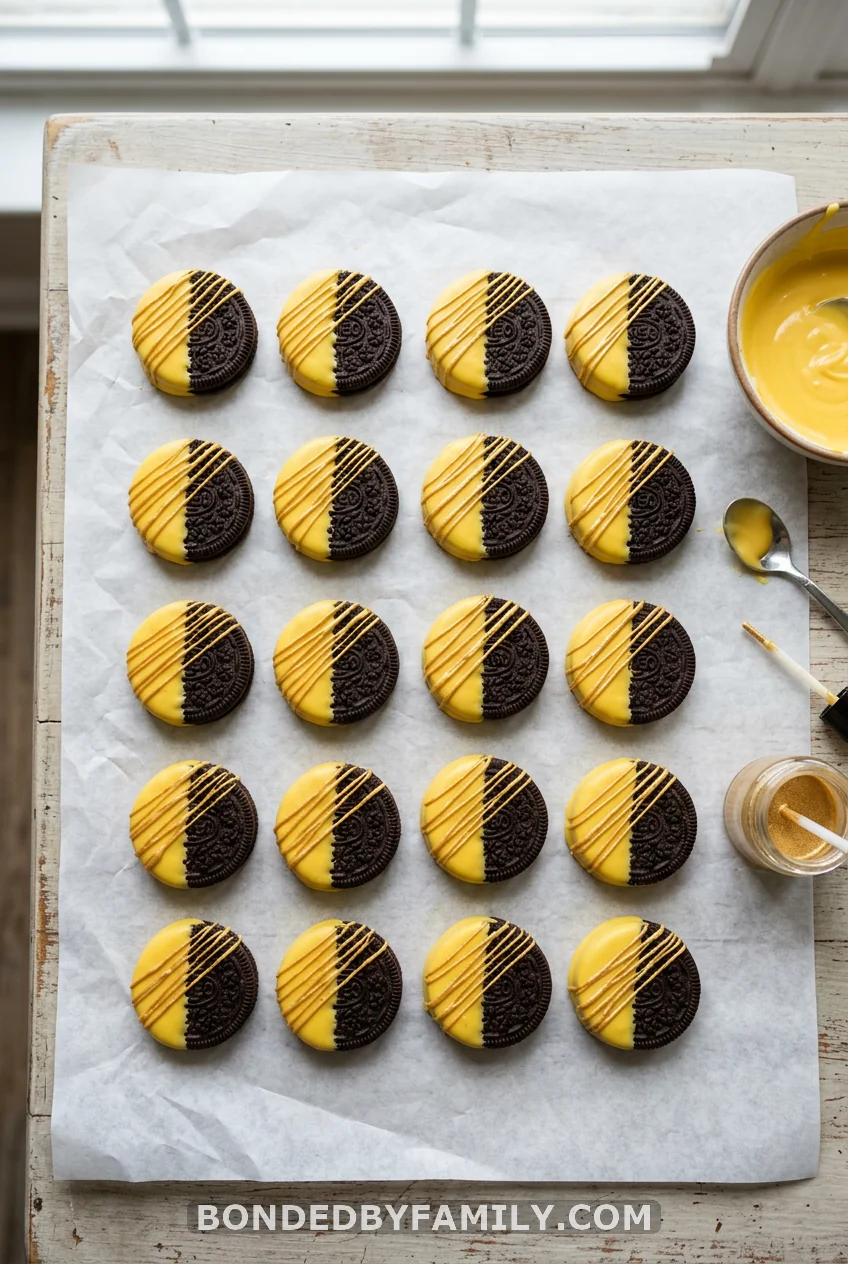
Dip standard Oreos halfway into yellow or white candy melts (Wilton, $3-4 per bag). Let set on parchment for 20 minutes. Once fully solid, drizzle with warm raw honey or gold-tinted white chocolate in a thin stream.
For a Pooh-specific detail: press a small edible bee-shaped candy topper ($4-6 for a bag on Amazon) into the coating before it fully sets.
One bag of candy melts covers 24 Oreos. Total cost for a party batch: under $10. Make up to 3 days ahead in an airtight container at room temperature.
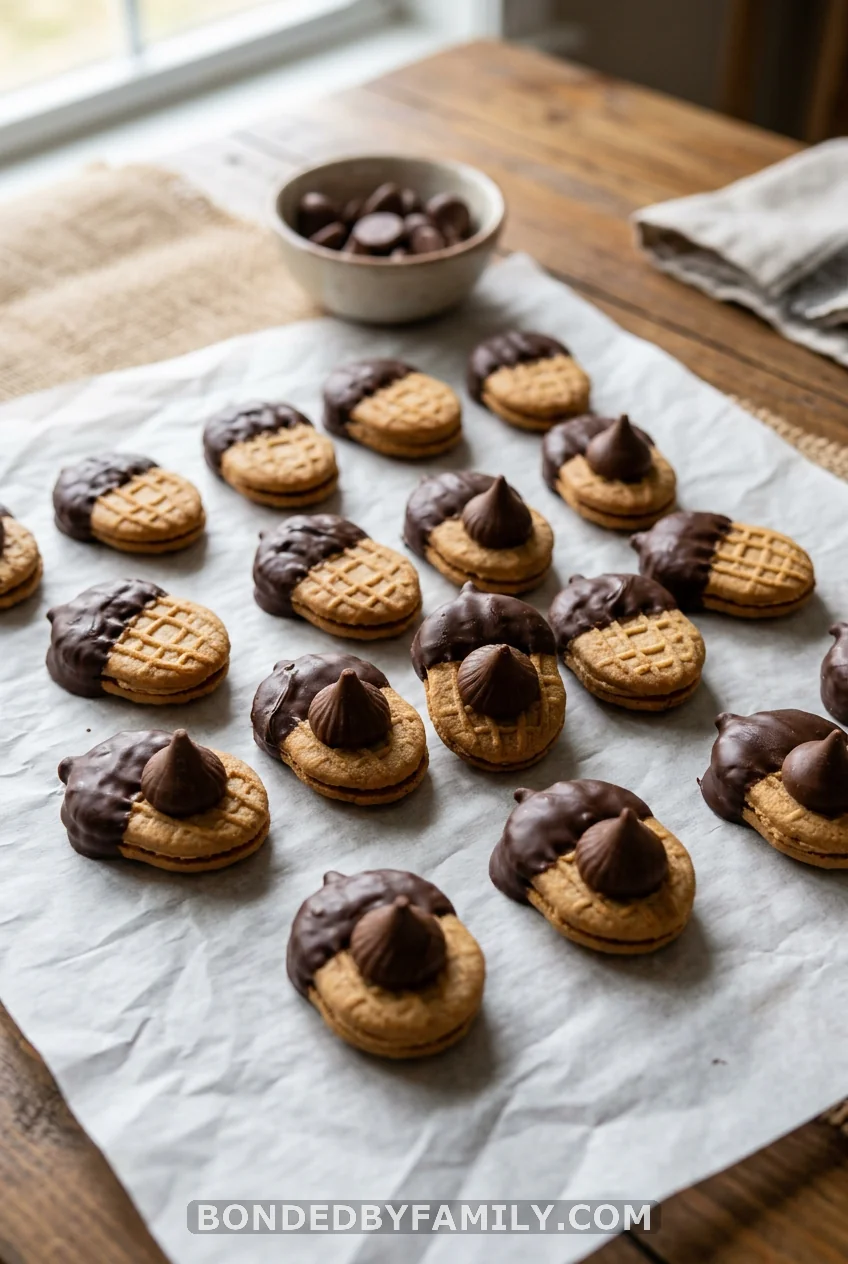
11. Acorn Nutter Butter Cookies
This one surprises people every time they see it.
Dip the round end of a Nutter Butter cookie in melted dark or milk chocolate. Before the chocolate sets, press a Hershey’s Kiss flat-side down onto what is now the “top” of the acorn. The resemblance is strong – a proper forest acorn, cap and all, made from two pantry staples.
Label them “Christopher Robin’s Acorns” on the dessert table. Every guest works out the construction and then eats four of them.
One package of Nutter Butters, one bag of chocolate chips, and one bag of Kisses runs about $10 and produces 30 or more cookies. They hold at room temperature for 2-3 days. No refrigeration needed.
12. Owl’s Wisdom Berry Cups
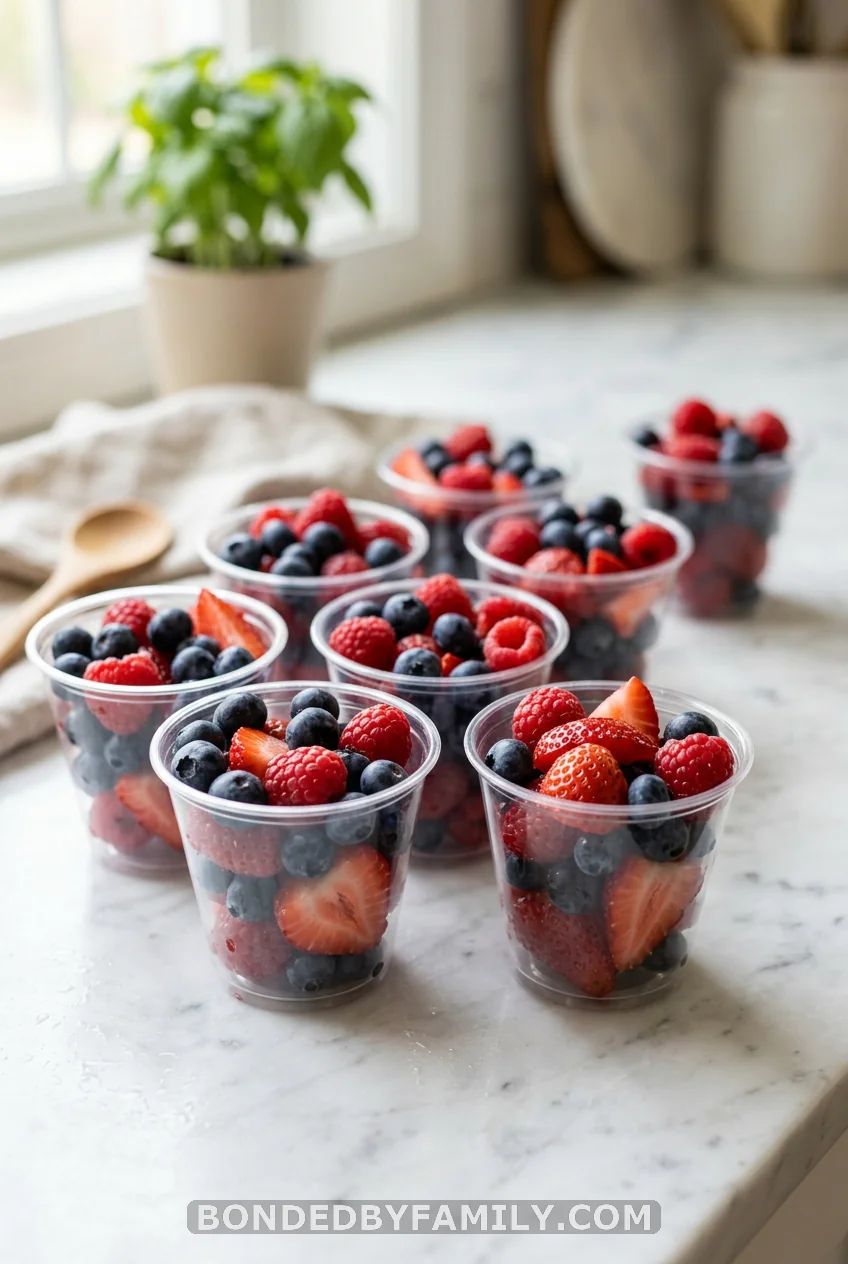
Fill 4-oz clear cups with blueberries, raspberries, and sliced strawberries. Berries stay cold, do not melt, require no skill, and give guests a break from another layer of sugar.
Put an Owl quote card beside the display and label them “Owl’s Wisdom Berries.” Done in 5 minutes. Takes up space on the table without adding anything to your prep load.
13. Tigger’s Bounce Mix Party Bags
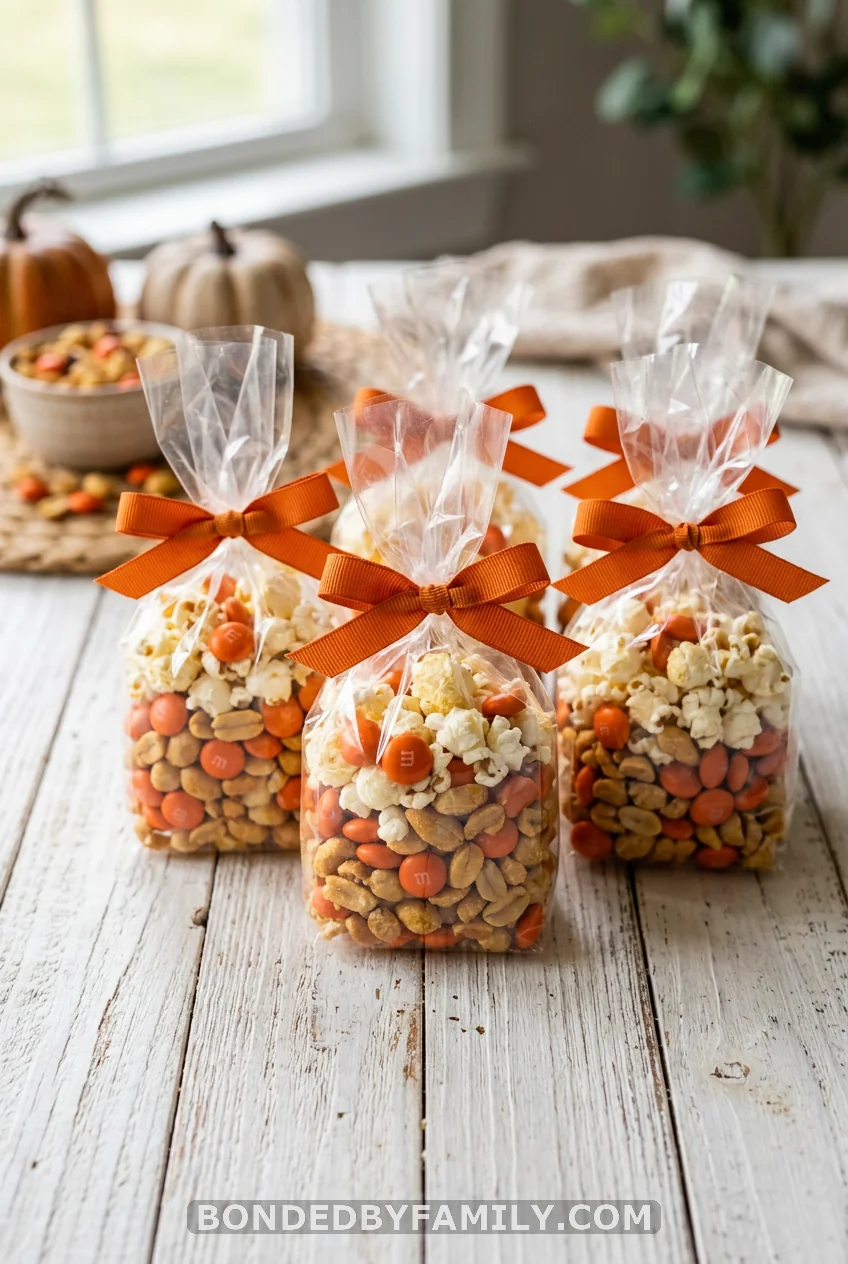
Orange M&Ms, honey-roasted peanuts (or sunflower seeds for nut-free), and white cheddar popcorn mixed together and poured into small cellophane bags, tied with orange ribbon.
The color scheme pulls directly from Tigger. The salty-sweet combination gives guests something to snack on that cuts through the dessert-heavy table. One large bag of each ingredient fills 25-30 bags. Total cost: $15-18.
This doubles as a take-home favor. Guests grab one on the way out.
14. Rabbit’s Carrot Patch Strawberries
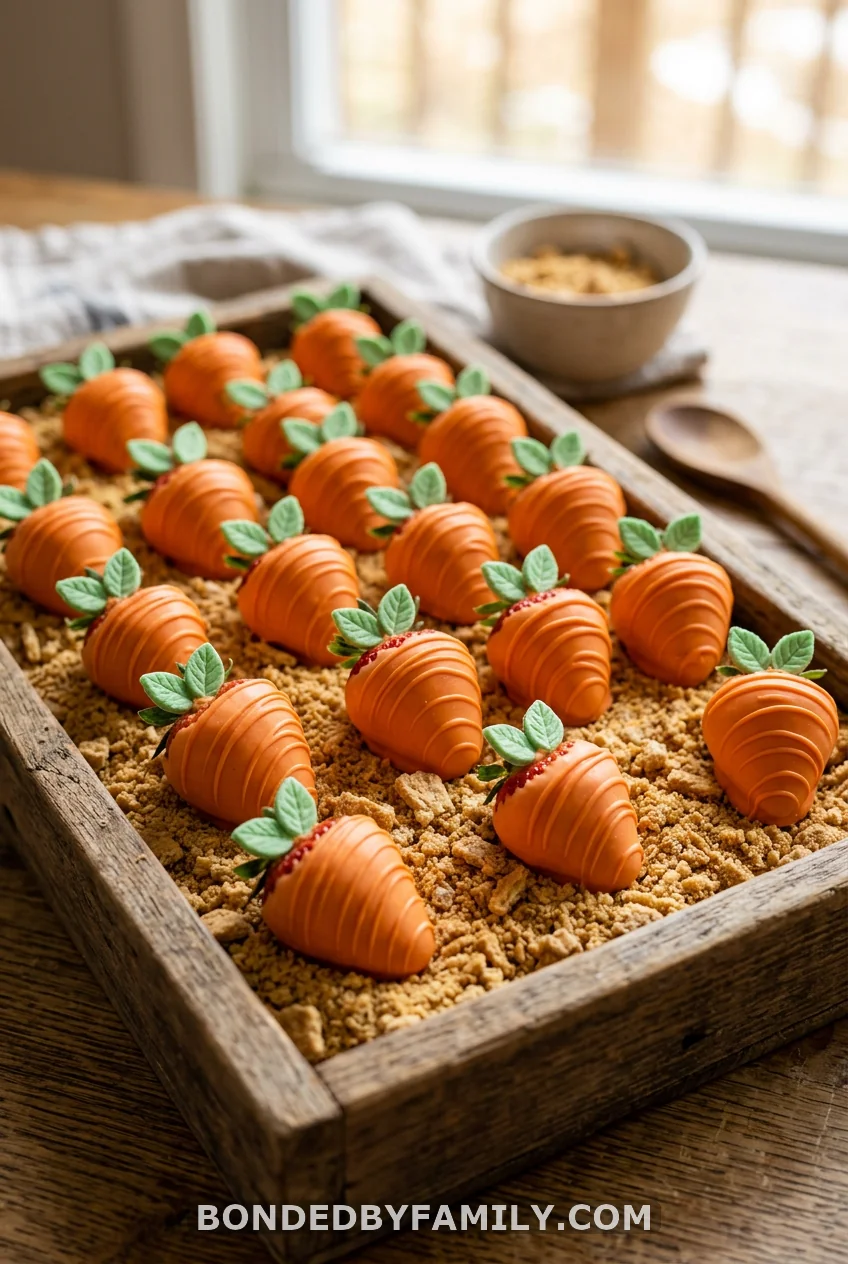
Dip whole strawberries in orange candy melts. While still tacky, press a strip of green fruit roll-up or a dab of green-tinted white chocolate at the hull to suggest carrot tops. The resemblance holds.
Serve on a layer of crushed graham crackers inside a wooden display box – it reads as soil and lands the carrot metaphor without explanation.
Label this station “Rabbit’s Carrot Patch.”
Important: serve within 4 hours of dipping. Strawberry moisture and candy coating do not stay compatible for long.
15. Hunny Pot Chocolate Candy Bark
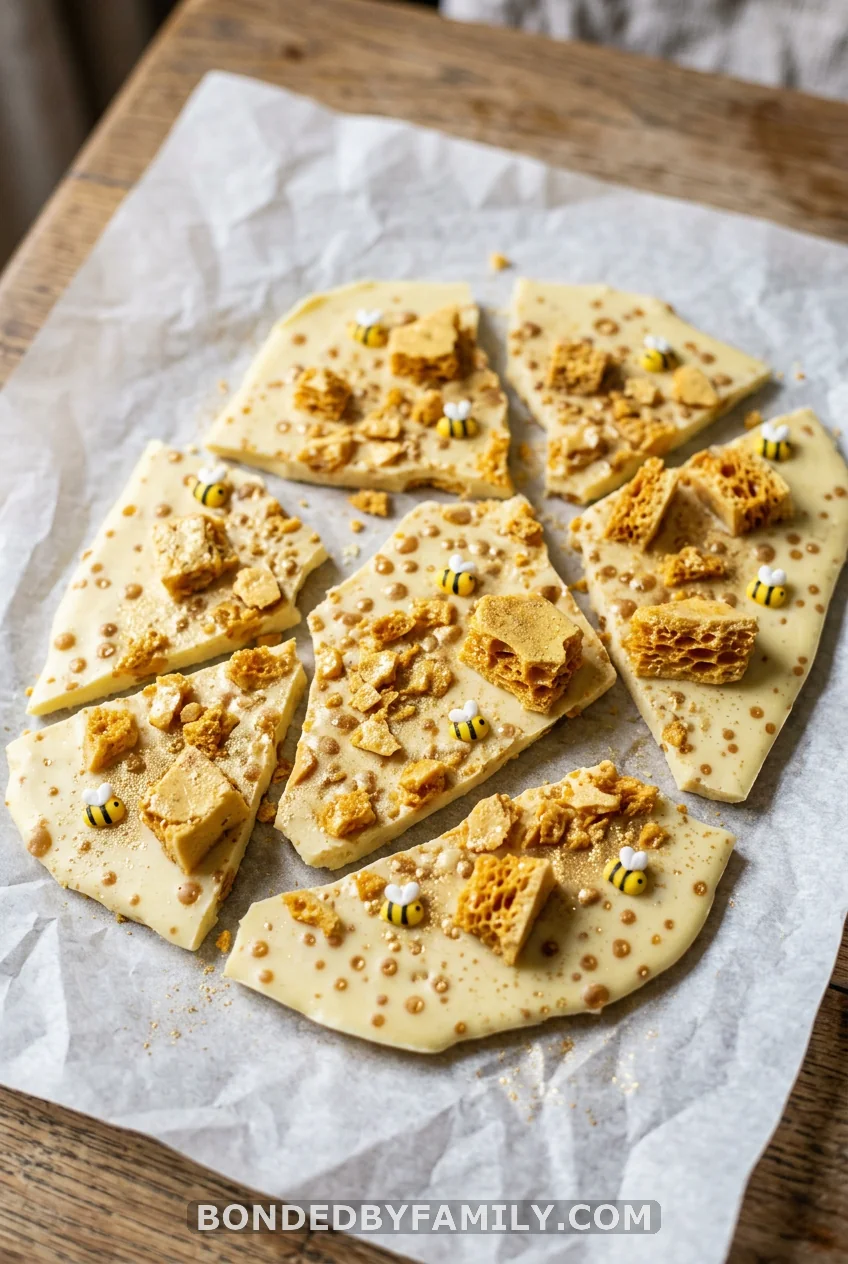
None of the other Winnie the Pooh treat guides mention candy bark. Worth noting, because it is the most forgiving format on this entire list.
Melt white chocolate wafers and stir in one teaspoon of honey extract. Spread onto a parchment-lined baking sheet about one-quarter inch thick. While still wet, scatter:
- Honeycomb candy pieces (Cadbury Crunchie bars broken up, or Jolly Rancher honeycomb, $2-3 each)
- Small edible candy bee decorations
- A dusting of gold luster dust applied with a dry pastry brush
Refrigerate for 30 minutes until fully set, then break into shards.
Stack shards upright in a glass jar or lay flat on a board. The gold dust and honeycomb pieces photograph well. Cost for a batch serving 20: under $12. No skill required. No timing stress.
16. The Pooh Bear Honey Cake
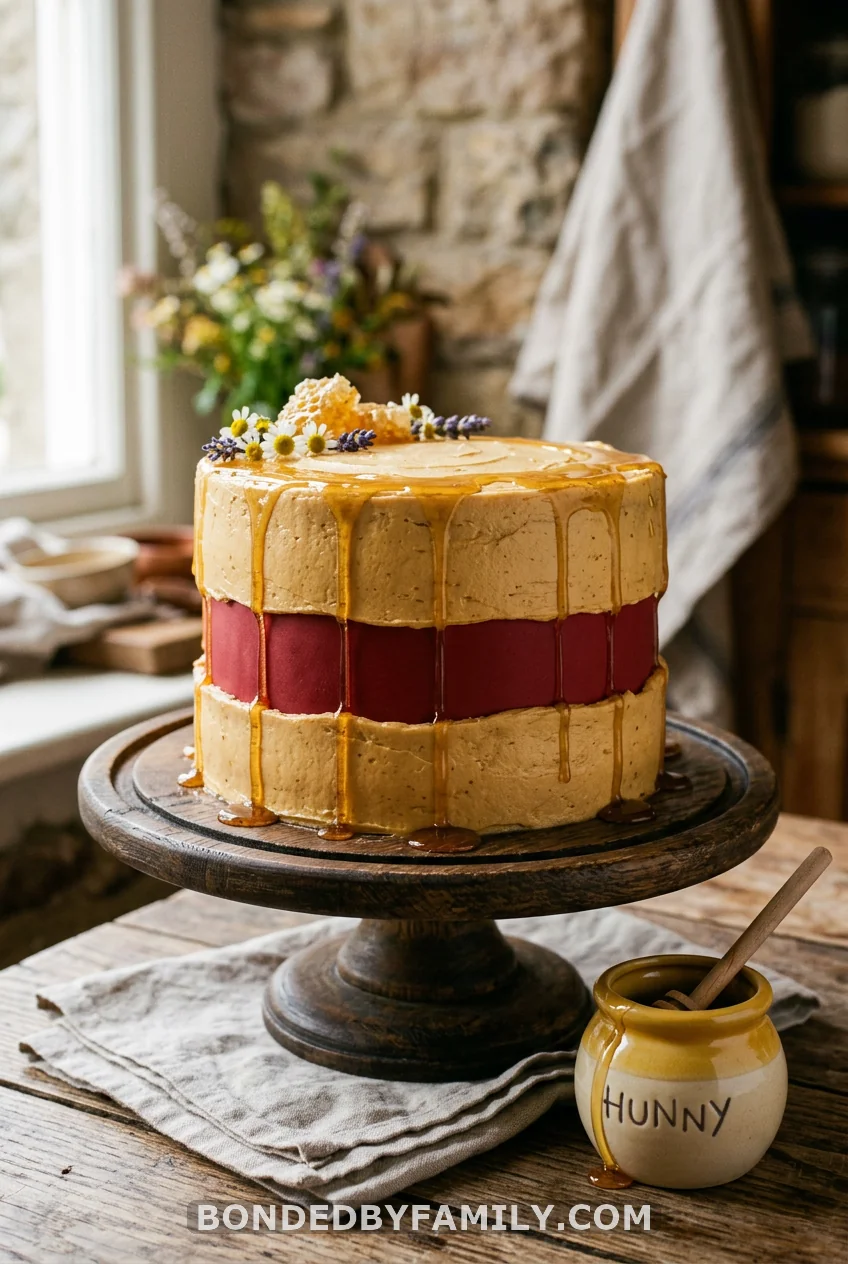
Every other treat on this table supports this moment.
The base: two layers of vanilla honey cake. In any standard vanilla recipe, replace one-quarter of the granulated sugar with raw honey at equal volume. The cake bakes slightly denser with a warm color and a honey note guests notice without being able to name.
Frost in honey buttercream – standard American buttercream with two tablespoons of raw honey blended in per cup of butter used. The color goes naturally amber without food coloring.
For the Pooh effect: yellow frosting all over, a band of red fondant pressed around the lower half to suggest his red shirt, and “HUNNY” piped in brown on the front panel. A small ceramic hunny pot set beside the base – or a fondant one on top – finishes the look.
Honey drizzle: warm two tablespoons of raw honey until pourable (not hot, just warm), then drizzle slowly down the sides of a fully chilled cake. It runs in natural trails and is set against the cold frosting. The visual is striking and takes 30 seconds.
Buying from a bakery: Ask for a lightly frosted two-layer cake in yellow with a honey drizzle and a red accent band. Any bakery can do this from one reference photo. Budget: $45-90 depending on size and your local market.
Baking yourself: A two-layer 8-inch round takes about 2 hours plus 1 hour of refrigeration before frosting. Ingredient cost: $12-18.
Putting the Table Together
You do not need all 16. Pick five or six with a clear visual story between them.
The Hunny Pot Cups, Tigger Tail pretzels, and candy bark cover the height range, the color range, and the skill range all at once. Add the berry cups for something fresh, the cupcake tower for the centerpiece moment behind the cake, and a batch of Nutter Butter acorns because no one has seen the trick before and everyone eats four of them.
Use Hundred Acre Wood character names for every label. Set up height variation – tall jar for pretzels, low tray for cookies, cake on a riser, cups at eye level. Honey and yellow throughout.
Your guests will not count how many treats came from scratch. They will eat Tigger Tails and tell the mom-to-be she is going to be wonderful. A full, themed table set that tone. These 16 give you the tools to build it.
Frequently Asked Questions
What are the most popular Winnie the Pooh baby shower treats?
Honey-themed cupcakes, Tigger tail pretzel rods, and chocolate Hunny Pot dessert cups appear at nearly every Pooh-themed party. They are popular because they are visually recognizable to guests of any age, can be made ahead without losing quality, and work equally well for vintage A.A. Milne-style showers and modern Disney-themed ones.
How far in advance can I make Winnie the Pooh baby shower treats?
Most Winnie the Pooh baby shower treats on this list work 1-3 days ahead. Chocolate Hunny Pot cups (empty) hold up to one week in an airtight container at room temperature. Tigger tail pretzel rods hold for 3-5 days in a cool, dry spot. Sugar cookies hold 5 days in an airtight container. Honey mousse filling holds for 3 days refrigerated. The exception is chocolate-dipped strawberries – serve those within 4 hours of dipping.
How do I label treats with Winnie the Pooh character names?
Print tent cards in a script or storybook font on white cardstock. Cut and fold. Etsy sellers also carry editable printable food tent card sets for this theme, typically $3-6 for an instant download you customize at home. Character pairing suggestions: Rabbit’s Garden for veggie cups, Piglet’s Punch for lemonade, Owl’s Wisdom Berries for fruit cups, Christopher Robin’s Acorns for the Nutter Butter cookies.
Can I make Winnie the Pooh baby shower treats without candy melts?
Yes. Tempered real chocolate works for every item on this list that calls for candy melts and tastes better. The trade-off is technique: tempering requires a candy thermometer and temperature management (melt dark chocolate to 115 degrees, cool to 82 degrees, hold at 88-90 degrees). Candy melts skip that process and still produce a finished result, which is why most home bakers choose them for party work.
What Winnie the Pooh treats work best as a dessert table centerpiece?
The honey layer cake is the natural anchor. Behind it, the Beehive Cupcake Tower adds height. At the front, the Chocolate Hunny Pot Cups clustered together are the most photographed item guests leave with on their phones. If you are choosing one treat to invest your full effort in, the cake and the Hunny Pots together give you the most visual return per hour spent.