You are planning a Winnie the Pooh baby shower, and you want the diaper cake to stop people mid-conversation. Not just sit there looking lumpy on the gift table – really make guests gasp, pull out their phones, and crowd around it before the mom-to-be even arrives.
A great Winnie the Pooh diaper cake does three things at once. It doubles as the centerpiece. It tells the whole Hundred Acre Wood story at a glance. And it hands new parents a practical stash of diapers they will tear through in the first two weeks. The trick is knowing which style fits your vision, your budget, and your skill level.
Below are 10 ideas ranging from a 20-minute gift basket to a full three-tier build with a Pooh plush climbing out of a hunny pot. Every single one is gender-neutral or easily adapted. Find your match.
1. The Classic 3-Tier with Plush Pooh Topper
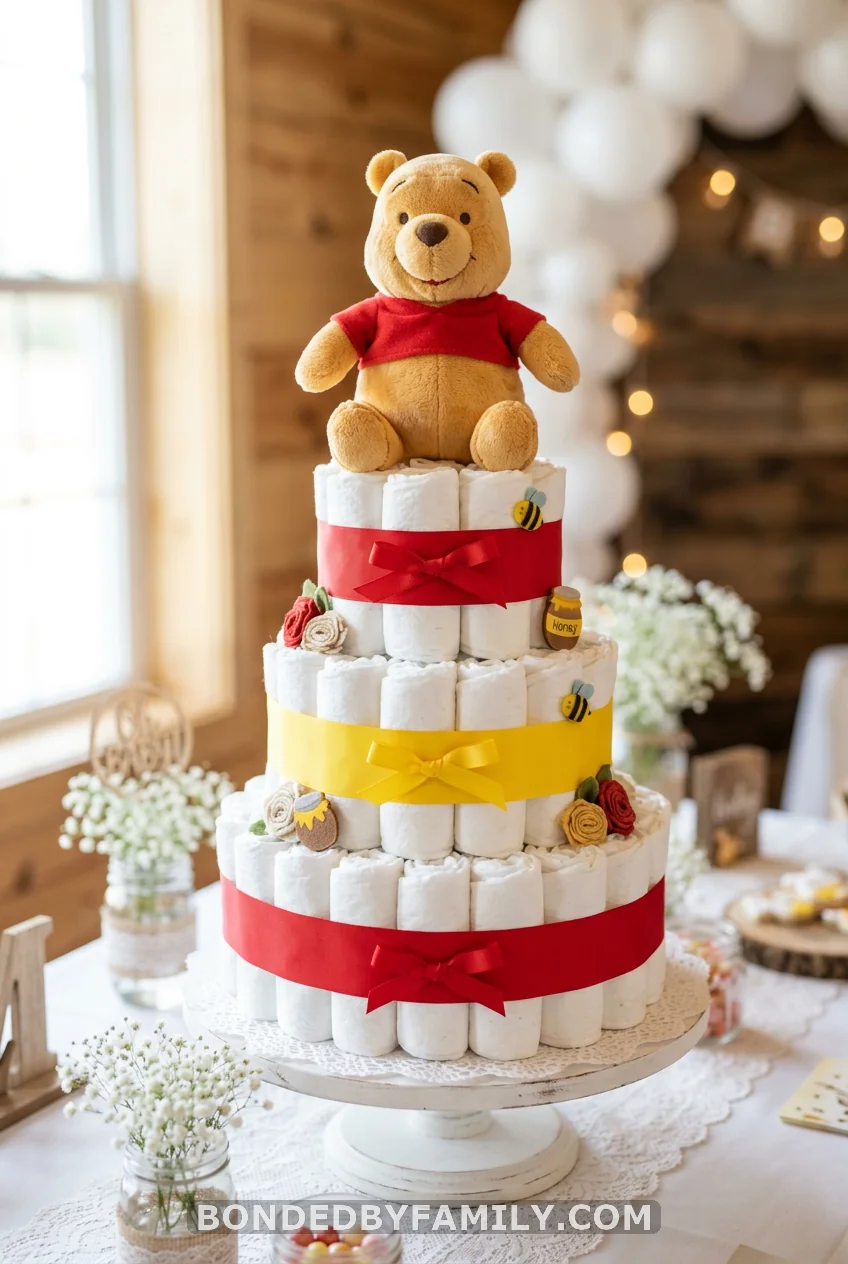
This is the design that fills Pinterest when you search “Winnie the Pooh diaper cake.” Three stacked tiers of rolled diapers, honey-yellow and classic red ribbon, a round-bellied Pooh plush sitting on top. It has been the signature look for decades and there is a reason for that.
Why This Design Still Wins
Three tiers read as a real cake from across the room. Guests see the silhouette before they understand what they are looking at, and that delayed recognition – “wait, is that made of diapers?” – is exactly the reaction you want at a shower. The color palette writes itself: honey yellow, classic red, maybe a touch of cream or sage. Every piece of Winnie the Pooh merch on the market fits those colors, which means shopping is painless.
What You Need (Materials and Costs)
- 75-100 Pampers Swaddlers Size 1 diapers – a box of 88 runs $30-45 at Target or Walmart
- Clear rubber bands – a bag from Walmart costs $1-2
- 1 paper towel roll or 8oz baby bottle as the center post for Tier 1 (the bottle is free and doubles as a gift inside)
- Yellow grosgrain ribbon, 1.5-inch width, 5 yards – $5-7 at Hobby Lobby or Michael’s
- Red satin ribbon, 1-inch width, 3 yards – $3-5
- Winnie the Pooh 9-inch plush – $12-15 at Target, JoAnn, or Amazon
- Floral pins to secure ribbon – $2-3 for a pack of 50
Total DIY cost: roughly $55-75 depending on what you already own
Compare that to ordering from Lil’ Baby Cakes: their 4-tier build (73 Pampers Swaddlers, Pooh plush, baby socks, Johnson’s shampoo, luxury washcloth, gold and red ribbon, roughly 12 inches wide by 16 inches tall) costs $98.95. DIY saves you $25-40 and 100% of the wait time. Ordering saves you the work if time is the scarcer resource.
How to Build It (Numbered Steps)
- Roll every diaper. Start from the open end and roll toward the folded edge. Roll snugly – tight enough that the diaper holds its shape, not so tight it gets crushed. Snap a clear rubber band around each one immediately.
- Build Tier 1 (the base). Stand your paper towel roll or baby bottle in the center of a flat surface. Arrange rolled diapers in a tight ring around it, rubber-band ends pointing up. Add a second ring of diapers around the first. Keep building out until the tier is 8-9 inches in diameter. Loop a single rubber band around the outside of the whole tier to hold it. Aim for 40-50 diapers at this level.
- Build Tier 2 (the middle). Same method, smaller footprint. Stop at 5-6 inches across. Use 20-25 diapers.
- Build Tier 3 (the top). Smaller still, 3-4 inches across. Eight to twelve diapers are plenty.
- Stack the tiers. Lift Tier 2 carefully onto Tier 1 and press gently so it sits flat. Repeat with Tier 3 on top of Tier 2.
- Cover the rubber bands with ribbon. Wrap yellow ribbon around each tier, tucking the starting end under and securing the finish with a floral pin. Add a red ribbon layer on top of the yellow for contrast. Floral pins every 3-4 inches keep things from slipping.
- Set the topper. Your 9-inch Pooh plush sits on Tier 3 with no attachment needed. His weight holds him in place.
What to Pack Inside
This is the detail every tutorial skips, and it is where the gift earns its keep. The inside of the tiers is usable space. Before you secure the ribbon, tuck these items between the diaper rolls:
- 2-3 folded onesies in Newborn or 0-3 month size
- 3-4 bibs
- 2 pacifiers in newborn size
- 1-2 pairs of baby socks
- A small bottle of Johnson’s Baby Lotion or Johnson’s Baby Wash
Parents disassemble the cake after the shower and find these inside. It turns a decorative centerpiece into a layered gift that keeps giving.
Common Mistakes to Avoid
- Rolling diapers too loosely. A loose roll springs open the moment you add ribbon. Roll tight, band immediately.
- Using Size 2 diapers. Size 1 (up to 14 lbs) rolls more uniformly. Size 2 is wider and creates slightly uneven tiers that wobble.
- Skipping the floral pins. Grosgrain ribbon looks smooth and taut but slips without pins. Pin every 3-4 inches.
- Choosing a 12-inch plush. A 12-inch Pooh on a 4-inch top tier will topple everything. Stick to 9 inches. Check that the plush can sit upright on its own before you buy it.
- Forgetting the inner gifts. An empty diaper cake is a missed opportunity. It takes five extra minutes to tuck onesies and socks inside. Do it.
2. The Hunny Pot Diaper Cake
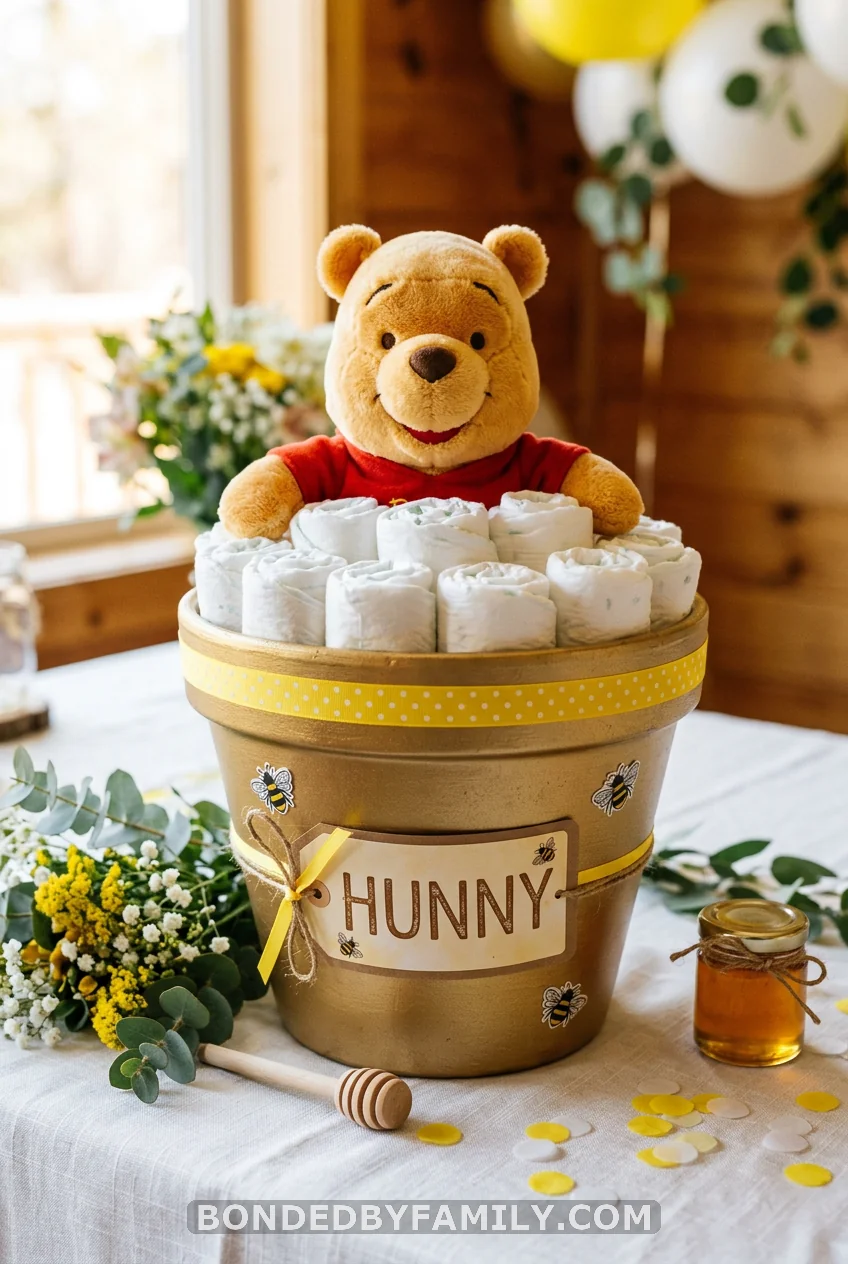
Standard tiers look like a cake. The hunny pot version looks like a prop from an actual storybook, and the difference in reaction when guests walk in is noticeable.
The best version of this design uses 10-inch and 12-inch circular papier-mache boxes (Michaels, $4-6 for a set) spray-painted gold on the outside only. Fill them with rolled diapers, stack them, and hot-glue a printable “HUNNY” sign to the front. Icing bumblebees from a cake decorating supply store ($3-4 per pack) goes on the sides.
The finishing move is the Pooh plush. Sit a 9-inch Pooh on a glass mason jar positioned directly behind the cake so he appears to be gripping the rim and peering inside. Thread baker’s twine through small holes in the papier-mache, attach it to his arms, and run the other ends through two thin wooden dowels pressed into the back of the diaper stack. From the front, he looks like he is holding on and leaning over. That detail has been repinned thousands of times. It costs about $2 extra and takes ten minutes to set up.
Total build cost sits around $40-60, which is well under even the cheapest ready-made Pooh diaper cake you will find online.
3. The Hot Air Balloon Diaper Cake
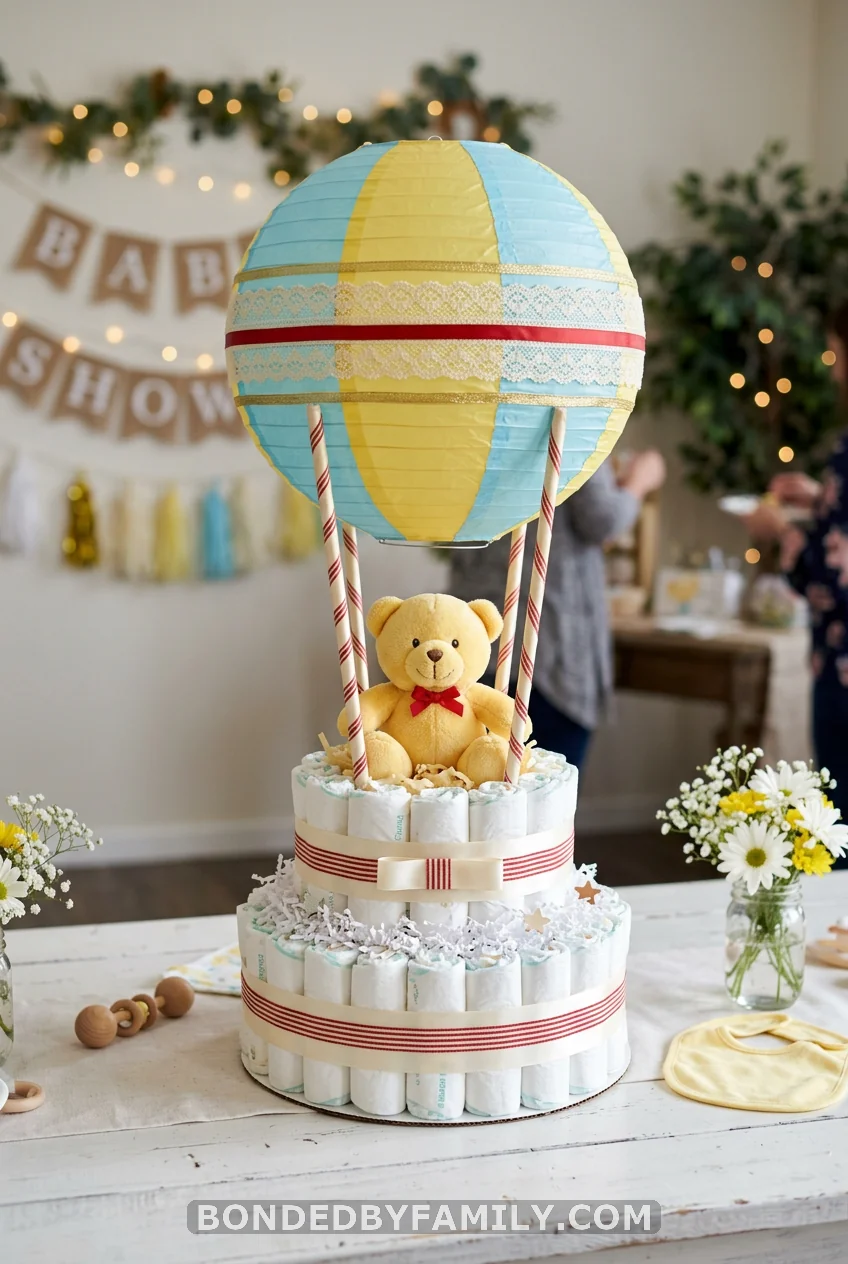
Pinterest data makes this call clearly. The hot air balloon variation was the highest-saved original pin in the raw data behind this keyword, pulling 401 saves from a single post. That is a strong creative signal.
The structure is cleaner than it sounds. Two standard diaper tiers form the balloon’s basket. A round paper lantern in yellow or sky blue ($4-6 at Party City or Amazon) sits on top of the actual balloon. Alternate red, yellow, and cream ribbon bands around the lantern, and it reads as a real hot air balloon immediately. Attach the lantern to the top tier with three or four bamboo skewers pushed gently into the diaper roll – no glue needed, they hold by friction.
A Pooh plush sits in the basket portion with his head and red shirt visible above the rim. If you want to get more detailed, a small “100 Acre Wood Expedition” printable tag tied to the lantern with baker’s twine ($0 from Etsy) completes the story.
This design photographs especially well in vertical format. The lantern creates natural vertical line tension that draws the eye upward, which means it looks great in both close-up and distance shots. If the shower guest list skews toward Pinterest and Instagram sharers, this is the one that will travel farthest online.
4. The Diaper Bear
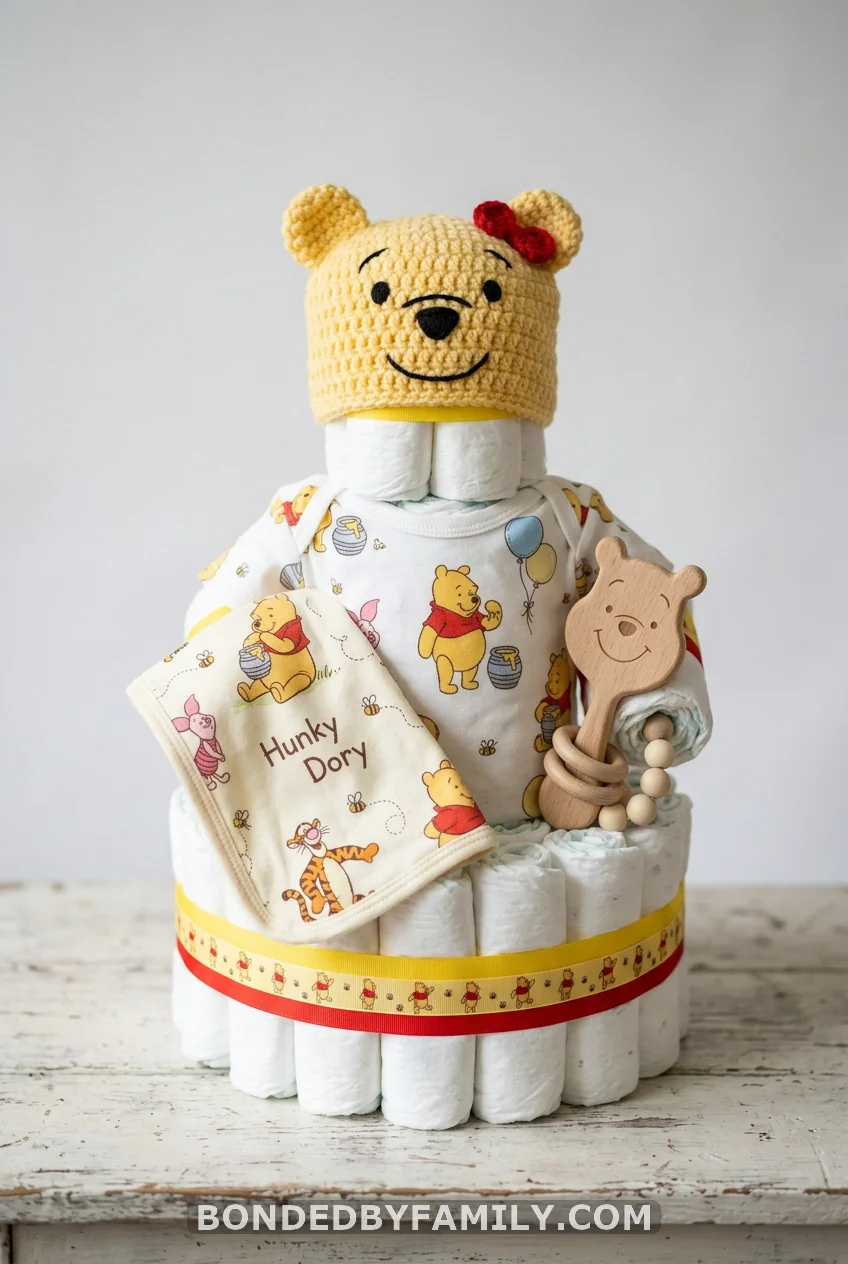
Roll 45 diapers into two cylinders – one taller for the body, one shorter for the head. Dress the top stack in a Winnie the Pooh onesie and hat. H&M’s organic Pooh set ($18-22, hat and pants included) fits the build perfectly. Tuck the pants into the lower cylinder for the legs, drape a small burp cloth across the chest, and tuck in a wooden rattle. Build time: 30 minutes. Cost: under $35.
5. The Pink Piglet Cake for Baby Girls
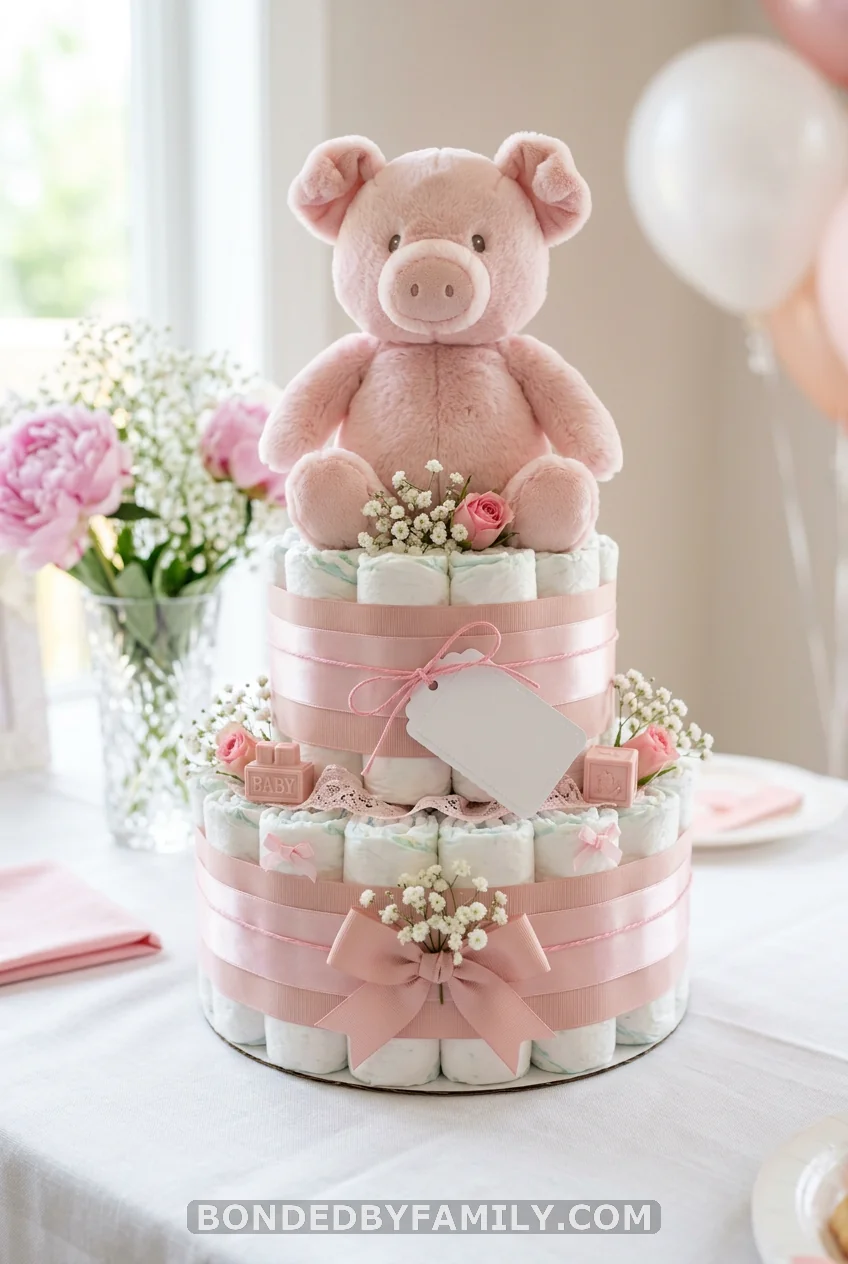
Most Winnie the Pooh diaper cakes default to yellows and reds. That palette reads gender-neutral or slightly boy-coded depending on the ribbon weight. If the shower is for a baby girl, the Piglet version fixes this immediately without redesigning anything structural.
Swap the Pooh plush topper for a plush Piglet ($10-15 at Target or Amazon). Replace the yellow grosgrain with soft pink satin ribbon on each tier. Add a blush or pale pink outer ribbon layer, and the whole palette reads clearly as a girl-coded Winnie the Pooh theme without being generic pink.
One detail competitors consistently skip: thread a small handwritten card with the baby’s name through the top ribbon using a mini safety pin. It takes two minutes and makes the whole cake feel custom-made rather than assembled from a kit. When the mom-to-be sees her baby’s name on the ribbon, the reaction is always worth it.
6. The Diaper Gift Basket
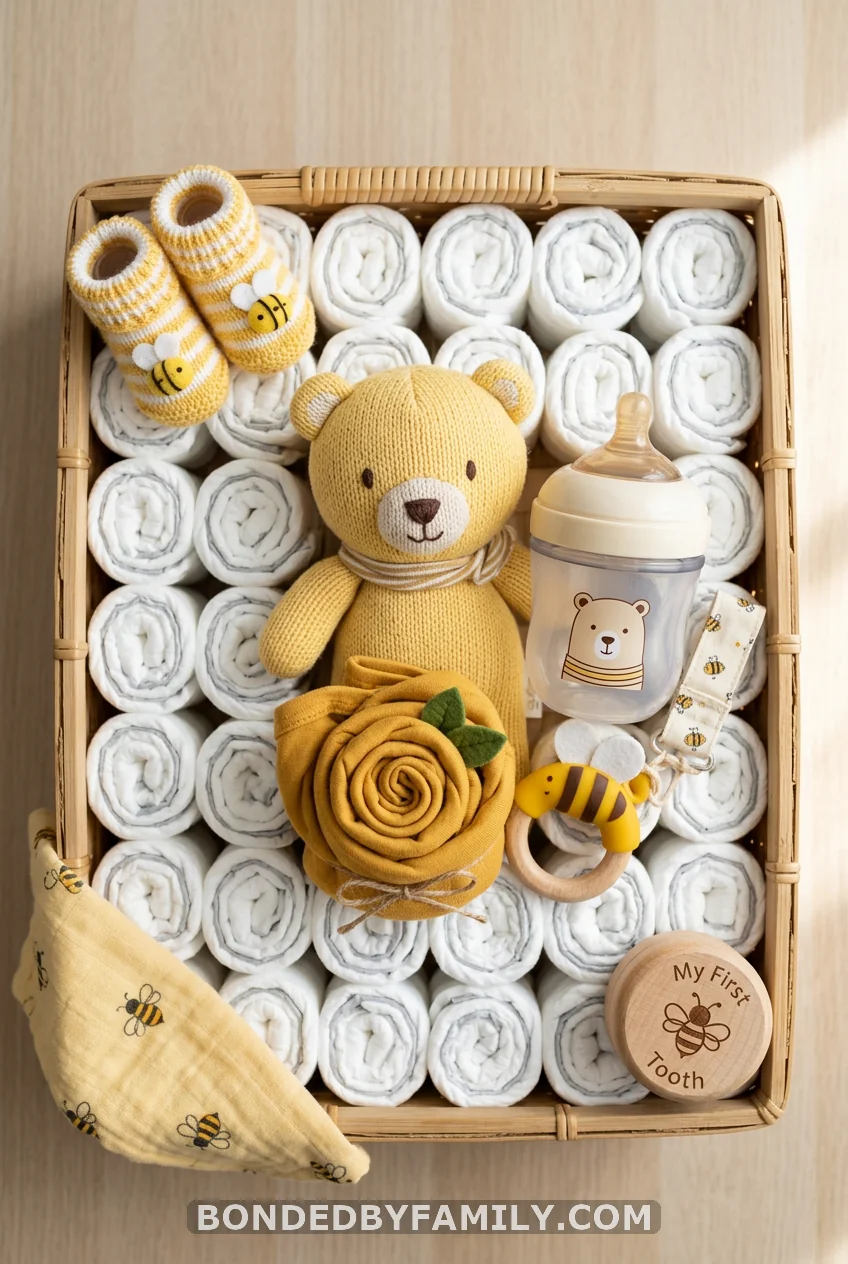
No tiers, no special technique. Grab a storage basket (10x10x6 inches – bamboo or fabric both work), roll 26 Size 2 diapers into the base, then tuck in a Pooh plush, a Winnie the Pooh baby bottle, a rolled onesie shaped into a flower, baby socks, and a small Pooh “Baby on Board” sign. Build time is 20 minutes. The basket itself becomes nursery storage afterward, which means the gift outlasts the shower. This is also a great option for a baby shower gift basket.
7. The Tigger-Striped Diaper Cake
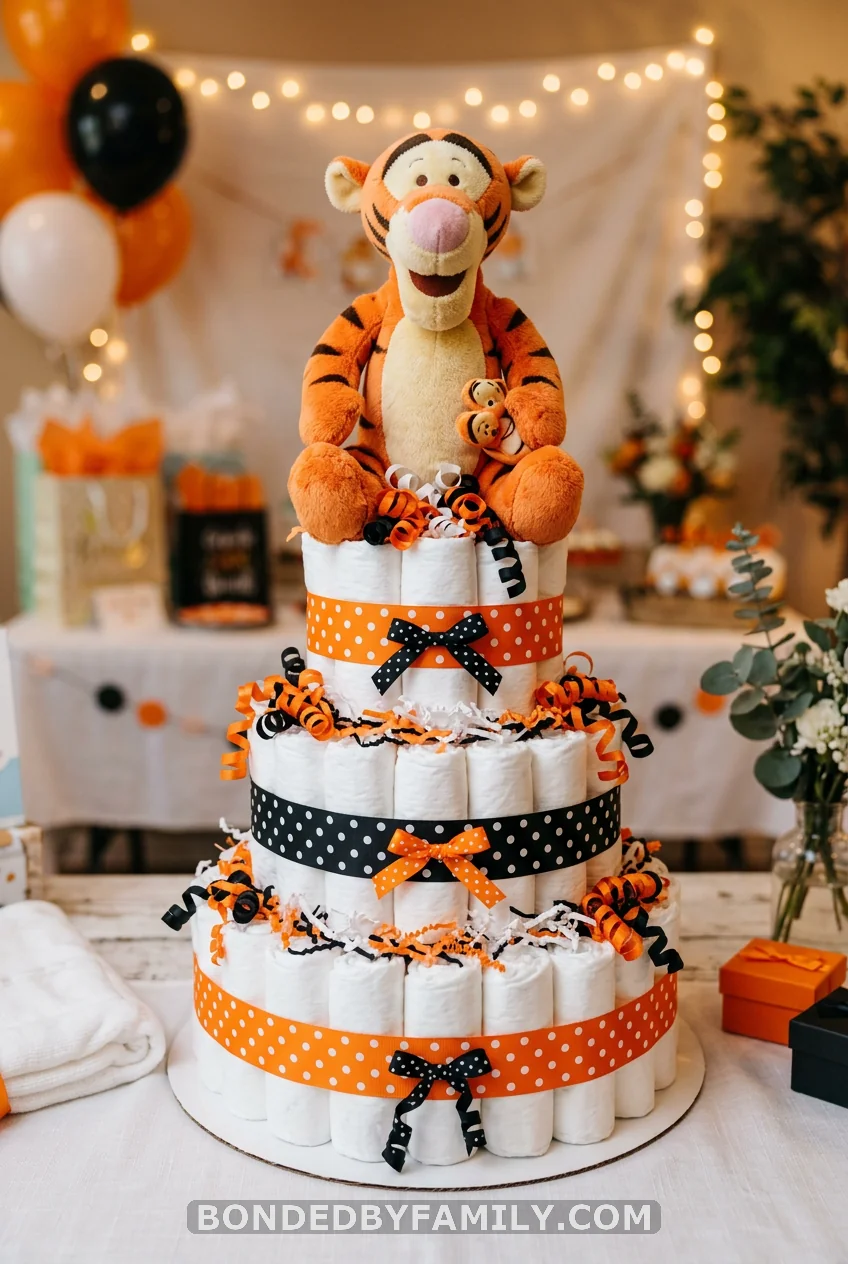
Build it exactly like the classic 3-tier from idea number one. Swap every yellow ribbon for orange and use black polka-dot ribbon as the contrasting layer. Tigger plush on top – 8 to 10 inches, available at Target for $12-15. Orange and black communicate Tigger without any other decoration. Total cost difference from the classic build: zero. Best when Tigger is truly her favorite, not a fallback.
8. The Pooh and Friends Gang Cake
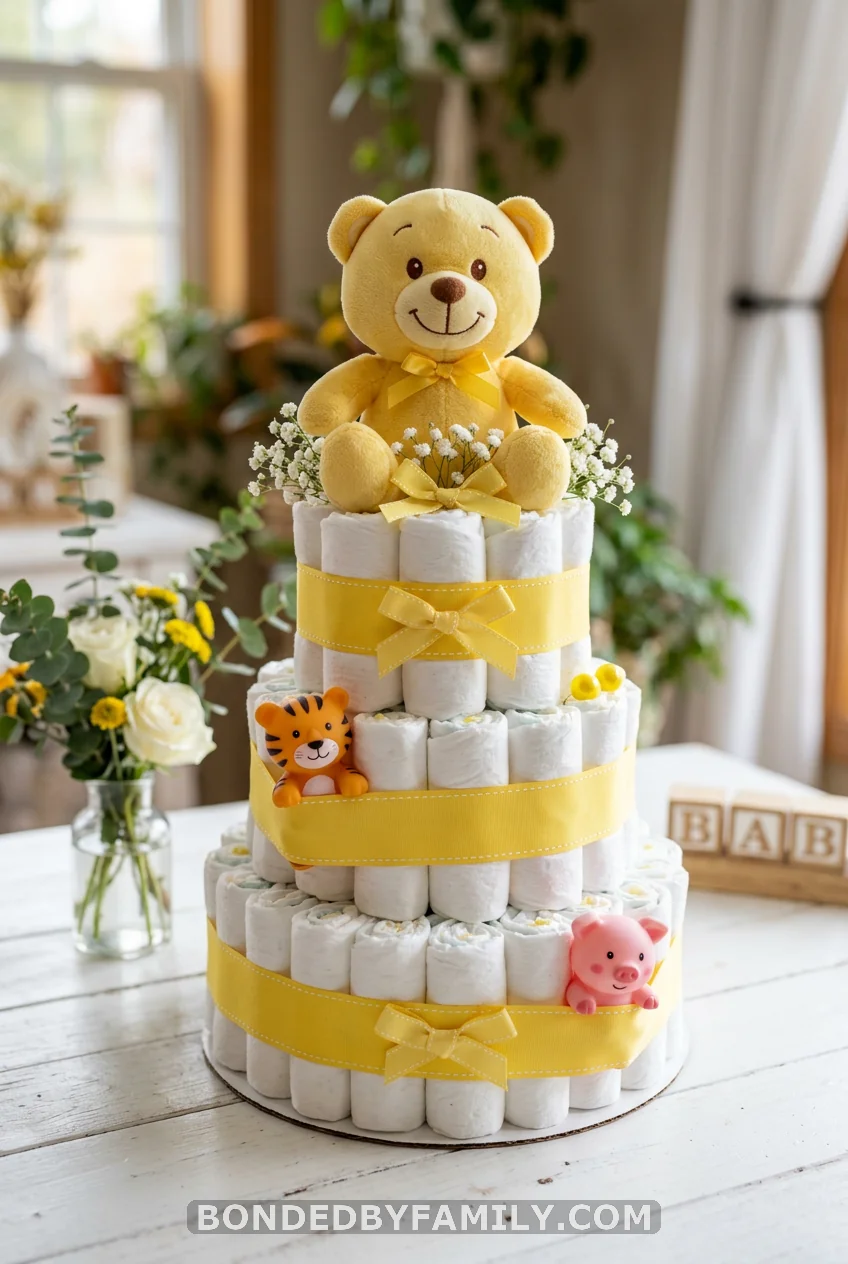
Everyone assumes more characters mean more impressive. They plan a cake with Pooh on top, Piglet on Tier 2, Tigger on Tier 3, and Eeyore wedged into the side. Then they build it and wonder why it looks cluttered rather than joyful.
What most people think: More characters tell a richer story and show more effort.
What works instead: One character topper plus one or two small character accents in the lower tiers.
The visual logic is the same as gift-wrapping. Too many focal points create no focal point. When Pooh sits alone on the top tier, every eye in the room goes directly to him. Add a full-sized Piglet to the middle, and you split attention in a way that weakens the impact of both.
The version that photographs well and reads clearly from across the room uses Pooh as the primary topper, then places small Piglet and Tigger figurines – not plush, figures, which are smaller and visually quieter – tucked into the ribbon of the lower tiers. Dollar Tree and Party City carry Winnie the Pooh figurine sets for $4-8. One 9-inch plush on top, two 2-inch figures tucked into the ribbon below. That is your gang cake, and it works.
9. The Winnie the Pooh Diaper Snail
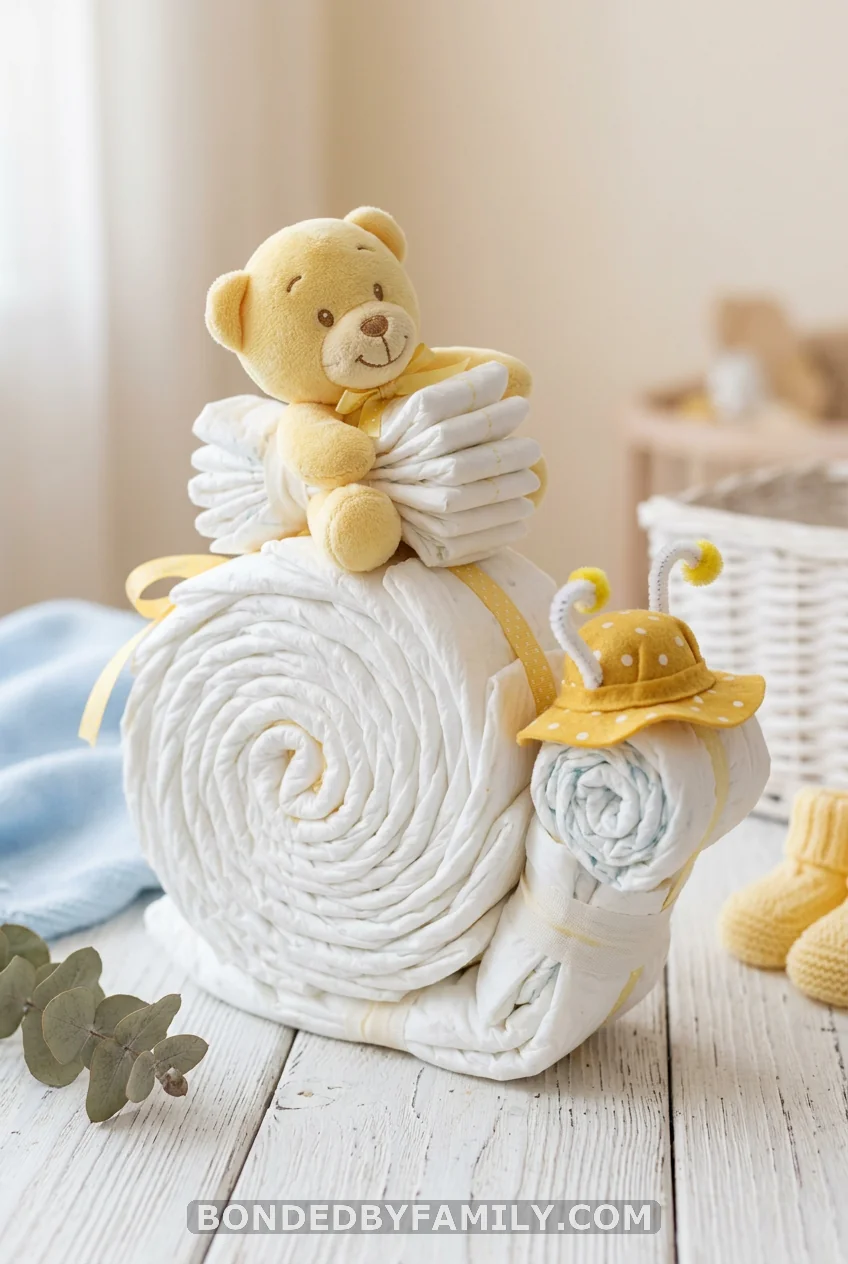
This one surprises people. The snail shape comes from coiling a single long column of rolled diapers into a spiral – the shell – with a smaller rounded cluster at one end forming the head. It sounds fiddly, but the build is less complicated than stacking three separate tiers because you never have to worry about the layers staying put.
The Winnie the Pooh version puts a small Pooh sun hat on the snail’s head cluster and balances a Pooh plush on the shell. If the head cluster is only 4-6 rolled diapers bundled together, the hat sits naturally without any attachment. The contrast between the white diaper spiral and the yellow-and-red Pooh accessories does all the visual work.
To build the shell, lay a receiving blanket flat and arrange rolled diapers in a single line along its length, securing each one with a rubber band. Once your line is long enough – roughly 30-35 diapers – coil the entire strip into a tight spiral and hold it in place with a large rubber band around the outside, or a strip of ribbon tied gently around the circumference. Tuck the head cluster into the open interior end of the coil. A hat goes on the head. Plush goes on the shell. Done in under an hour.
10. The Vintage Storybook Pooh Edition
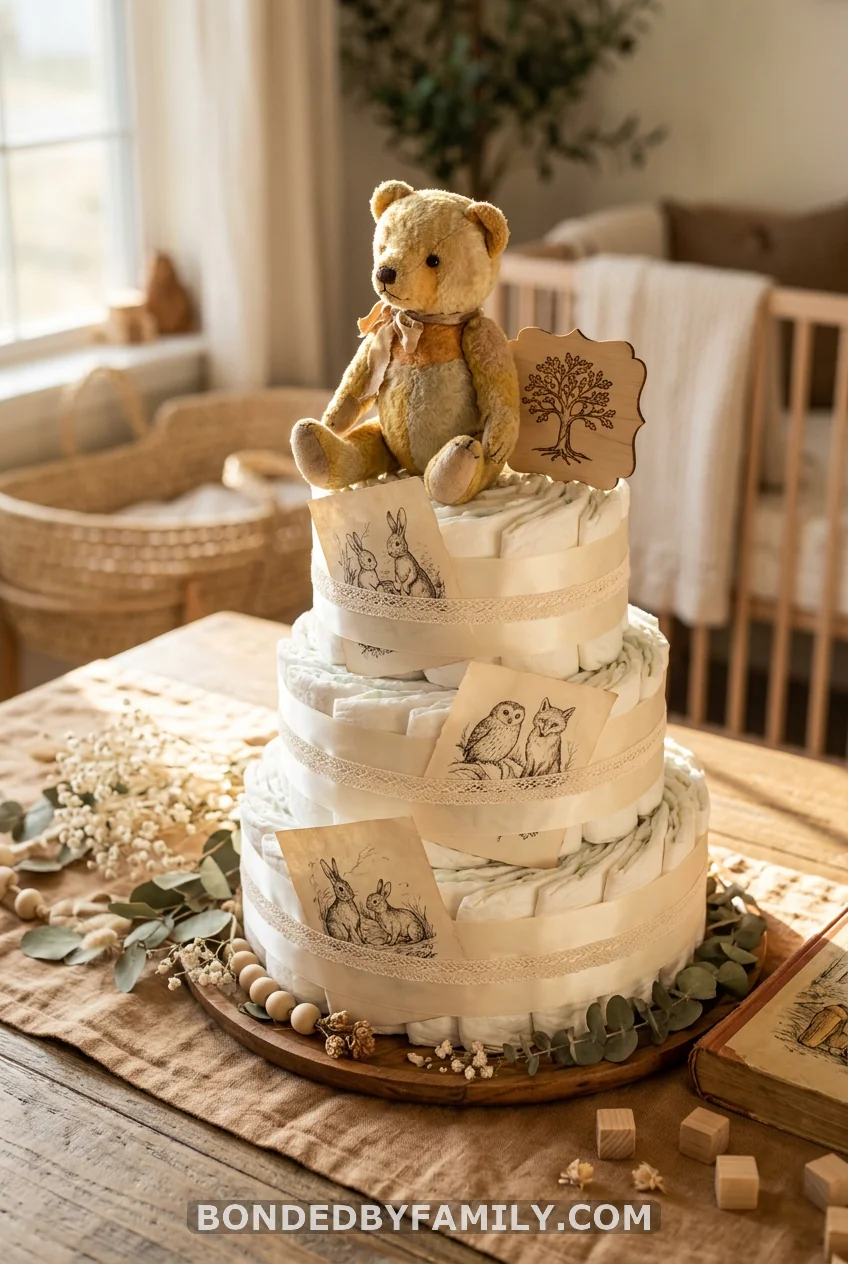
There are two versions of Winnie the Pooh, and they produce two very different diaper cakes. Modern Disney Pooh uses bright fire-engine red and saturated yellow – what you see on commercial packaging. Classic or Vintage Pooh draws from E.H. Shepard’s original illustrations: softer lines, cream and warm tan instead of bold yellow, a palette that reads as heirloom rather than party supply.
The vintage version builds differently. Use cream-colored ribbon in place of yellow. Ivory or warm white ribbon for the outer layer of each tier. A classic-illustration Pooh plush – the Steiff or Manhattan Toy versions carry the right aesthetic ($20-30 rather than the standard $12-15) – as the topper. Pages printed from a public-domain E.H. Shepard illustration (the originals are copyright-free) tucked gently into the ribbon folds of each tier. A small wooden “100 Acre Wood” sign from an Etsy seller ($8-12) on the top tier completes the look.
This version photographs with more warmth and depth than the bright-palette version because the muted tones do not compete with each other for the camera’s attention. Details read clearly, and textures show up in photos. For showers with a “literary baby shower” or “heirloom nursery” theme, this is the cake that fits the room perfectly.
The Right Cake for the Right Mom
Ten ways to build a Winnie the Pooh diaper cake, and each one says something specific. The classic three-tier says you put in real time and care. The hot air balloon says you paid attention to what is trending right now. The diaper snail says you wanted something no one else at this shower will have.
Pick the one that fits the mom-to-be and the vibe she is going for. Then remember that the inside matters as much as the outside. A thoughtfully packed cake with onesies, bibs, and pacifiers tucked into the tiers is a gift that keeps paying off long after the ribbons hit the recycling bin.
The Hundred Acre Wood has always been about small things done with a whole lot of warmth. Your diaper cake can be exactly that.
Frequently Asked Questions
How many diapers do I need for a Winnie the Pooh diaper cake?
A standard 3-tier cake uses 75-100 diapers. The base tier takes 40-50, the middle 20-25, and the top 8-12. If you are building a 4-tier cake, budget for 100-120 diapers. Size 1 diapers (up to 14 lbs) roll the most uniformly and are the most practical size for newborns in the early weeks.
What size Winnie the Pooh plush works best as a diaper cake topper?
A 9-inch plush is the standard for a 3-tier cake. Anything larger (12+ inches) risks toppling the top tier. Anything smaller (5-6 inches) gets lost visually and does not read from across a room. Before you buy, check that the plush can sit upright on its own without support.
Is it cheaper to make or buy a Winnie the Pooh diaper cake?
DIY runs $55-75 for a 3-tier cake with a plush topper. Ready-made options start around $98.95 for a 4-tier build from dedicated diaper cake shops. If you are comfortable with rolling diapers and handling ribbon, DIY is the better value. If you are short on time, the pre-made versions ship boxed and ready to display.
What diapers work best for building a diaper cake?
Pampers Swaddlers Size 1 are the most consistent choice. They roll cleanly, hold their shape well, and have minimal scent. Huggies Little Snugglers are a close second. Avoid generic store-brand diapers if possible – they tend to roll unevenly and create lumpy tiers. Pampers also makes a Winnie the Pooh print in select sizes, which adds a fun thematic detail when parents start unpacking after the shower.
Can I make a gender-neutral Winnie the Pooh diaper cake?
Yes, and the Winnie the Pooh theme is one of the strongest for gender-neutral builds. The classic palette of honey yellow, red, and cream does not skew toward either gender. If the parents have not shared the baby’s sex, swap ribbon colors to sage green, warm beige, or soft lavender, and the cake works beautifully for either.