You’re three weeks out from your woodland baby shower and scrolling Pinterest at 11 PM, watching perfectly frosted tree stumps and $400 fondant deer mock your baking skills. Same.
Here’s what nobody admits: most woodland cakes online are made by pros with industrial mixers and $80 silicone molds you’ll use exactly once. The “rustic naked cake” everyone pins? That’s $200 worth of organic cream cheese frosting and eucalyptus shipped overnight from a farm in Oregon.
This isn’t that. These are woodland baby shower cake ideas built for actual humans with KitchenAid stand mixers, grocery store fondant, and the sneaking suspicion that your “perfectly imperfect” tree bark texture might just look like you forgot to frost half the cake.
Some of these ideas take 20 minutes. One requires an entire Saturday and a silicone fox mold. Most fall somewhere in the middle. I’m telling you upfront which ones are weekend projects and which ones you can pull off Thursday night after the toddler’s asleep.
The Two-Tier Naked Cake With Actual Woodland Animals (Not Fondant Blobs)
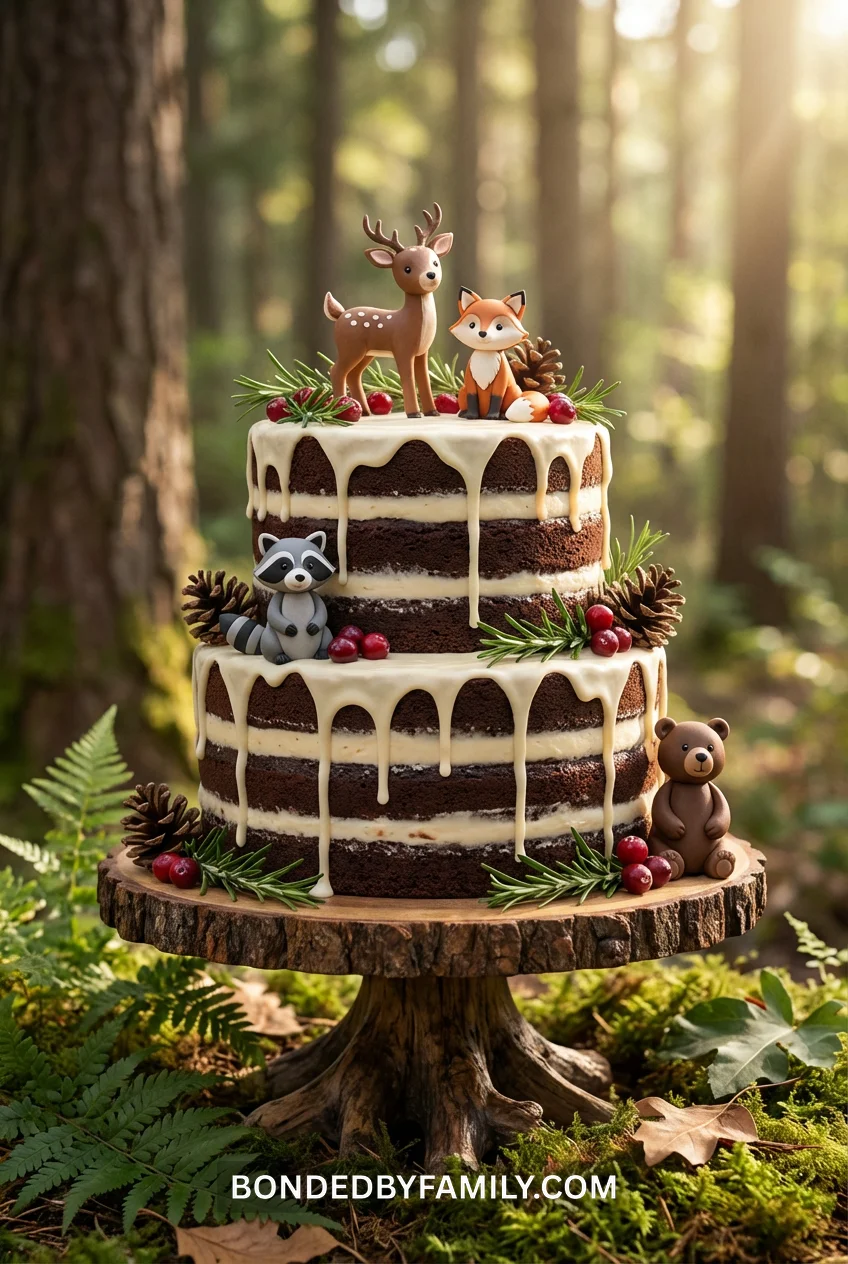
This is the one every woodland baby shower has, but most people do it wrong. The “naked” aesthetic only works if your cake layers are actually level and your filling doesn’t ooze out like a busted pipe. That requires chilling.
Bake your tiers the day before. Wrap them in plastic wrap and refrigerate overnight. Room temperature cake tears when you frost it. Cold cake accepts frosting like a dream.
The Tier Reality
Most recipes say “two 6-inch rounds and two 8-inch rounds” like that’s helpful. Here’s what you actually need:
- Bottom tier: Three 8-inch rounds (gives you height without looking stubby)
- Top tier: Two 6-inch rounds (proportion matters more than Pinterest admits)
- Cake board between tiers: Mandatory. The top tier will sink into the bottom without support
Cost breakdown if you’re buying rather than baking:
- Bakery 8-inch rounds: $12-18 each x3 = $36-54
- Bakery 6-inch rounds: $8-12 each x2 = $16-24
- Total base: $52-78 before you frost a single layer
The Fondant Animal Situation
You have three options, and two of them are lies:
Option 1: Make them yourself – Stop. Unless you’ve worked with fondant before, your deer will look like a drunk potato. This isn’t the time to learn.
Option 2: Etsy fondant toppers – Search “woodland animal cake toppers fondant.” Prices range $18-45 for a set of 4-6 animals. Ships in 3-7 days. The $18 versions are often rock-hard and taste like sweetened chalk. The $35-45 versions from established sellers (like “SweetieSugarCakes” or “LittleCakesAndCompany”) are actually edible and arrive looking like the photos.
Option 3: Plastic figurines – Controversial take: clean plastic animals from the craft store work fine. Spray them with food-safe sealant if you’re worried. Cost: $8-12 for a bag of 12. Nobody will eat the fondant deer anyway.
Assembly That Won’t Collapse
Level your bottom tier layers. Stack them with buttercream or cream cheese frosting between. Insert four bubble tea straws (cut to exact height) in a square pattern, 2 inches from the edge. This is your support structure.
Place your 6-inch cardboard round on top of the straws. Stack your top tier on the cardboard. If you skip the straws, the top tier sinks into the bottom by hour two of your shower. Ask me how I know.
Frosting application: You want visible cake layers, so don’t fully coat. Spread frosting on each layer, let some squeeze out. Use an offset spatula to smooth the outside just enough that it doesn’t look like a landslide. Chill 30 minutes between tiers.
Decoration: Fresh rosemary sprigs tucked into frosting seams. Small pinecones (baked at 200°F for 20 minutes to kill bugs, yes really). Fondant animals on top. Done.
Time commitment: 6-8 hours across two days (baking day one, assembly day two)
Cost reality: $75-120 depending on whether you bake or buy, and which fondant route you take
Single-Tier Tree Stump Effect Using Chocolate Buttercream
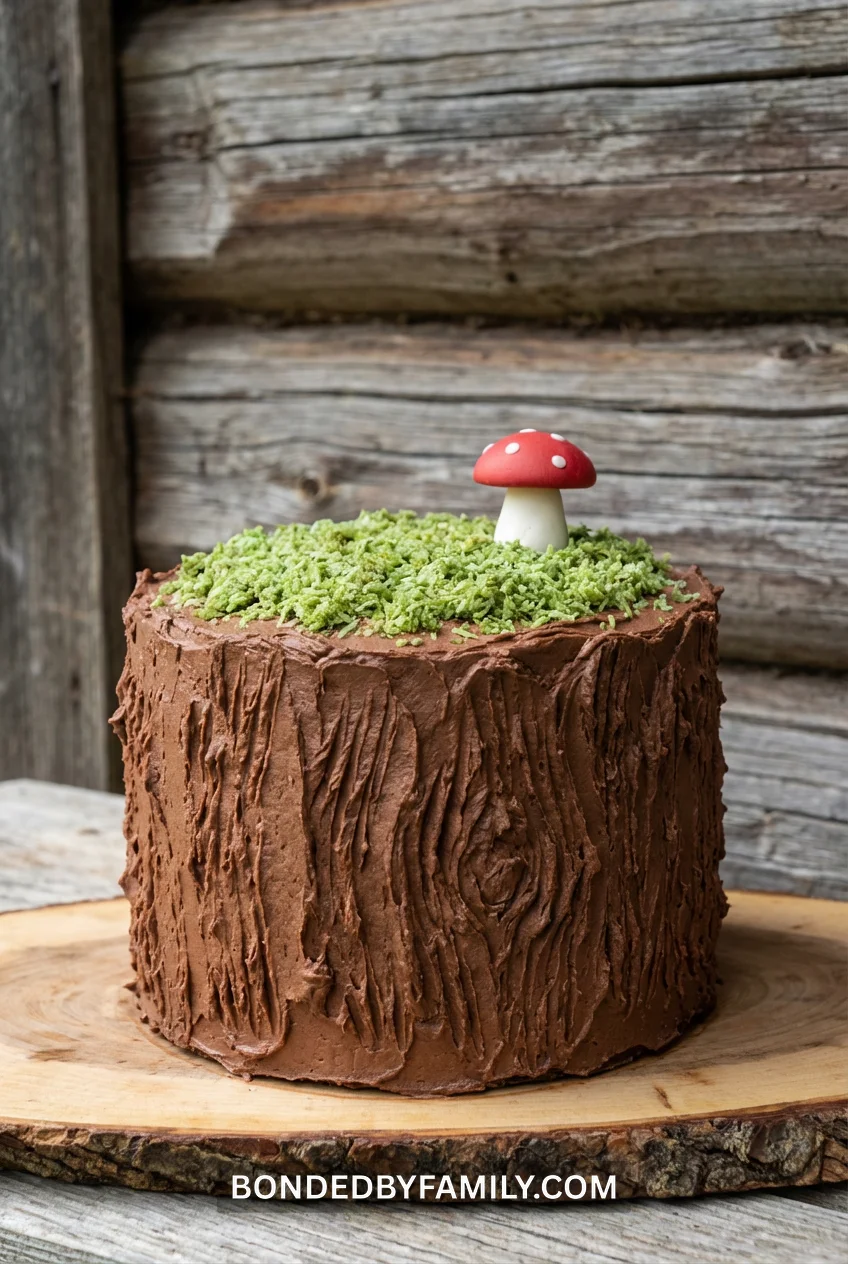
Your shower has 25 people. You don’t need architectural engineering. You need one layer that looks intentional.
Bake two 9-inch rounds. Stack with filling. Frost with chocolate buttercream. While the frosting is still soft (not set), drag a fork vertically around the entire circumference. This creates bark texture. It won’t look like real tree bark. It’ll look like someone dragged a fork through frosting. That’s fine. Call it “rustic.”
The Moss Hack
Sweetened coconut flakes + green gel food coloring + zip-top bag = edible moss that costs $3 instead of $18.
Put 1 cup coconut flakes in a gallon zip-top bag. Add 8-10 drops green gel coloring (liquid coloring makes it soggy). Seal and massage the bag until color distributes. Dump the green coconut around the base of your tree stump cake and on top. Looks like moss. Is moss flavored with coconut. Close enough.
Add a few store-bought chocolate rocks (Walmart has them near the ice cream toppings) and maybe one sad fondant mushroom from Amazon ($8 for a pack of 12). Boom. Tree stump.
Time commitment: 90 minutes start to finish
The Tiered Buttercream Masterpiece With Hand-Piped Woodland Creatures
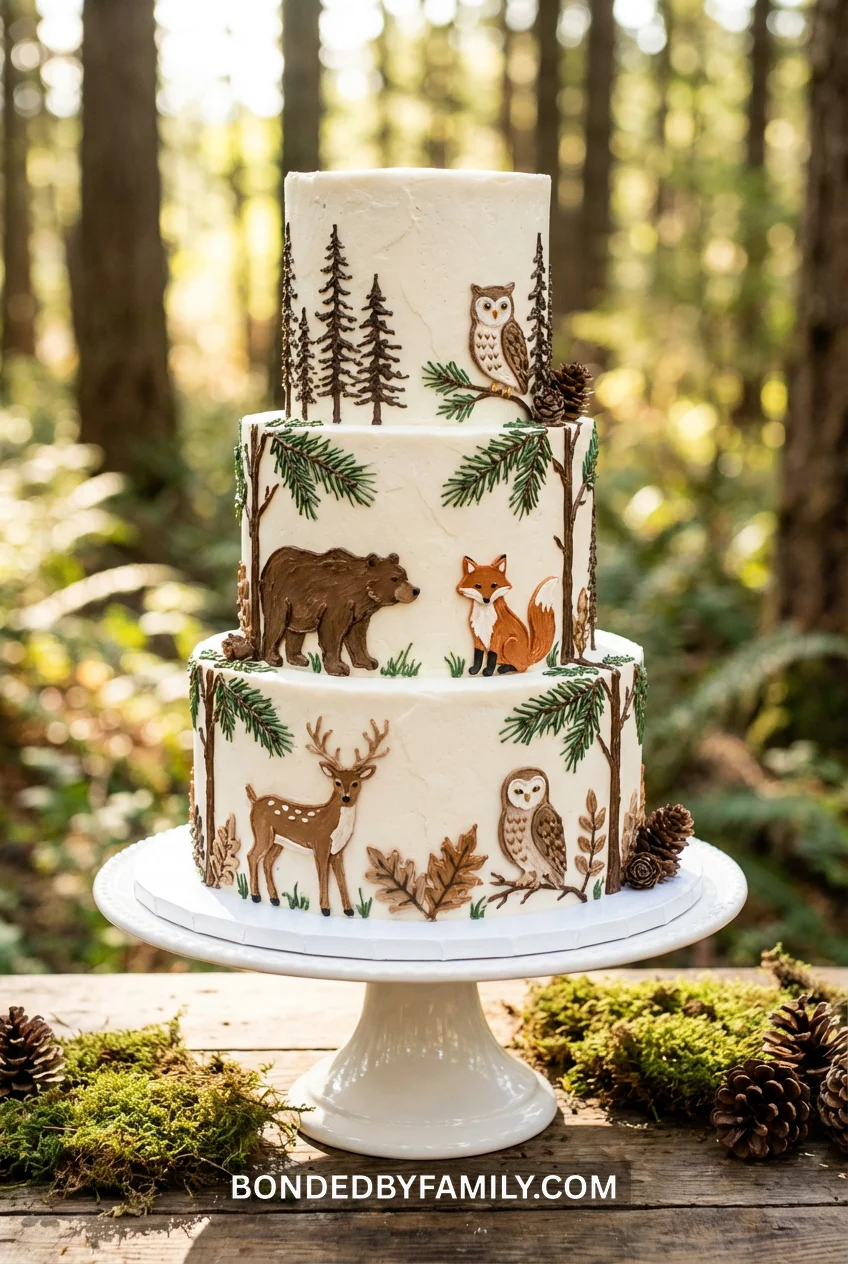
This is for the person who already knows what a #12 round tip does and owns more than one offset spatula.
You’ll need three tiers (12-inch base, 9-inch middle, 6-inch top), support dowels, a turntable, and about 12 hours of your life. This isn’t a “Thursday night” cake. This is a “cleared my entire Saturday and told the family I’m unavailable” cake.
Buttercream Recipe That Pipes Without Bleeding
American buttercream is too soft for detailed piping in warm rooms. Swiss meringue buttercream is temperature-stable but takes practice. If you’re reading this and thinking “what’s the difference,” stick with American but add these modifications:
- Standard ratio: 1 cup butter to 3-4 cups powdered sugar
- Piping ratio: 1 cup butter to 4.5-5 cups powdered sugar (stiffer consistency)
- Add 2 tablespoons meringue powder per batch (stabilizes in heat)
- Chill piped decorations 15 minutes before moving the cake
Make three batches: white (base coat), brown (tree bark, deer, bear), rust-orange (fox), gray (optional for additional woodland creatures).
The Tier Structure
12-inch base: Four layers of cake, needs 8-10 support dowels arranged in two concentric circles 9-inch middle: Three layers, needs 5-6 dowels 6-inch top: Two layers, no dowels needed
Each tier gets crumb coated (thin layer of frosting to trap crumbs), chilled 30 minutes, then a smooth final coat. Use a bench scraper for smooth sides if you want the “professional bakery” look. Use your offset spatula if you want “homemade with love.”
Piping the Woodland Animals
This is where hours disappear. You’ll need:
- Round tip #3 for outlines
- Round tip #5 for filling
- Leaf tip #352 for pine branches
- Star tip #16 for texture details
Sketch your animals on parchment paper first. Tape the parchment to a hard surface, cover with wax paper. Pipe your animals on the wax paper. Freeze them solid (20-30 minutes). They’ll peel right off and you can position them on your frosted cake without smudging.
For tree silhouettes: pipe directly on the cake with brown buttercream using tip #3. Start at the base, pipe upward in quick strokes that taper at the top. Add bare branches extending outward. Takes practice. First three trees will look like dying cacti. Keep going.
Pro move: Create dimension by piping some elements (like pinecones) separately, freezing them, and applying them raised off the cake surface with a dab of buttercream underneath. This creates shadow and depth.
Common mistakes to avoid:
- Piping on a cake that isn’t completely chilled – your animals will slide
- Using buttercream that’s too warm – it’ll bleed and lose detail within an hour
- Piping too much detail – from six feet away (where guests see your cake), fine details disappear
- Not testing your piping consistency – if it doesn’t hold a peak when you pull the bag away, add more powdered sugar
Time commitment: 10-14 hours (baking, cooling, crumb coating, chilling, final coating, piping)
Cost: $45-65 in ingredients if you’re making everything from scratch
When it’s worth it: You genuinely enjoy cake decorating and have done tiered cakes before. If this is your first tiered cake, do NOT make it for an event with a hard deadline. The stress will destroy you.
Minimalist Single-Tier White Cake With Gold Leaf Woodland Silhouette
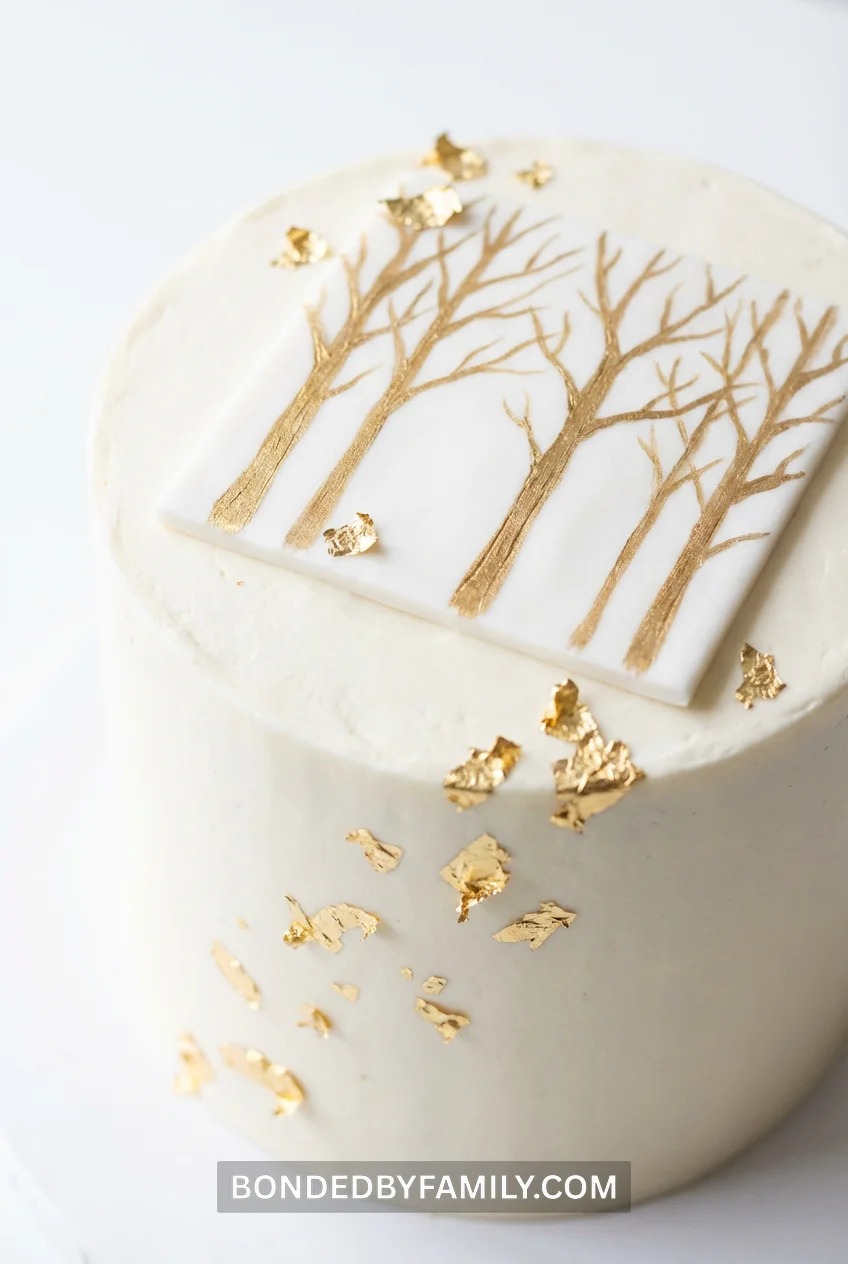
White cake. White buttercream frosting. One painted fondant rectangle with a gold leaf forest scene. That’s it.
The power is in the restraint. Every other woodland cake screams “LOOK AT ALL MY EFFORT.” This one whispers.
Bake a single 10-inch round cake, 3-4 inches tall (you may need to stack two layers). Frost it smooth with white buttercream. Chill until the frosting is firm to the touch.
Creating the Fondant Rectangle
Roll white fondant to 1/8-inch thickness. Cut a rectangle approximately 4×6 inches. Let it dry on parchment paper for 2 hours (it needs to be firm, not floppy).
The Painting Part
Mix edible gold luster dust with vodka or lemon extract (ratio: 1/4 teaspoon dust to 1 teaspoon liquid). Use a fine paintbrush to paint simple tree silhouettes – think stick figure trees, not botanical illustrations. Three to five trees of varying heights. The liquid evaporates in 5-10 minutes, leaving metallic gold paint.
Position the painted fondant rectangle at a slight angle on top of the cake. Add a few edible gold leaf flakes ($12 for a container on Amazon that lasts 20 projects) scattered on the white frosting around the base.
Why this works: It’s the anti-Pinterest cake. While everyone else is gluing 47 fondant acorns to a three-tier monstrosity, you’re serving understated elegance. Some guests will get it. Others will think you ran out of time. You’ll know the truth.
Time commitment: 2-3 hours
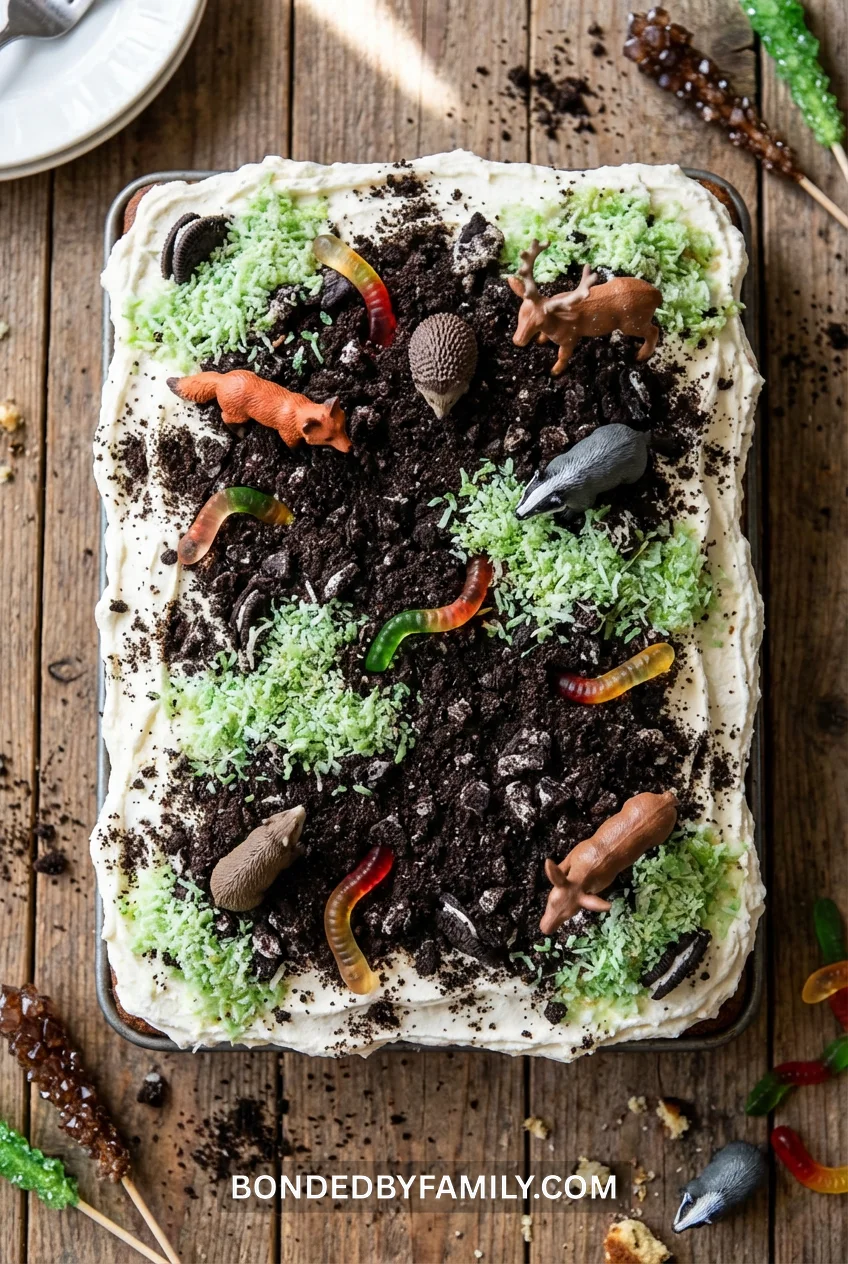
Sheet Cake With Whipped Cream Forest Floor Scene
Sheet cakes feed more people for less effort. A 9×13 sheet serves 20-24. A half-sheet (18×13) serves 40-50. No tiering. No dowels. No structural engineering.
The forest floor approach turns simplicity into a feature. You’re not creating a wedding-worthy masterpiece. You’re building a scene.
Base: Chocolate or vanilla sheet cake, your choice. Frost with stabilized whipped cream (add 2 tablespoons powdered sugar and 1/2 teaspoon gelatin per cup of heavy cream to keep it from weeping).
Dirt Layer: Crushed Oreos (filling scraped out, cookies pulverized in a food processor). Spread across two-thirds of the cake top, leaving one-third plain frosting.
Moss: Green-tinted coconut (see the tree stump hack above). Scatter in patches over the dirt and plain frosting.
Ground Cover:
- Chocolate rocks (bulk candy, $8/pound at Walmart)
- Pretzel stick “logs” broken into 2-3 inch pieces
- Gummy worms (the sour ones look more realistic than regular gummy worms – fight me on this)
Animals: Clean plastic woodland animal figurines from the craft store. Remove them before serving. Nobody’s eating plastic.
The Detail That Elevates It
Use a skewer or toothpick to create a “path” through your forest floor. Drag it through the crushed Oreos to expose the whipped cream underneath. This creates the illusion of a walking trail. Costs nothing. Adds visual interest.
Position your plastic animals along the path like they’re wandering through the forest. Lean a few against chocolate rocks. One face-first in the gummy worms like it’s had a rough day.
Time commitment: 60-90 minutes
Cost: $22-30 (cake ingredients, Oreos, coconut, candy, plastic animals)
Cupcake “Forest” Arranged To Form a Woodland Scene
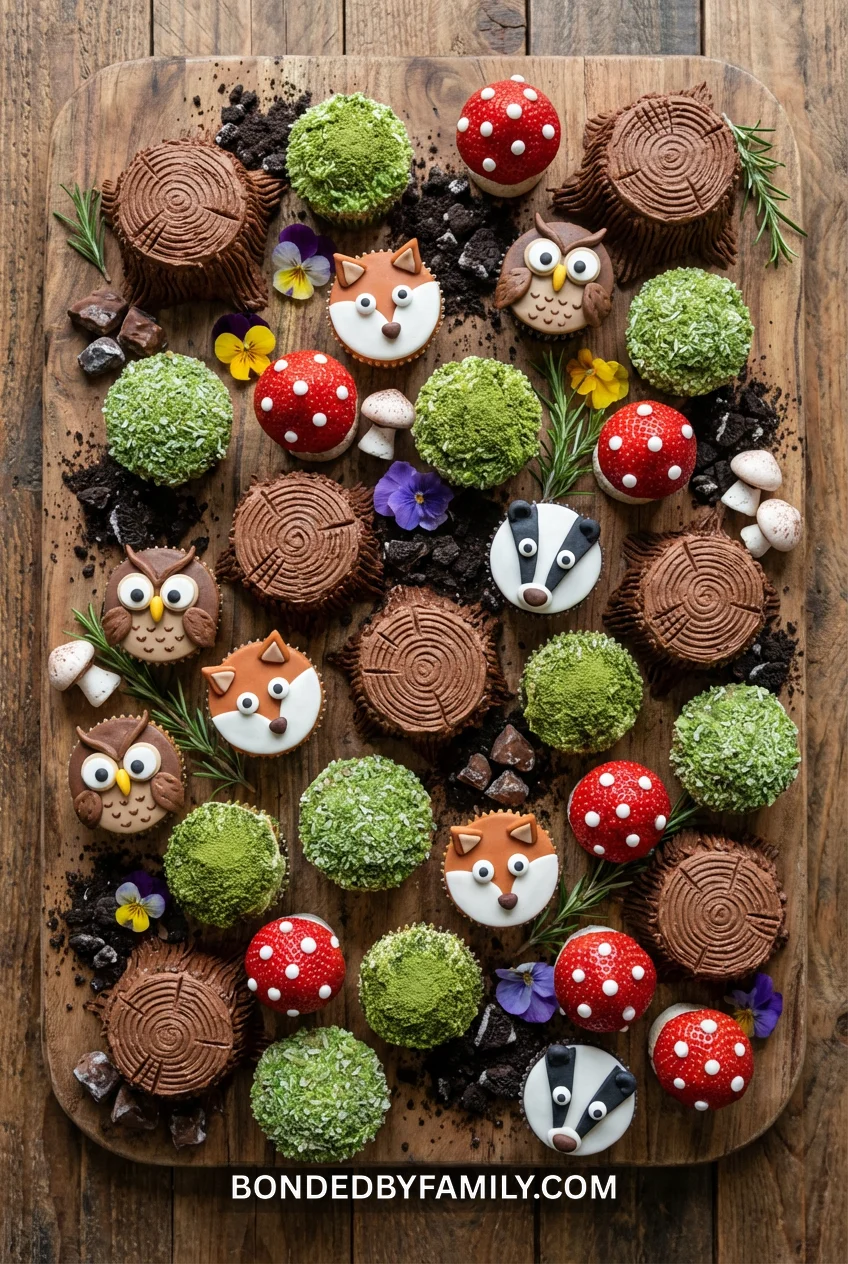
Individual cupcakes decorated as tree stumps, moss-covered rocks, toadstools, and woodland animal faces. Arrange them on a large platter to create a forest clearing scene.
The Genius of Cupcakes
No cutting. No portion drama. No “which size piece do you want” anxiety. Grab a cupcake, eat a cupcake, done.
Bake 24-36 cupcakes (use your favorite recipe or box mix – nobody will know). You’ll frost them in different ways to create variety:
Tree Stump Cupcakes (make 8-10): Chocolate buttercream frosted. Use a fork to create bark texture. Add a small green “moss” patch (the coconut trick) on one side. Top with a fondant or chocolate chip “beetle.”
Moss Rock Cupcakes (make 6-8): Vanilla buttercream frosted, completely covered with green-tinted coconut. Add 2-3 small chocolate rocks pressed into the coconut.
Toadstool Cupcakes (make 6-8): Frost with white buttercream. Top with a halved strawberry (hull removed) for the red mushroom cap. Use white buttercream to pipe dots on the strawberry.
Animal Face Cupcakes (make 8-10): Frost with brown (bear), orange (fox), or gray (raccoon) buttercream. Use candy eyes ($4 for 100 pieces on Amazon), mini chocolate chips for noses, and draw mouths with a #3 piping tip.
Assembly as Scene
This is where it gets fun. Arrange your cupcakes on a large wooden board or rectangular platter (18×24 inches works). Cluster the tree stumps in one area. Scatter moss rocks throughout. Create a little clearing in the middle with animal face cupcakes looking toward each other like they’re having a woodland meeting.
Fill gaps with the same elements from the sheet cake: crushed Oreo “dirt,” green coconut, chocolate rocks, pretzel stick logs.
Pro tip: Cupcake transport is hell. Assemble the scene at the shower venue, not at home. Bring cupcakes in a standard carrier, bring your decorating elements in zip-top bags, and spend 10 minutes arranging on-site. This prevents the “my entire woodland scene slid into one corner during the drive” disaster.
Time commitment: 3-4 hours (baking, cooling, frosting varieties, assembling scene)
Cost: $30-45 depending on whether you bake from scratch or use mixes
The Showstopper Three-Tier With Fondant Tree Bark Panels and Edible Moss
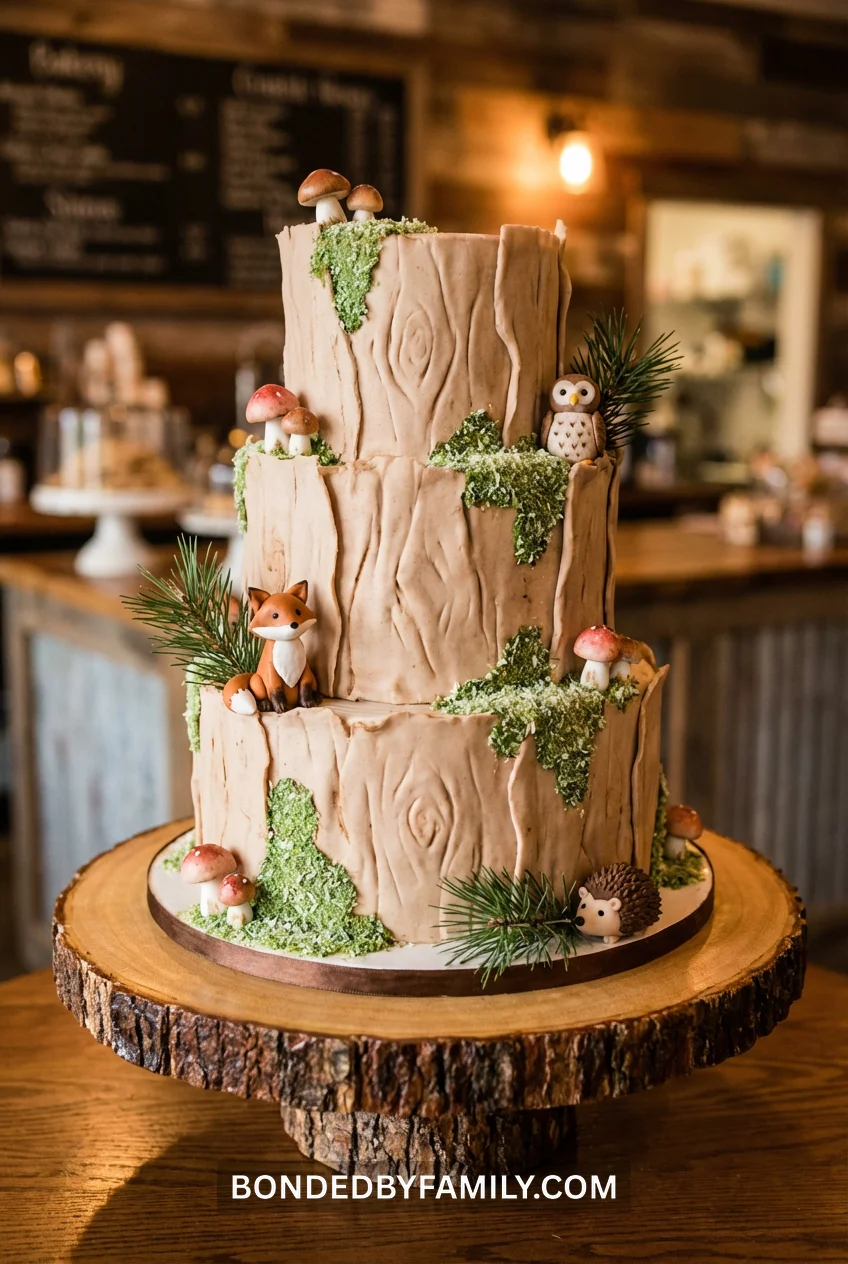
This is the one that gets 400 saves on Pinterest and makes other parents question their life choices. It’s also the one that requires fondant skills, patience, and a weekend you’re willing to sacrifice.
Three tiers (10-inch, 8-inch, 6-inch). Each tier gets covered in fondant that’s been textured to look like tree bark. Then you build a forest around it.
Creating Convincing Tree Bark Fondant
Standard fondant in tan/brown (Satin Ice “Brown” or Wilton “Ivory” mixed with brown gel coloring). Roll out to 1/8-inch thickness. Here’s where it gets specific:
You need a bark texture mat (Amazon: “$12-18 for a silicone tree bark mat”). Press your rolled fondant into the texture mat firmly. Peel it away. You now have textured fondant that looks like bark.
Cut panels to fit your tier sides. Each tier needs 3-4 panels depending on circumference. Apply panels to buttercream-frosted tiers using a small amount of water as glue. Overlap the seams slightly – real tree bark doesn’t have perfect joins.
Adding Dimension With Airbrush (Optional But Impactful)
If you own a cake airbrush ($40-120 for a basic setup), this is where it pays off. Mix brown and dark brown airbrush coloring. Lightly spray the recessed areas of your bark texture (the cracks and grooves). This creates shadow and makes the texture pop three-dimensionally.
Don’t own an airbrush? Use a small paintbrush dipped in brown luster dust mixed with vodka. Paint the cracks. Takes longer but achieves similar depth.
The Moss, Mushrooms, and Forest Floor Elements
Edible Moss: Green-tinted coconut applied to fondant using piping gel as adhesive. Cluster it near the base of each tier and in random patches on the sides like moss growing on a tree trunk.
Fondant Mushrooms: Roll small balls of white fondant for stems. Flatten small balls of red fondant for caps. Attach caps to stems with water. Use white buttercream to pipe dots on caps. Make 12-15 mushrooms in varying sizes. Attach them to the cake tiers with buttercream, positioned like they’re growing out of the bark.
Fondant Woodland Animals: Same as the two-tier naked cake, except you’ll need more. Budget $35-50 for a quality Etsy set that includes deer, fox, bear, raccoon, owl, and squirrel.
Pine Branch Accents: Real pine branches (wash thoroughly, let air dry) or silk pine picks from the craft store ($8 for a bundle of 12). Tuck them between tiers, around the base, and behind animals to create a forest environment.
Assembly and Doweling
Each tier requires precise doweling:
- 10-inch base: 8 dowels in two concentric circles
- 8-inch middle: 6 dowels in one circle
- 6-inch top: No dowels needed (it’s the final tier)
Cut dowels level with the top of each cake layer. Use a 6-inch and 8-inch cardboard round between tiers. Stack carefully. If a tier shifts even slightly during stacking, the fondant panels can crack at the seams.
The Catch: This cake needs to be assembled at the venue or transported already stacked. Transporting three separate tiers and stacking on-site means you need a dead-flat surface and 30-45 minutes of assembly time at the venue. Transporting it stacked means you need a vehicle with a flat floor, zero acceleration or braking, and someone riding next to the cake box ready to catch it if it shifts.
Time commitment: 14-18 hours across three days (baking, fondant covering, texturing, decorating)
Cost: $80-140 (fondant, texture mat, edible decorations, animals)
When it’s worth it: You’ve covered cakes in fondant before and this isn’t your first three-tier rodeo. If you’re learning as you go, your tree bark will look like crinkled paper and you’ll want to quit halfway through tier two.
Naked Cake With Pressed Flowers and Herbs
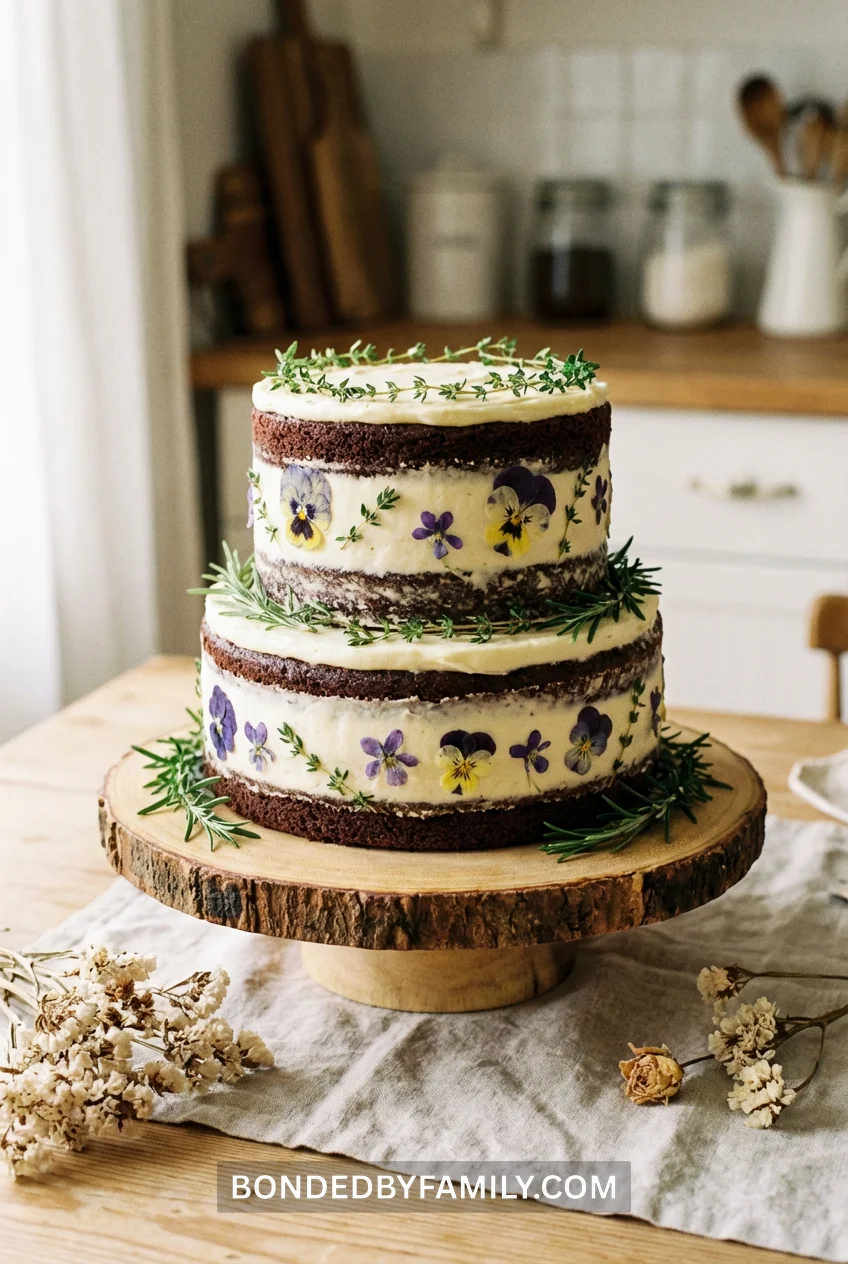
The pressed flower trend hit woodland weddings three years ago. It works equally well for baby showers if you’re after that “brought it straight from the forest” vibe.
Two tiers (8-inch and 6-inch). Naked cake style (visible cake layers with exposed frosting between). Fresh herbs pressed into the frosting while it’s still soft.
Sourcing Edible Flowers
Your grocery store probably doesn’t stock edible pressed flowers. You have three options:
Option 1: Buy fresh edible flowers from Whole Foods or a farmer’s market. Common varieties: pansies, violas, nasturtiums, borage. Press them yourself between parchment paper and heavy books for 24-48 hours. They’ll flatten but keep color reasonably well.
Option 2: Order pre-pressed edible flowers online. “Eat Your Flowers” brand on Amazon: $18-24 for a pack of 20-30 flowers. They arrive ready to apply. This is the reliable route.
Option 3: Use fresh herbs instead of flowers. Thyme, rosemary, lavender (if your shower isn’t crowded with fragrance-sensitive pregnant people). Free if you have an herb garden. $4 at the grocery store if you don’t.
Application Technique
Frost your naked cake. While the frosting is still tacky (within 15 minutes of application), press your flowers or herbs gently into the frosting. They should stick on contact.
For flowers: Position them artistically (read: not in a straight line). Cluster three small violas near the base. Add a single pansy near the top tier. Scatter individual petals.
For herbs: Create small bundles of 3-5 thyme or rosemary sprigs. Press the stem ends into the frosting. The greenery should look like it’s growing out of the cake.
Food Safety Note: Don’t use flowers from the floral department or a florist unless they specifically say “pesticide-free edible flowers.” Florist flowers are often treated with chemicals you don’t want in your mouth. If you’re unsure, default to fresh herbs – they’re always food-safe.
Time commitment: 2-3 hours (plus 24-48 hours if you’re pressing your own flowers)
Cost: $25-40 depending on flower source
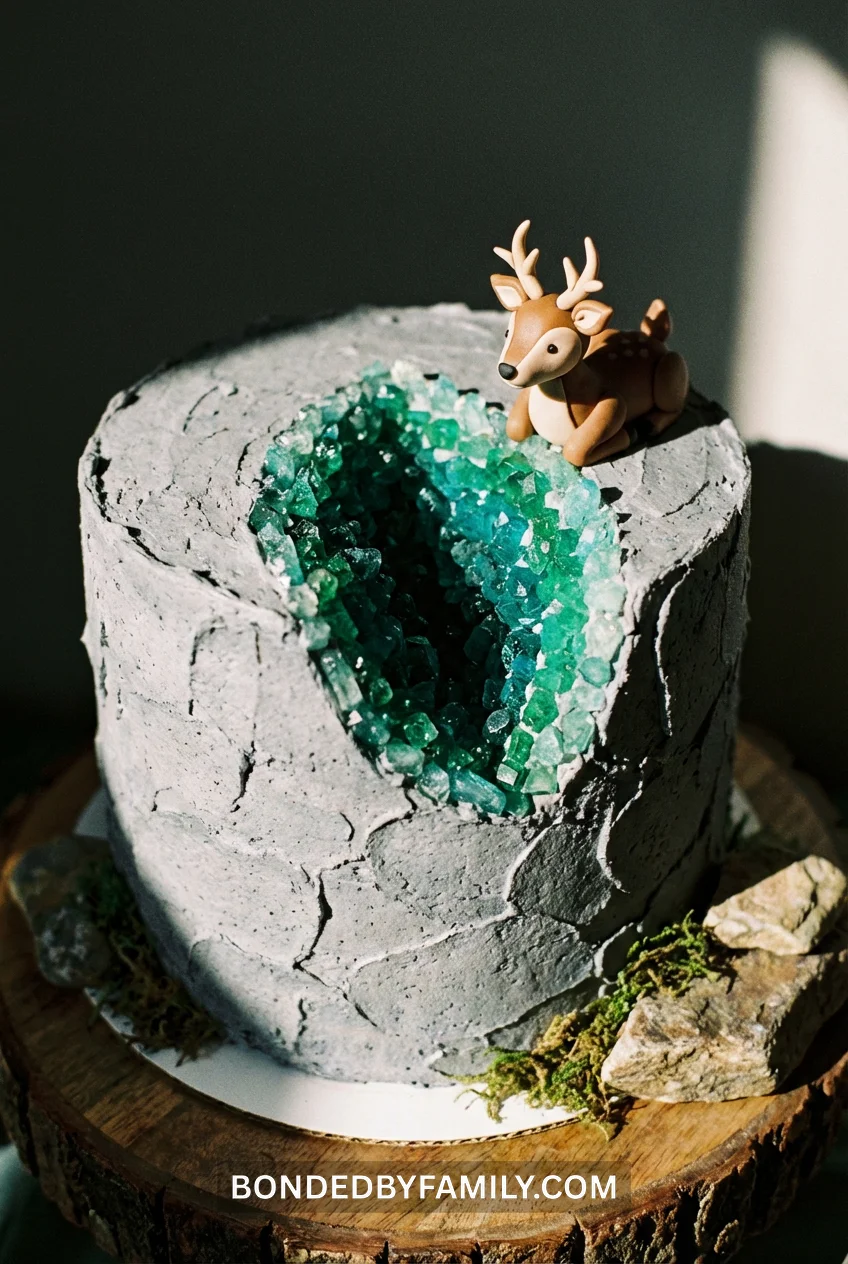
Geode “Woodland Crystal Cave” Cake With Rock Candy Clusters
Woodland doesn’t always mean trees and animals. Caves count. Crystals count. Especially if you’re doing a “where the wild things are” or “into the forest” theme that leans mystical rather than purely naturalistic.
This is a single-tier round cake (9 or 10 inches) with a carved hollow section filled with rock candy crystals that look like a geode or crystal cave.
Carving the Cavity
Bake your cake. Let it cool completely. Freeze it for 2-3 hours (semi-frozen cake carves without crumbling).
Use a paring knife to cut a large oval or teardrop shape on the top surface, about 4 inches long and 2 inches wide. Carve down at an angle, creating a shallow bowl shape. Remove the carved cake (eat it or save for cake pops).
Lining the Cavity With Isomalt or Rock Candy
You have two routes:
Route 1 – Rock Candy (Easier): Buy rock candy in green, blue, or clear (bulk candy stores, Amazon). Break the chunks into smaller pieces using a hammer and zip-top bag. Arrange the pieces in your carved cavity, attaching them with melted white chocolate as glue.
Route 2 – Isomalt Crystals (Harder But Prettier): Melt isomalt crystals (Amazon: $15-20 per pound) in a heavy-bottomed pot. Add gel food coloring (teal, emerald, or deep purple for woodland mystical vibes). Pour the melted isomalt into your carved cavity while it’s still liquid. Let it harden. It’ll form sharp crystal-like structures. Be warned: working with molten isomalt requires candy thermometers and experience with sugar work. If you’ve never done it, stick with rock candy.
Frosting and Finishing
Frost the sides and top rim of your cake with buttercream in a natural stone color (gray, tan, or off-white). Leave the carved cavity exposed so the crystals are visible.
Use an offset spatula or bench scraper to create rough, rocky texture in the frosting (think cliff face, not smooth fondant). Add a few gold luster dust highlights to the frosting near the crystal cavity to suggest ore veins.
Position a small fondant woodland animal (deer, fox, bear) near the edge of the cavity like it’s peering into the crystal cave.
Why this works: It’s unexpected. Every other woodland cake has trees. Yours has a literal crystal cave. It photographs like crazy (those light reflections through rock candy are Pinterest gold).
The catch: Isomalt cuts mouths. If you use it, warn guests before they bite into a “crystal.” Rock candy is safer but less dramatic visually.
Time commitment: 3-4 hours
Cost: $30-50 depending on rock candy vs. isomalt choice
Rustic Log Cake Roll With Chocolate Bark Buttercream
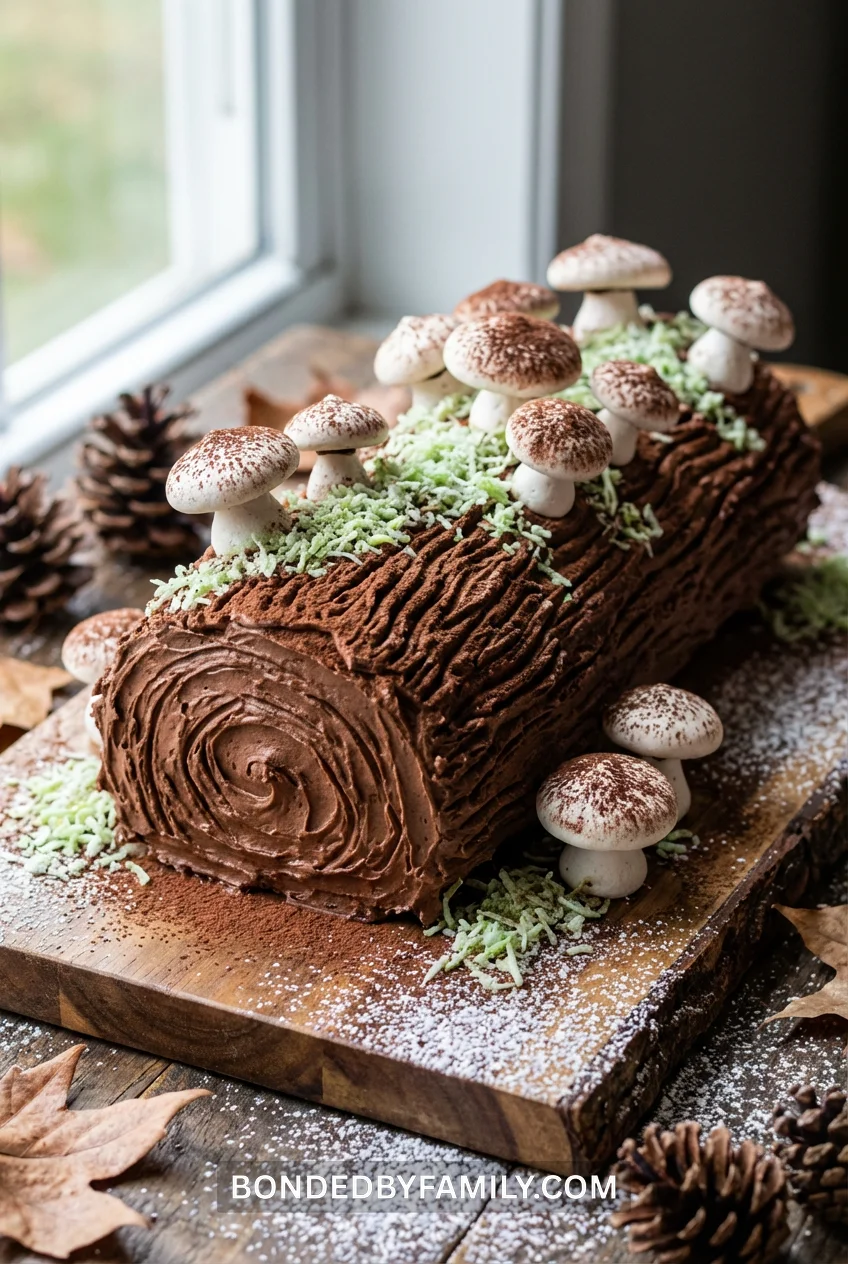
Cake rolls intimidate people. They shouldn’t. It’s basically a thin sheet cake that you roll into a cylinder. The woodland spin: texture it like a log and call it a day.
Baking the Cake Roll
You need a sheet pan (10×15 inches), parchment paper, and a kitchen towel. Standard chocolate or vanilla cake batter spread thin (about 1/4 inch) on the parchment-lined pan. Bake at 350°F for 10-12 minutes.
The second it comes out of the oven, flip it onto a clean kitchen towel dusted with powdered sugar. Peel off the parchment. Roll the cake in the towel (starting from the short end). Let it cool completely while rolled. This trains the cake to hold a spiral shape without cracking.
Filling and Re-Rolling
Unroll the cooled cake. Spread with your filling (chocolate ganache, buttercream, cream cheese frosting – your call). Re-roll without the towel. Wrap in plastic and refrigerate 30 minutes.
Creating Log Texture
Frost the outside with chocolate buttercream. Use a fork to drag vertical lines along the length of the log (mimics bark texture). For extra realism, use the fork tines to create swirls at each end (mimics tree ring growth patterns).
Meringue Mushrooms
These are traditional yule log decorations but work perfectly for woodland themes.
Beat 2 egg whites with 1/4 teaspoon cream of tartar until foamy. Gradually add 1/2 cup sugar, beating until stiff glossy peaks form. Transfer to a piping bag with a round tip.
Pipe small dome shapes (mushroom caps) on a parchment-lined baking sheet. Pipe cone shapes (stems) separately. Bake at 200°F for 60-90 minutes until dry and crisp. Let cool.
Assemble mushrooms by attaching caps to stems with a dab of melted chocolate. Dust caps with cocoa powder. Position them on your log cake, attaching with buttercream.
Add green coconut moss around the base of the mushrooms. Maybe a few chocolate chip “beetles.”
Time commitment: 2-3 hours
Cost: $15-25
Two-Tiered Semi-Naked Cake With Live Greenery (Remove Before Eating)

Live eucalyptus, ferns, or olive branches stuck directly into a frosted cake. It’s a trend borrowed from wedding cakes, scaled down for baby showers, and it works if you follow one critical rule: use floral picks.
Never stick stems directly into cake. Use plastic floral water picks (craft store, $6 for a pack of 12). Fill the picks with water, insert the stems, close the caps. Stick the picks into the cake. The greenery stays fresh, and there’s a physical barrier between plant matter and food.
This is a semi-naked two-tier cake (8-inch and 6-inch rounds). Light frosting application so cake layers are partially visible. Then you decorate it like a bouquet.
Greenery Selection
Baby eucalyptus, olive branches, and ferns are widely available at grocery store floral departments. Cost: $6-10 per bundle. You need 2-3 bundles for a two-tier cake.
Avoid: anything with berries (choking hazard if they fall off), anything with sharp thorns, anything that wilts quickly (looking at you, basil).
Placement Strategy
Insert floral picks at different heights around the back and sides of your cake, angled slightly upward. You want the greenery to cascade over the tiers without covering the entire cake face. The front should stay relatively clear so people can see the cake layers.
Add 2-3 picks on top of the upper tier for a cascading effect over the side.
The 12-Hour Rule
Assemble this cake the morning of your shower. Greenery will last 12-18 hours in floral picks before wilting. If you assemble the night before, you’ll have sad droopy leaves by shower time.
Before Serving: Remove all greenery and floral picks. This isn’t just for safety – nobody wants to bite into a fondant fox and get a mouthful of eucalyptus.
Time commitment: 90 minutes plus assembly morning-of
Woodland “Moss and Mushroom” Mini Cakes (Individual Servings)
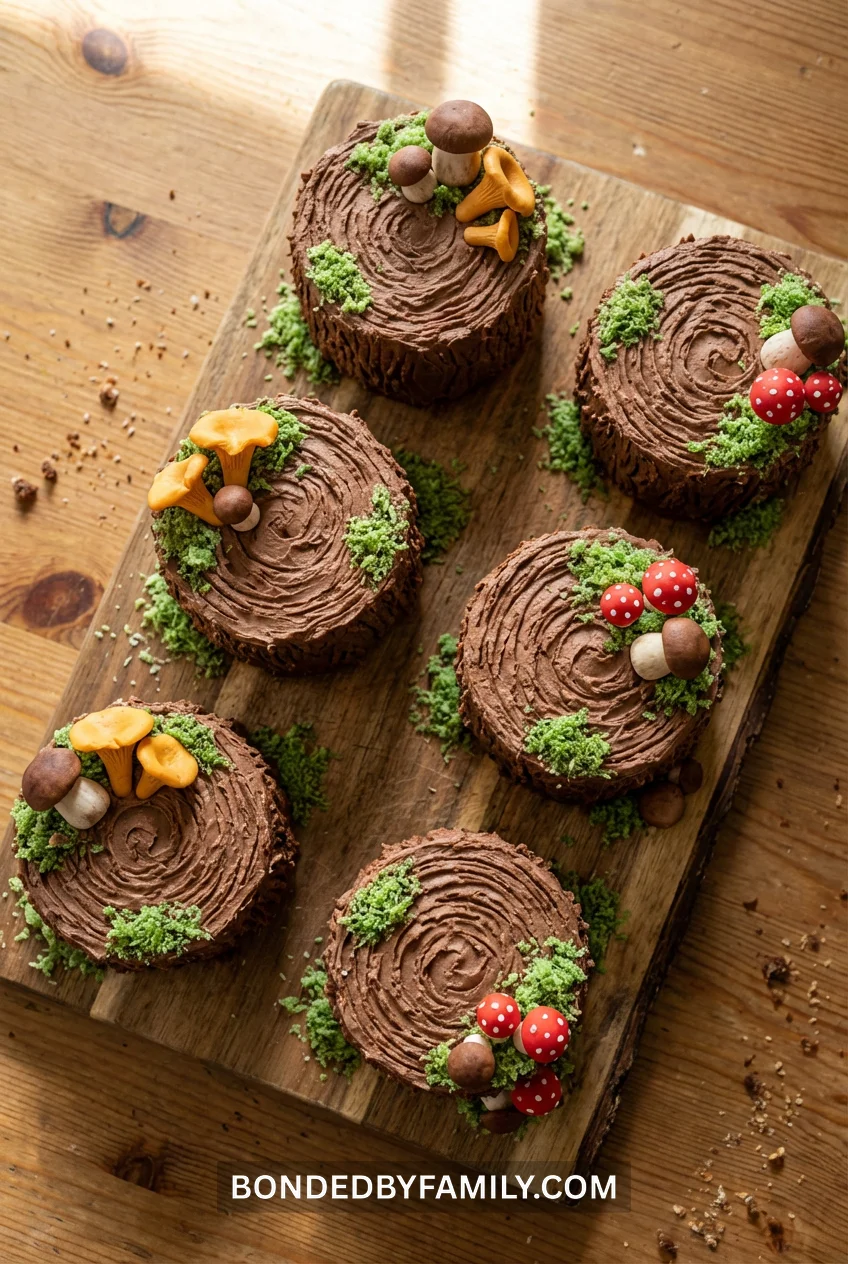
Mini cakes are the portion-control answer nobody asked for but everyone appreciates. These are individual 4-inch cakes, each person gets their own.
Bake cakes in 4-inch round pans (you’ll need 18-24 cakes for a typical shower). Stack two layers per mini cake with filling. Frost the tops and sides.
Decoration Variations
This is where individual cakes shine – each one can look different:
Cake 1-4: Chocolate buttercream textured like bark, topped with green coconut moss Cake 5-8: Vanilla buttercream smooth finish, topped with fondant mushrooms (red cap with white dots) Cake 9-12: White buttercream with hand-piped tiny woodland animal faces Cake 13-16: Chocolate buttercream with crushed Oreo “dirt” and a gummy worm Cake 17-20: Vanilla buttercream with pressed herbs (thyme or rosemary)
Display them on a large wooden board or tiered cake stand. The variety becomes the visual appeal.
Pro tip: Mini cakes transport beautifully. Use a muffin tin to hold them steady during transport (each cake sits in a muffin cup). No shifting, no disasters.
Time commitment: 4-5 hours for 20 mini cakes
Cost: $40-60 depending on decoration complexity
The “I Have 48 Hours and Zero Skills” Emergency Woodland Cake
Here’s the reality: sometimes Pinterest perfect isn’t happening. You’re working full-time, the shower is Saturday, and it’s Thursday night.
The Fastest Path to Woodland Cake:
- Buy a plain frosted cake from your grocery store bakery ($20-30)
- Buy a bag of plastic woodland animal figurines ($8-12)
- Buy fresh rosemary ($3)
- Buy green-tinted coconut or make it yourself in 5 minutes ($4)
At home: Press rosemary sprigs into the top and sides of the cake. Scatter green coconut around the base. Position plastic animals on top. Remove animals before serving.
Total time: 15 minutes Total cost: $35-50 Level of shame: Zero, unless you tell people you made it from scratch
FAQ
Can I make woodland cake decorations ahead of time?
Yes. Fondant animals can be made 2-4 weeks ahead and stored in an airtight container at room temperature. Buttercream decorations (piped animals, trees, mushrooms) can be made 1 week ahead, frozen on wax paper, then applied to the cake the day before your shower. Cake layers can be baked and frozen (wrapped tightly) up to 1 month ahead.
What’s the best cake flavor for woodland baby showers?
Chocolate and vanilla are safe crowd-pleasers. If you want something more seasonal, try spice cake (cinnamon, nutmeg), carrot cake, or lemon cake. Avoid polarizing flavors like coconut cake or red velvet unless you know your crowd.
How do I keep fresh greenery from wilting on my cake?
Use floral water picks (available at craft stores). Insert the greenery stems into the water-filled picks, then insert the picks into the cake. The water keeps stems fresh for 12-18 hours. Always assemble greenery decorations the morning of your event, not the night before.
Are fondant woodland animals safe to eat?
Technically yes, but they’re often unpleasantly sweet and have a chewy texture. Most guests remove them before eating the cake. If you want truly edible animal decorations, use buttercream transfers or hand-piped buttercream animals instead of fondant.
What’s the easiest woodland cake for beginners?
The single-tier tree stump cake with chocolate buttercream and fork-textured “bark.” It requires basic frosting skills, uses grocery store ingredients, and takes under 2 hours. Add green coconut moss and a few chocolate rocks for instant woodland vibes without advanced techniques.